0%

程序员的自我修养–链接、装载与库10.2 栈与调用惯例 里面讲到了堆栈帧这块的内容,联想到同事面试时说到捕获奔溃调用栈的问题,感觉挺有意思,于是记录一下。
本文主要讲解以下内容

  1. 栈帧是什么东西?
  2. Arm64 汇编基础,Arm64 栈帧
  3. 栈帧回溯怎么玩?怎么符号化?常见的三方库又是怎么玩的?

程序员的自我修养–链接、装载与库》是这么描述栈的:

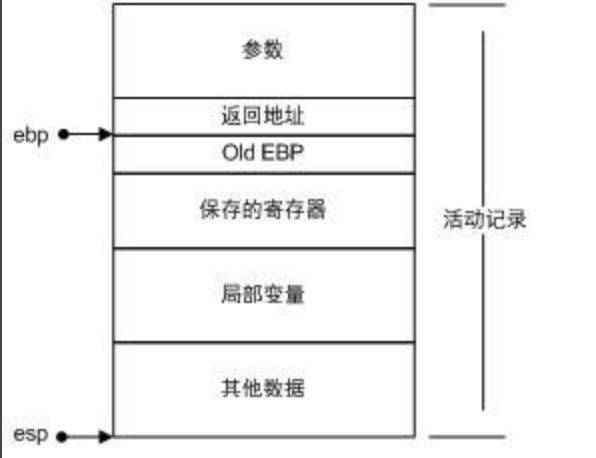
栈(stack)是现代计算机程序里最为重要的概念之一,几乎每一个程序都使用了栈,没有栈就没有函数,没有局部变量,也就没有我们如今能够看见的所有的计算机语言。
在经典的计算机科学中,栈被定义为一个特殊的容器,用户可以将数据压入栈中(入栈,push),也可以将已经压入栈中的数据弹出(出栈,pop),但栈这个容器必须遵守一条规则:先入栈的数据后出栈(First In Last Out, FIFO),多多少少像叠成一叠的书:先叠上去的书在最下面,因此要最后才能取出。
在计算机系统中,栈则是一个具有以上属性的动态内存区域。程序可以将数据压入栈中,也可以将数据从栈顶弹出。压栈操作使得栈增大,而弹出操作使栈减小。

栈帧

栈保存了函数调用所需的信息,而这些信息称为堆栈帧(Stack Frame)或活动记录(Activate Record),包括以下内容:

  • 函数的返回地址和参数
  • 临时变量:包括函数的非静态局部变量以及编译器自动生成的其他临时变量
  • 保存的上下文:包括在函数调用前后需要保持不变的寄存器

栈帧

上图是 i386 中一个函数的栈帧,根据 ebp(Frame Pointer, 帧寄存器) 和 esp(Stack Pointer, 栈寄存器) 这两寄存器可以划分一个函数的堆栈。

  1. ebp 是固定的,始终指向栈底(高地址)
  2. esp 始终指向栈顶(低地址),它是动态变化的
  3. 可以通过 ebp esp 和获取栈帧中的数据,比如,ebp+4 获取函数的返回地址

调用惯例

调用惯例:函数的调用方和被调用方对于函数如何调用须要有一个明确的约定。就像两个人沟通一样的,只有使用相同的语言(普通话)才能进行友好的沟通。
而调用惯例包括以下几方面的内容:

  1. 函数参数的传递顺序和方式
    1. 函数参数的传递有很多种方式,最常见的一种是通过栈传递。函数的调用方将参数压入栈中,函数自己再从栈中将参数取出。对于有多个参数的函数,调用惯例要规定函数调用方将参数压栈的顺序:是从左至右,还是从右至左。有些调用惯例还允许使用寄存器传递参数,以提高性能。
  2. 栈的维护方式
    1. 在函数将参数压栈之后,函数体会被调用,此后需要将被压入栈中的参数全部弹出,以使得栈在函数调用前后保持一致。这个弹出的工作可以由函数的调用方来完成,也可以由函数本身来完成。 // PS: 如果不进行栈回退 pop 操作的话,函数调用会将程序的栈空间用完,从而出现经典的 stackoverflow 错误
  3. 名字修饰(Name-mangling)的策略
    1. 为了链接的时候对调用惯例进行区分,调用管理要对函数本身的名字进行修饰。不同的调用惯例有不同的名字修饰策略。

Arm64

有了上面书本基础知识的加持,现在到 Arm64 架构下实践一波吧。

汇编基础

寄存器

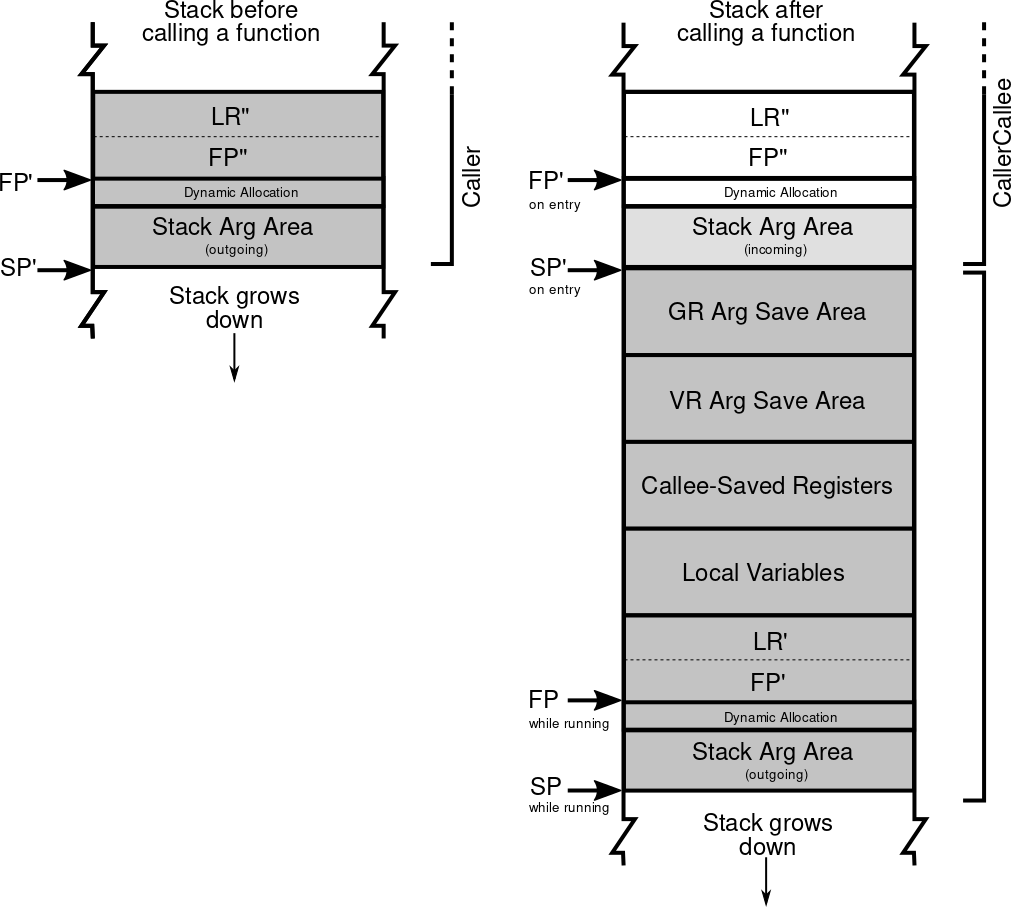
寄存器(Register)是中央处理器内用来暂存指令、数据和地址的电脑存储器。 它就是 CPU 内部用来存储数据的存储器件,容量小、访问速度快。

而 Arm64 有 31 个通用寄存器,相关用途如下。

The 64-bit ARM (AArch64) calling convention allocates the 31 general-purpose registers as:
x31 (SP): Stack pointer or a zero register, depending on context.
x30 (LR): Procedure link register, used to return from subroutines.
x29 (FP): Frame pointer.
x19 to x29: Callee-saved.
x18 (PR): Platform register. Used for some operating-system-specific special purpose, or an additional caller-saved register.
x16 (IP0) and x17 (IP1): Intra-Procedure-call scratch registers.
x9 to x15: Local variables, caller saved.
x8 (XR): Indirect return value address.
x0 to x7: Argument values passed to and results returned from a subroutine.

摘自 Calling_convention#ARM_(A64)


总结下常用的:

  1. x0-x7: 用来存放函数调用的参数和函数返回值(x0),更多参数可以使用堆栈来存放
  2. x29 (FP): 上图 i386 中的 ebp, 它里面存储的是上一个函数(该函数的调用方 caller) ebp 的地址
  3. x30 (LR): 存储函数的返回地址
  4. SP: 上图 i386 中的 esp, 指向栈顶
    1. 现在执行 lldb 命令register read x31 会报错:error: Invalid register name 'x31'.
  5. PC: 记录 CPU 当前执行的是哪条指令

指令

一些常见的指令,内容摘自 10分钟入门arm64汇编,具体的可以参加 ARM 操作手册。

1
2
3
4
5
6
7
8
9
10
11
add x0,x0,#1            ;x0 <==x0+1 ,把x0的内容加1。
add x0,x0,#0x30 ;x0 <==x0+0x30,把x0的内容加 0x30。
add x0,x1,x3 ;x0 <==x1+x3, 把x1的内容加上x3的内容放入x0
add x0,x1,x3,lsl #3 ;x0 <==x0+x3*8 ,x3的值左移3位就是乘以8,结果与x1的值相, 放入x0.
add x0,x1,[x2] ;x0 <==x1+[x2], 把x1的内容加上x2的内容作为地址取内存内容放入x0
ldr x0,[x1] ;x0 <==[x1], 把x1的内容作为地址取内存内容放入x0
str x0,[x1] ;[x1] <== x0, 把x0的内容放入x1的内容作为地址的内存中
ldr x0,[x1,#4] ;x0 <==[x1+4], 把x1的内容加上4, 作为内存地址, 取其内容放入x0
ldr x0,[x1,#4]! ;x0 <==[x1+4]、 x1<==x1+4, 把x1的内容加上4, 作为内存地址, 取其内容放入x0, 然后把x1的内容加上4放入x1
ldr x0,[x1],#4 ;x0 <==[x1] 、x1 <==x1+4, 把x1的内容作为内存地址取内存内容放入x0, 并把x1的内容加上4放入x1
ldr x0,[x1,x2] ;x0 <==[x1+x2], 把x1和x2的内容相加, 作为内存地址取内存内容放入x0

栈帧

aapcs64-variadic-stack
跟《程序员的自我修养–链接、装载与库》里面的栈帧差不多,图片来自 Procedure Call Standard for the Arm® 64-bit Architecture (AArch64)

Demo

用一个 Demo 将上面的内容串联起来。

1
2
3
4
5
6
7
8
9
10
11
12
13
14
15
16
- (int)test1:(int)a {
int res = [self test2:a b:2];
return res;
}

- (int)test2:(int)a b:(int)b {
int res = a + b;
return res;
}

- (void)viewDidLoad {
[super viewDidLoad];

int res = [self test1:1];
NSLog(@"res: %d", res);
}

在函数调用方 test1 和被调方 test2 的第一行代码处下断点,并用汇编查看。

caller - test1

1
2
3
4
5
6
7
8
9
10
11
12
13
14
15
16
17
18
Demo_fishhook`-[ViewController test1:]:
0x102067294 <+0>: sub sp, sp, #0x30 ; sp = sp - 0x30(48), 开辟栈空间
0x102067298 <+4>: stp x29, x30, [sp, #0x20] ; 将 x29(fp) 里面的内容存入 sp+0x20(32)的位置,占 8B(x29 共 64bit, 8B) 长度;将 x30(lr) 的内容存入 sp+0x20+8=sp+40 的位置,占 8B
0x10206729c <+8>: add x29, sp, #0x20 ; x29 = sp + 0x20
0x1020672a0 <+12>: stur x0, [x29, #-0x8] ; 将 x0 的内容,x29-0x8 的位置
0x1020672a4 <+16>: str x1, [sp, #0x10] ; 将 x1 的内容放入 sp+0x10 的位置
0x1020672a8 <+20>: str w2, [sp, #0xc] ; w2 是 x2 的低32位,占 4B
-> 0x1020672ac <+24>: ldur x0, [x29, #-0x8] ; 数据读取,就是将上面的数据再读出来
0x1020672b0 <+28>: ldr w2, [sp, #0xc] ; 数据读取
0x1020672b4 <+32>: adrp x8, 87
0x1020672b8 <+36>: ldr x1, [x8, #0xb80] ; 数据读取放入 x1 寄存器中
0x1020672bc <+40>: mov w3, #0x2 ; x3 的低32位存的值是 0x2
0x1020672c0 <+44>: bl 0x102d2f0e4 ; symbol stub for: objc_msgSend ; 函数跳转
0x1020672c4 <+48>: str w0, [sp, #0x8] ; 存储 test2 的结果
0x1020672c8 <+52>: ldr w0, [sp, #0x8] ; 读取 w0
0x1020672cc <+56>: ldp x29, x30, [sp, #0x20] ; 将 [sp, #0x20] 的内容放入 x29 x30 寄存器
0x1020672d0 <+60>: add sp, sp, #0x30 ; sp = sp + 0x30
0x1020672d4 <+64>: ret

这里大概做了下面几件事

  1. 开辟栈空间,存储 x29 x30 的值到栈,因为后面会修改 x29 x30 的值
  2. 给 x29 赋值,即固定当前函数 x29 的位置
  3. 存储和读取 x0 x1 w2test2:b: 函数入参的值
  4. 给 x3 赋值为 2, 相当于 test2:b: 函数入参 b 的值
  5. bl 调用 test2:b: 函数
  6. 从栈中取出 x29 x30 的值,回退栈空间
  7. ret: 函数返回到 x30 所指向的地址

1
2
3
4
5
6
7
8
9
10
11
12
13
14
15
16
17
18
19
20
21
22
23
24
25
26
27
28
29
30
31
32
33
34
35
36
(lldb) register read
General Purpose Registers:
x0 = 0x0000000102709160
x1 = 0x00000001020ab733 "test1:"
x2 = 0x0000000000000001
x3 = 0x000000016dd9dbf0
x4 = 0x0000000000000010
x5 = 0x0000000000000020
x6 = 0x000000016dd9d8f0
x7 = 0x0000000000000000
x8 = 0x00000001020be000 (void *)0x00000001020ab182: initWithCodeType:baseAddress:size:name:uuid:.hex + 7651
x9 = 0x0000000000000000
x10 = 0x000000000000005d
x11 = 0x00000001030221d8
x12 = 0x000000000000005d
x13 = 0x0000000000000000
x14 = 0x0000000180964000
x15 = 0x000000020b12c000
x16 = 0x00000001020bf9b2 (void *)0xe12800000001020b
x17 = 0x0000000102067294 Demo_fishhook`-[ViewController test1:] at ViewController.m:144
x18 = 0x0000000000000000
x19 = 0x0000000102709160
x20 = 0x0000000000000000
x21 = 0x00000001f59e3000 UIKitCore`_UIInternalPreference_IdleSchedulerTargetDeadlineFraction
x22 = 0x000000019b10ec13
x23 = 0x000000019b7043f5
x24 = 0x0000000000000000
x25 = 0x00000001f630c000 UIKitCore`_UIPreviewPresentationAnimator._startMediaTime
x26 = 0x00000001027083f0
x27 = 0x000000019bb48a24
x28 = 0x00000001fab5f4e8 CoreFoundation`__NSArray0__struct
fp = 0x000000016dd9da20
lr = 0x000000010206718c Demo_fishhook`-[ViewController viewDidLoad] + 76 at ViewController.m:84:9
sp = 0x000000016dd9da00
pc = 0x00000001020672ac Demo_fishhook`-[ViewController test1:] + 24 at ViewController.m:145:16
cpsr = 0x40000000

现在来 debug 看下相关寄存器里面的值,分别看.

  • x0-x7, 存放参数和返回值
    • x0 和 x1 存储的是 OC 方法的前两个隐藏入参: self 和 _cmd.
      1
      2
      3
      4
      5
      (lldb) po 0x0000000102709160
      <ViewController: 0x102709160>

      (lldb) po (char *)0x00000001020ab733
      "test2:b:"
    • x2 = 0x0000000000000001 存储的值是 1, 主上面的汇编代码使用的 w2, 即 x2 低 32 位(即 000000001), 就是值 1
    • 断点指向到 0x1020672c0 处后,x3 = 0x0000000000000002,同 x2, 值 2
  • pc, 当前断点指向的地址

1
2
(lldb) p/x 0x000000016f351a20 - 0x000000016f351a00
(long) $13 = 0x0000000000000020

fp-sp=0x20, 因为上面开始开辟栈空间 0x30, 但存储 x29 和 x30 用了 0x10, 所以还剩 0x20 大小的空间可用。

callee - test2

1
2
3
4
5
6
7
8
9
10
11
12
13
Demo_fishhook`-[ViewController test2:b:]:
0x1020672d8 <+0>: sub sp, sp, #0x20
0x1020672dc <+4>: str x0, [sp, #0x18]
0x1020672e0 <+8>: str x1, [sp, #0x10]
0x1020672e4 <+12>: str w2, [sp, #0xc]
0x1020672e8 <+16>: str w3, [sp, #0x8]
-> 0x1020672ec <+20>: ldr w8, [sp, #0xc]
0x1020672f0 <+24>: ldr w9, [sp, #0x8]
0x1020672f4 <+28>: add w8, w8, w9
0x1020672f8 <+32>: str w8, [sp, #0x4]
0x1020672fc <+36>: ldr w0, [sp, #0x4]
0x102067300 <+40>: add sp, sp, #0x20
0x102067304 <+44>: ret
1
2
3
4
5
6
7
8
9
10
11
12
13
14
15
16
17
18
19
20
21
22
23
24
25
26
27
28
29
30
31
32
33
34
35
36
37
38
(lldb) register read
General Purpose Registers:
x0 = 0x0000000102709160
x1 = 0x00000001020ab740 "test2:b:"
x2 = 0x0000000000000001
x3 = 0x0000000000000002
x4 = 0x0000000000000010
x5 = 0x0000000000000020
x6 = 0x000000016dd9d8f0
x7 = 0x0000000000000000
x8 = 0x00000001020be000 (void *)0x00000001020ab182: initWithCodeType:baseAddress:size:name:uuid:.hex + 7651
x9 = 0x0000000000000000
x10 = 0x000000000000002e
x11 = 0x0000000103021ee8
x12 = 0x000000000000002e
x13 = 0x0000000000000000
x14 = 0x0000000180964000
x15 = 0x000000020b12c000
x16 = 0x00000001020bf9b2 (void *)0xe12800000001020b
x17 = 0x00000001020672d8 Demo_fishhook`-[ViewController test2:b:] at ViewController.m:149
x18 = 0x0000000000000000
x19 = 0x0000000102709160
x20 = 0x0000000000000000
x21 = 0x00000001f59e3000 UIKitCore`_UIInternalPreference_IdleSchedulerTargetDeadlineFraction
x22 = 0x000000019b10ec13
x23 = 0x000000019b7043f5
x24 = 0x0000000000000000
x25 = 0x00000001f630c000 UIKitCore`_UIPreviewPresentationAnimator._startMediaTime
x26 = 0x00000001027083f0
x27 = 0x000000019bb48a24
x28 = 0x00000001fab5f4e8 CoreFoundation`__NSArray0__struct
fp = 0x000000016dd9da20
lr = 0x00000001020672c4 Demo_fishhook`-[ViewController test1:] + 48 at ViewController.m:145:9
sp = 0x000000016dd9d9e0
pc = 0x00000001020672ec Demo_fishhook`-[ViewController test2:b:] + 20 at ViewController.m:151:15
cpsr = 0x40000000

(lldb)

继续来看寄存器的值

  • x0-x7, 存放参数和返回值
    • x0 x1 跟 test1 一样,它们两个的 x0 值都是 0x0000000102709160
    • x2 = 0x0000000000000001, 入参 a 的值为 1
    • x3 = 0x0000000000000002, 入参 b 的值为 2
    • 返回值,当断点在 0x102067304 的时候,变化的寄存器值如下,x0 就是返回值
      1
      2
      3
      4
      5
      x0 = 0x0000000100f0ac70
      x8 = 0x0000000100a26000 (void *)0x0000000100a13182: initWithCodeType:baseAddress:size:name:uuid:.hex + 7651
      x9 = 0x0000000000000000
      sp = 0x000000016f4359e0
      pc = 0x00000001009cf2ec Demo_fishhook`-[ViewController test2:b:] + 20 at ViewController.m:151:15
      sp 和 pc 变化是可以理解的,因为回退栈空间了;但 x8 和 x9 也发生变化就不知道原因了
  • fp = 0x000000016dd9da20, 跟 test1 的 fp 值相同
  • lr = 0x00000001020672c4, 就是 test1 处的 0x1020672c4(即函数跳转处的下一条指令)

总结

  1. lr 寄存器存储的是函数返回值,根据 lr 可以回溯到上个函数
  2. test2 没有存储 x29 x30 到栈中, 而 test1 则有存储;因为 test2 是叶子函数,它里面没有调用其他函数。函数调用会用到 bl, 而 bl 则会把下一条指令的地址存入 x30 寄存器,会改变 x30 的值,所以出于保护现场的目的需要提前保存 x30 的值。而这里没有函数调用,意味着不会改变 x30, 所以就没有存储 x30 的意义了。
  3. 关于 fp 也是一个有趣的点,分别在 viewDidLoad 和 test1 处下断点,见下图
  • viewDidLoad.fp = 0x000000016f705a60
  • test1.fp = 0x000000016f705a20
  • 由于 fp 是指针,那就看它所指向地址存储的数据(x 0x000000016f705a20):0x16f705a20: 60 5a 70 6f 01 00 00 00, 因为是小端,所有读取出来就是 0x016f705a60(viewDidLoad.fp),从而验证了该函数的 fp 指向上个函数的 fp
  • 0x16f705a8: 8c f1 6f 00 01 00 00 00 就是 0x01006ff18c (test1.lr),因为在 x29 x30 在 test1 里面就是连续存储的,见 stp x29, x30, [sp, #0x20]

获取函数调用栈

思路

根据前面的 Arm64/Demo/总结 可知,如果要获取函数调用栈的话,首先要找到当前函数的 pc 和 lr 指针。

  1. 获取当前函数的 pc, 得到当前函数的地址
  2. 根据 lr 得到上个函数的地址
  3. 循环进行 2 步,直到 lr 为空
  4. 拿到相关地址后符号化

具体实现

从易后难,先看符号化的逻辑。

符号化

看上面的 Arm64/Demo, 如果在 test2 获取的话,相关寄存器的值如下

  1. pc: 0x00000001020672ec
  2. lr: 0x00000001020672c4

而 test2 和 test1 的函数地址分别是

  1. 0x1020672d8
  2. 0x102067294

也就是说获取的地址值是大于实际地址值的,那这要怎么处理呢?带着这个问题,看下经典库 KSCrash 是怎么处理的。

1
2
3
4
5
6
7
8
9
10
11
12
13
14
15
16
17
18
19
20
21
22
23
24
25
26
27
28
29
30
31
32
33
34
35
36
37
38
39
40
41
42
43
44
45
46
47
48
49
50
51
52
53
54
55
56
57
58
59
60
61
62
63
64
65
66
67
68
69
70
71
72
73
74
75
76
77
78
79
80
81
82
83
84
85
86
87
88
89
90
91
92
93
94
95
96
bool ksdl_dladdr(const uintptr_t address, Dl_info* const info)
{
info->dli_fname = NULL;
info->dli_fbase = NULL;
info->dli_sname = NULL;
info->dli_saddr = NULL;
// 在哪个 image
const uint32_t idx = imageIndexContainingAddress(address);
if(idx == UINT_MAX)
{
return false;
}
const struct mach_header* header = _dyld_get_image_header(idx);
// ALSR 值
const uintptr_t imageVMAddrSlide = (uintptr_t)_dyld_get_image_vmaddr_slide(idx);

// 就是没有 ALSR 的 VMaddress
const uintptr_t addressWithSlide = address - imageVMAddrSlide;
// 虚拟基地址+ALSR值, 就是包含 ALSR 的虚拟内存地址, 其实就是 header, 验证结果见下面 segmentBase fishhook
const uintptr_t segmentBase = segmentBaseOfImageIndex(idx) + imageVMAddrSlide;
if(segmentBase == 0)
{
return false;
}

info->dli_fname = _dyld_get_image_name(idx);
info->dli_fbase = (void*)header;

// Find symbol tables and get whichever symbol is closest to the address.
const nlist_t* bestMatch = NULL;
uintptr_t bestDistance = ULONG_MAX;
uintptr_t cmdPtr = firstCmdAfterHeader(header);
if(cmdPtr == 0)
{
return false;
}
for(uint32_t iCmd = 0; iCmd < header->ncmds; iCmd++)
{
const struct load_command* loadCmd = (struct load_command*)cmdPtr;
// 符号表查询
if(loadCmd->cmd == LC_SYMTAB)
{
const struct symtab_command* symtabCmd = (struct symtab_command*)cmdPtr;
const nlist_t* symbolTable = (nlist_t*)(segmentBase + symtabCmd->symoff);
const uintptr_t stringTable = segmentBase + symtabCmd->stroff;

for(uint32_t iSym = 0; iSym < symtabCmd->nsyms; iSym++)
{
// If n_value is 0, the symbol refers to an external object.
if(symbolTable[iSym].n_value != 0)
{
// 符号表的值,是不包含 ASLR 值的,所以上面 addressWithSlide 是要减去 ASLR
uintptr_t symbolBase = symbolTable[iSym].n_value;
// 两种相减,找距离最近的
uintptr_t currentDistance = addressWithSlide - symbolBase;
/*
`(addressWithSlide >= symbolBase)` : 因为 symbolBase 是具体符号值;而 addressWithSlide 则是需要查找的地址值, 二者可能想到,所以是 >= symbolBase
(currentDistance <= bestDistance) : 寻找最匹配的,距离越近越好
*/
if((addressWithSlide >= symbolBase) &&
(currentDistance <= bestDistance))
{
// iSym 符号表的下标,跟 fishhook 里面的字符串计算是一样的道理
bestMatch = symbolTable + iSym;
bestDistance = currentDistance;
}
}
}
if(bestMatch != NULL)
{
// + imageVMAddrSlide(ASLR值),因为前面 addressWithSlide 有减去 imageVMAddrSlide ASLR 值
info->dli_saddr = (void*)(bestMatch->n_value + imageVMAddrSlide);
if(bestMatch->n_desc == 16)
{
// This image has been stripped. The name is meaningless, and
// almost certainly resolves to "_mh_execute_header"
info->dli_sname = NULL;
}
else
{
// 过掉符号修饰的前面的 `_`。
info->dli_sname = (char*)((intptr_t)stringTable + (intptr_t)bestMatch->n_un.n_strx);
if(*info->dli_sname ==addressWithSlide - '_')
{
info->dli_sname++;
}
}
break;
}
}
// 继续匹配下一个符号
cmdPtr += loadCmd->cmdsize;
}

return true;
}

从上面代码可知,跟 fishhook 查找符号表原理是类似的,就是用 lr 的地址值到符号表里一一匹配,找到比 lr 地址值小并离 lr 地址值最近的那个符号就是该函数的符号。

获取线程信息

因为 KSCrash 这块的代码比较多,现在还没捋顺,于是就找到了《iOS 开发高手课》作者的 SMCallStack.m


大致逻辑(只针对 Arm64 架构)如下

1
2
3
4
5
6
7
8
9
10
11
12
13
14
15
16
17
18
19
20
21
22
23
24
25
26
27
28
29
30
31
32
33
34
35
36
37
38
39
typedef struct SMStackFrame {
const struct SMStackFrame *const previous;
const uintptr_t return_address;
} SMStackFrame;

NSString *smStackOfThread(thread_t thread) {
uintptr_t buffer[100];
int i = 0;
_STRUCT_MCONTEXT64 machineContext;
mach_msg_type_number_t state_count = ARM_THREAD_STATE64_COUNT;
kern_return_t kr = thread_get_state(thread, ARM_THREAD_STATE64, (thread_state_t)&machineContext.__ss, &state_count);
if (kr != KERN_SUCCESS) {
return [NSString stringWithFormat:@"Fail get thread: %u", thread];
}
const uintptr_t instructionAddress = machineContext.__ss.__pc;
buffer[i++] = instructionAddress;
uintptr_t linkRegisterPointer = machineContext.__ss.__lr;
if (linkRegisterPointer) {
buffer[i++] = linkRegisterPointer;
}
SMStackFrame stackFrame = {0};
const uintptr_t framePointer = machineContext.__ss.__fp;

vm_size_t bytesCopied = 0;
if (framePointer == 0 || vm_read_overwrite(mach_task_self(), (vm_address_t)(void *)framePointer, (vm_size_t)sizeof(stackFrame), (vm_address_t)&stackFrame, &bytesCopied) != KERN_SUCCESS) {
return @"Fail frame pointer";
}

bytesCopied = 0;

for (; ; i++) {
buffer[i] = stackFrame.return_address;
if (buffer[i] == 0 || stackFrame.previous == 0 || vm_read_overwrite(mach_task_self(), (vm_address_t)(void *)stackFrame.previous, (vm_size_t)sizeof(stackFrame), (vm_address_t)&stackFrame, &bytesCopied) != KERN_SUCCESS) {
break;
}
}
// xxxxx
return @"";
}

代码大致逻辑能看懂:根据系统函数获取 pc fp lr, 再循环获取 lr 加入数组。
但不知道为什么要这样写,只能找到根据大佬的代码去搜索相关资料,基本都是操作系统领域的相关知识。

_STRUCT_MCONTEXT64

1
2
3
4
5
6
7
8
9
10
11
12
13
14
15
16
17
18
#define _STRUCT_MCONTEXT64      struct __darwin_mcontext64
_STRUCT_MCONTEXT64
{
_STRUCT_ARM_EXCEPTION_STATE64 __es;
_STRUCT_ARM_THREAD_STATE64 __ss;
_STRUCT_ARM_NEON_STATE64 __ns;
};

_STRUCT_ARM_THREAD_STATE64
{
__uint64_t __x[29]; /* General purpose registers x0-x28 */
__uint64_t __fp; /* Frame pointer x29 */
__uint64_t __lr; /* Link register x30 */
__uint64_t __sp; /* Stack pointer x31 */
__uint64_t __pc; /* Program counter */
__uint32_t __cpsr; /* Current program status register */
__uint32_t __pad; /* Same size for 32-bit or 64-bit clients */
};

获取线程寄存器相关信息。

thread_get_state

xnu 源码中找到了搜索到了蛛丝马迹,获取到 state 内容后使用相关寄存器。

1
2
3
4
5
6
7
8
9
10
11
12
13
14
15
16
17
18
19
20
21
22
23
24
25
26
27
28
29
30
31
32
33
34
35
36
37
#if defined(__i386__)
i386_thread_state_t state = {};
thread_state_flavor_t flavor = x86_THREAD_STATE32;
mach_msg_type_number_t count = i386_THREAD_STATE_COUNT;
#elif defined(__x86_64__)
x86_thread_state64_t state = {};
thread_state_flavor_t flavor = x86_THREAD_STATE64;
mach_msg_type_number_t count = x86_THREAD_STATE64_COUNT;
#elif defined(__arm__)
arm_thread_state_t state = {};
thread_state_flavor_t flavor = ARM_THREAD_STATE;
mach_msg_type_number_t count = ARM_THREAD_STATE_COUNT;
#elif defined(__arm64__)
arm_thread_state64_t state = {};
thread_state_flavor_t flavor = ARM_THREAD_STATE64;
mach_msg_type_number_t count = ARM_THREAD_STATE64_COUNT;
#else
#error thread_get_register_pointer_values not defined for this architecture
#endif

kern_return_t ret = thread_get_state(thread, flavor, (thread_state_t)&state, &count);

// xxxx
if (sp) {
uintptr_t __sp = arm_thread_state64_get_sp(state);
if (__sp > 128) {
*sp = __sp - 128 /* redzone */;
} else {
*sp = 0;
}
}

push_register_value(arm_thread_state64_get_lr(state));

for (int i = 0; i < 29; i++) {
push_register_value(state.__x[i]);
}

vm_read_overwrite

vm_read_overwrite

The vm_read and vm_read_overwrite functions read a portion of a task’s virtual memory (they enable tasks to read other tasks’ memory). The vm_read function returns the data in a dynamically allocated array of bytes; the vm_read_overwrite function places the data into a caller-specified buffer (the data_in parameter).

上面的代码就是调用系统函数 vm_read_overwrite 从 fp 的位置开始读取内存,给 SMStackFrame 结构体赋值,从而得到 lr, 再根据 lr 递归调用获取整个函数的调用链。

扩展

ksdl_dladdr

从上面的调试可知,dladdr 就是 lldb 命令 image lookup -a 0x00xxx 的代码实现,二者功能是类似的。

NAME
dladdr – find the image containing a given address

上面是在终端使用 man dladdr 得到的内容。

有一个问题:为什么不使用系统的 dladdr 函数?而要自己实现 ksdl_dladdr 呢?
找到了相关问题 BSBacktraceLogger - 请问为什么不用系统提供的dladdr方法,而需要自己写一个fl_dladdr呢? #8,但作者没有给出有用的答案。

1
2
3
4
5
6
7
8
9
10
11
12
13
14
15
/** async-safe version of dladdr.
*
* This method searches the dynamic loader for information about any image
* containing the specified address. It may not be entirely successful in
* finding information, in which case any fields it could not find will be set
* to NULL.
*
* Unlike dladdr(), this method does not make use of locks, and does not call
* async-unsafe functions.
*
* @param address The address to search for.
* @param info Gets filled out by this function.
* @return true if at least some information was found.
*/
bool ksdl_dladdr(const uintptr_t address, Dl_info* const info);

ksdl_dladdr 的声明可知,从侧面反应系统的 dladdr 是同步的,会使用锁,可能会导致耗时。

有兴趣的可以查看 dyld 里面关于 dladdr 的实现。

lldb backtrace thread

不管是 SMCallStack 还是 BSBacktraceLogger 输出结果跟 lldb bt 的结果还是有些差异的,可能跟着两个库代码很久没更新有关系,plcrashreporter 的输出结果最接近(因为不知道怎么根据 KSCrash 直接获取调用堆栈),代码如下:

1
2
3
4
5
6
PLCrashReporterConfig *config = [[PLCrashReporterConfig alloc] initWithSignalHandlerType:PLCrashReporterSignalHandlerTypeBSD symbolicationStrategy:PLCrashReporterSymbolicationStrategyAll];
PLCrashReporter *crashReporter = [[PLCrashReporter alloc] initWithConfiguration:config];
NSData *data = [crashReporter generateLiveReport];
PLCrashReport *reporter = [[PLCrashReport alloc] initWithData:data error:NULL];
NSString *report = [PLCrashReportTextFormatter stringValueForCrashReport:reporter
withTextFormat:PLCrashReportTextFormatiOS];

所以,就想找到 lldb backtrace thread 的源码实现。
下载 lldb 工程,然后搜索 Backtrace thread 找到如下相关代码

1
2
3
4
5
6
7
8
9
10
11
12
13
14
15
lldb::ThreadSP
GetExtendedBacktraceThread (ConstString type);

// ----
uint32_t
SBThread::GetExtendedBacktraceOriginatingIndexID ()
{
ThreadSP thread_sp(m_opaque_sp->GetThreadSP());
if (thread_sp)
return thread_sp->GetExtendedBacktraceOriginatingIndexID();
return LLDB_INVALID_INDEX32;
}

// ----
typedef std::shared_ptr<lldb_private::Thread> ThreadSP;

坑爹,看到 lldb_private 就知道凉凉了,因为它是私有的,只在 llvm 官网找到了相关定义 lldb_private::Thread Class Reference

后面又想过是否可以通过查看 GDB 的源码来查看 backtrace thread 的源码实现,嗯,是个好想法!!!

objc_msgSend

我们知道,OC 的方法调用最终都会走 objc_msgSend 这个汇编实现的函数,那为什么它没有出现在调用堆栈里面呢?
可以猜测下答案:因为 objc_msgSend 不会使用栈空间。
下面来 debug 调试下,还是前面 viewDidLoad 调用 test1 的例子,分别对比在这两个函数汇编下寄存器的值。


call test1

1
2
3
4
5
6
7
8
9
10
11
12
13
14
15
16
17
18
19
20
21
22
23
24
25
26
27
28
29
30
31
Demo_fishhook`-[ViewController viewDidLoad]:
0x104e32f58 <+0>: sub sp, sp, #0x40
0x104e32f5c <+4>: stp x29, x30, [sp, #0x30]
0x104e32f60 <+8>: add x29, sp, #0x30
0x104e32f64 <+12>: stur x0, [x29, #-0x8]
0x104e32f68 <+16>: stur x1, [x29, #-0x10]
0x104e32f6c <+20>: ldur x8, [x29, #-0x8]
0x104e32f70 <+24>: add x0, sp, #0x10
0x104e32f74 <+28>: str x8, [sp, #0x10]
0x104e32f78 <+32>: adrp x8, 89
0x104e32f7c <+36>: ldr x8, [x8, #0x6c0]
0x104e32f80 <+40>: str x8, [sp, #0x18]
0x104e32f84 <+44>: adrp x8, 88
0x104e32f88 <+48>: ldr x1, [x8, #0xbe8]
0x104e32f8c <+52>: bl 0x104e730a4 ; symbol stub for: objc_msgSendSuper2
0x104e32f90 <+56>: ldur x0, [x29, #-0x8]
0x104e32f94 <+60>: adrp x8, 88
0x104e32f98 <+64>: ldr x1, [x8, #0xbf0]
0x104e32f9c <+68>: mov w2, #0x1
-> 0x104e32fa0 <+72>: bl 0x104e73098 ; symbol stub for: objc_msgSend
0x104e32fa4 <+76>: str w0, [sp, #0xc]
0x104e32fa8 <+80>: ldr w9, [sp, #0xc]
0x104e32fac <+84>: mov x8, x9
0x104e32fb0 <+88>: adrp x0, 81
0x104e32fb4 <+92>: add x0, x0, #0x440 ; @"res: %d"
0x104e32fb8 <+96>: mov x9, sp
0x104e32fbc <+100>: str x8, [x9]
0x104e32fc0 <+104>: bl 0x104e72720 ; symbol stub for: NSLog
0x104e32fc4 <+108>: ldp x29, x30, [sp, #0x30]
0x104e32fc8 <+112>: add sp, sp, #0x40
0x104e32fcc <+116>: ret
1
2
(lldb) register read
General Purpose Registers:

objc_msgSend

1
2
3
4
Demo_fishhook`objc_msgSend:
-> 0x104e73098 <+0>: nop
0x104e7309c <+4>: ldr x16, #0xd6e4 ; (void *)0x0000000198569ce0: objc_msgSend
0x104e730a0 <+8>: br x16
1
2
3
(lldb) si
(lldb) register read
General Purpose Registers:
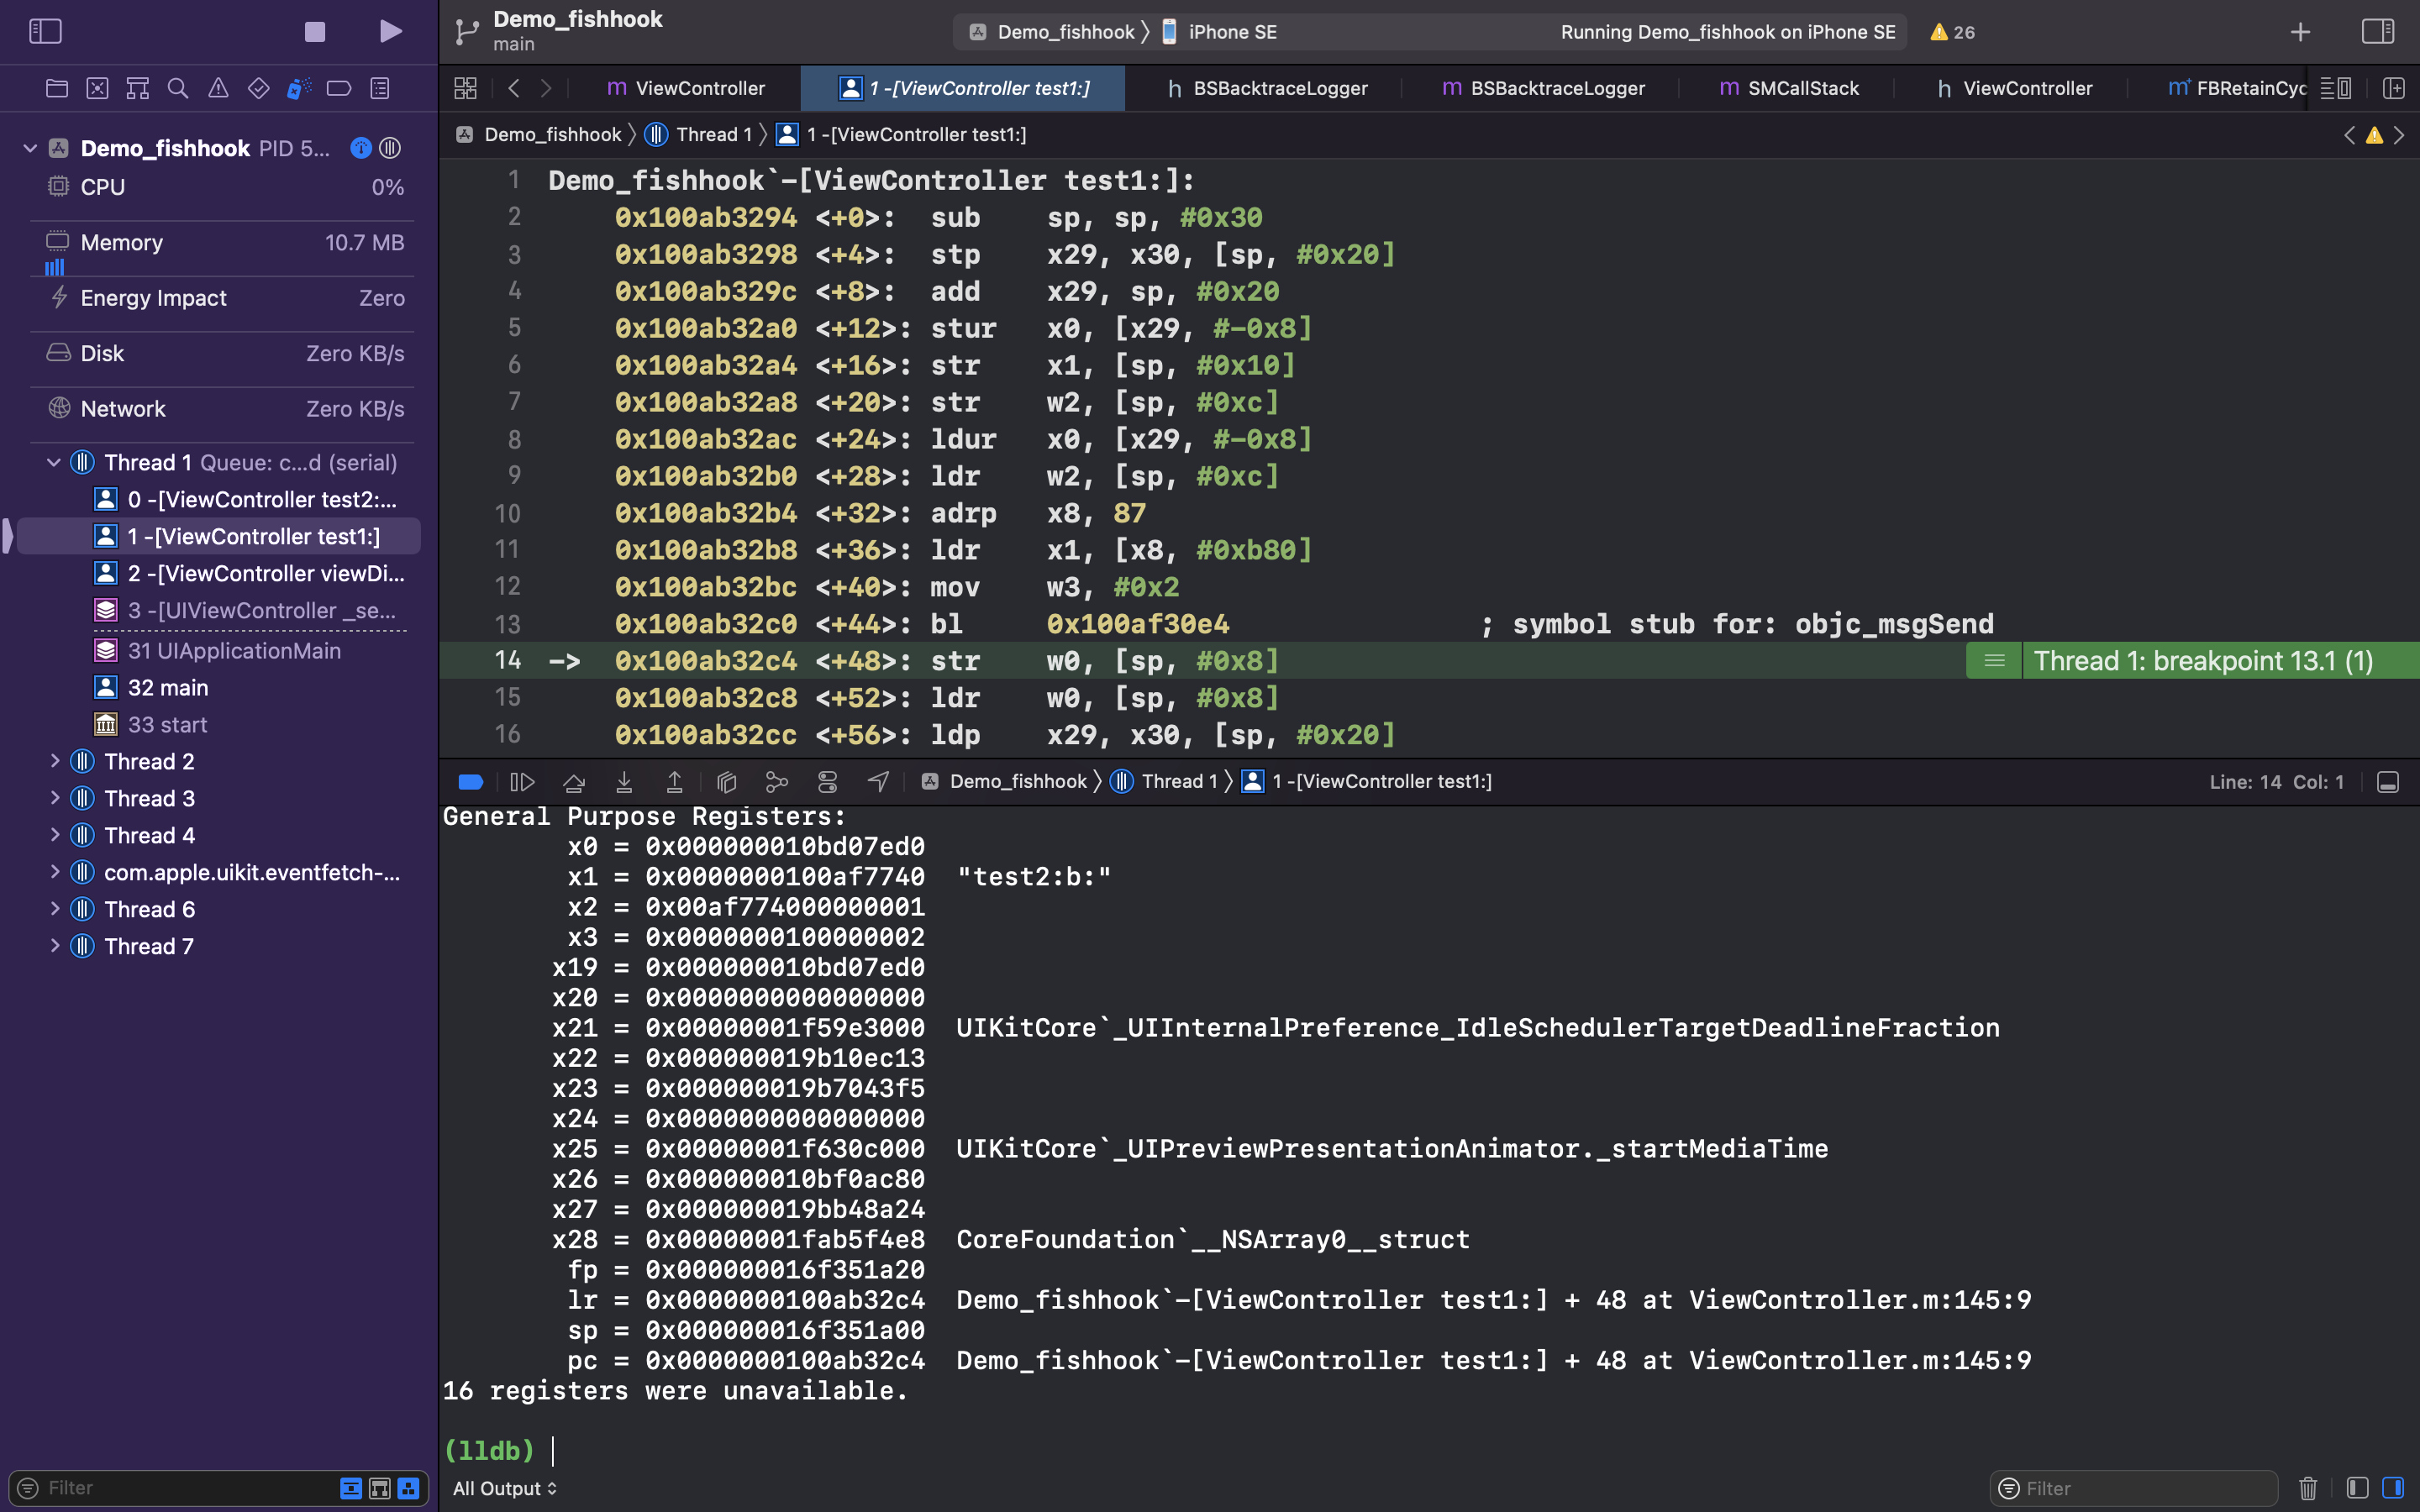
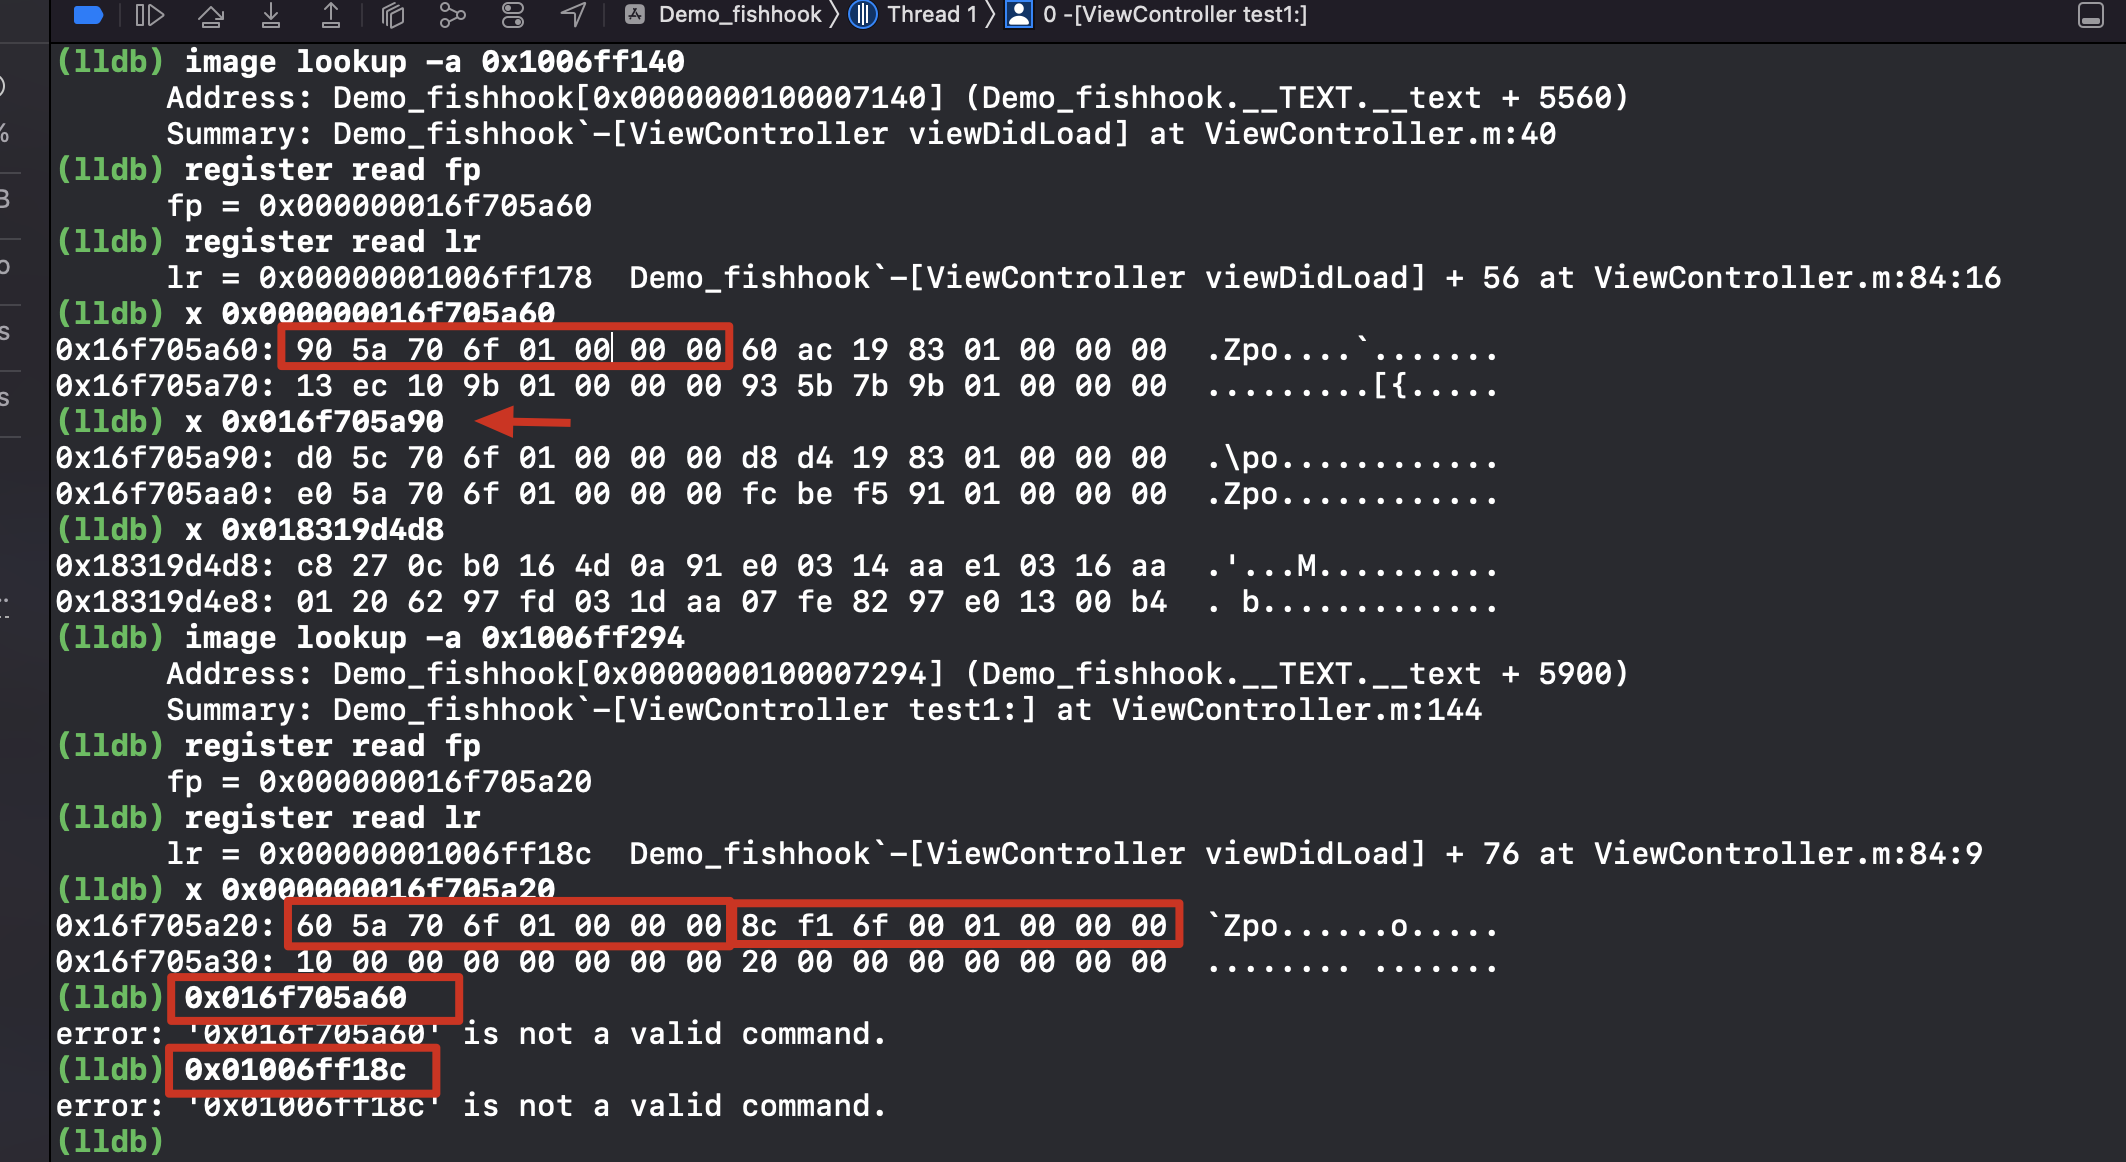
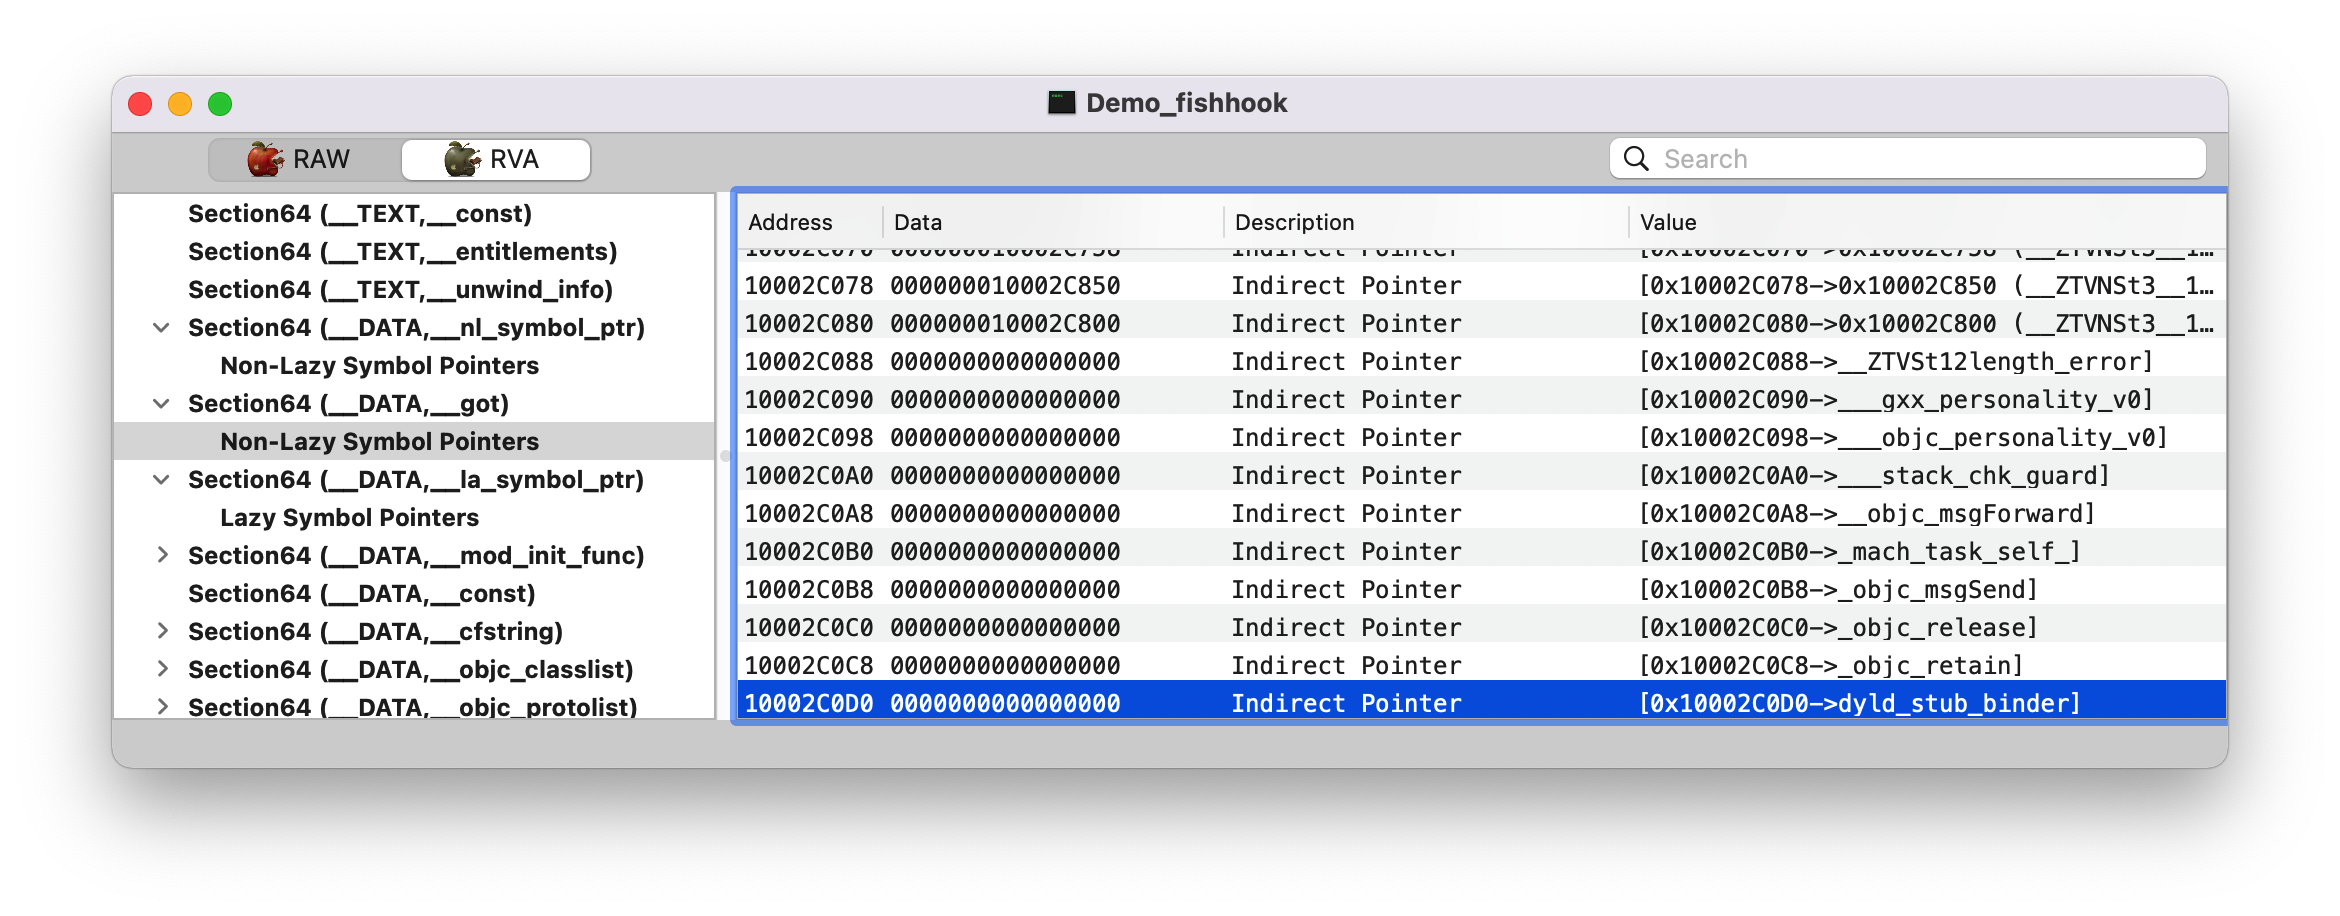
对比发现两者变化的仅仅是 lrpc

1
2
3
4
5
6
7
// test1
lr = 0x0000000104e32f90 Demo_fishhook`-[ViewController viewDidLoad] + 56 at ViewController.m:84:16
pc = 0x0000000104e32fa0 Demo_fishhook`-[ViewController viewDidLoad] + 72 at ViewController.m:84:15

// objc_msgSend
lr = 0x0000000104e32fa4 Demo_fishhook`-[ViewController viewDidLoad] + 76 at ViewController.m:84:9
pc = 0x0000000104e73098 Demo_fishhook`symbol stub for: objc_msgSend

经过上面的输出可知,objc_msgSend 共用当前函数的栈空间,没有产生新的栈空间,所以就不会出现在函数调用栈里面了,所以,这是 objc_msgSend 用汇编实现的原因之一吗?

参考链接

最近把《程序员的自我修养–链接、装载与库》这本书又重新温习了下,加深了对可执行文件的理解,这篇文章就结合 fishhook 来实践一下。

Demo - NSLog

先从一个 NSLog 的 Demo 实践开始,讲解调用系统库函数 NSLog 的执行流程。

1
2
3
4
5
6
7
8
9
int main(int argc, char * argv[]) {
NSString * appDelegateClassName;
@autoreleasepool {
// Setup code that might create autoreleased objects goes here.
appDelegateClassName = NSStringFromClass([AppDelegate class]);
NSLog(@"%@", @"hello world");
}
return UIApplicationMain(argc, argv, nil, appDelegateClassName);
}

lldb

在 NSLog 处下断点,并在 Xcode 设置 debug -> debug workflow -> always show disassembly 查看其汇编实现。

1
2
3
4
5
6
    0x10fcf0a79 <+89>:  leaq   0x26f20(%rip), %rdi       ; @"%@"
0x10fcf0a80 <+96>: leaq 0x26f39(%rip), %rsi ; @"hello world"
-> 0x10fcf0a87 <+103>: movb $0x0, %al
0x10fcf0a89 <+105>: callq 0x10fd12000 ; symbol stub for: NSLog
0x10fcf0a8e <+110>: movq -0x20(%rbp), %rdi
0x10fcf0a92 <+114>: callq 0x10fd122ac ; symbol stub for: objc_autoreleasePoolPop

0x10fd12000 处下断点

1
2
(lldb) b 0x10fd12000
Breakpoint 3: where = Demo_fishhook`symbol stub for: NSLog, address = 0x000000010fd12000

单步执行过掉 NSLog 处的断点,到

1
2
Demo_fishhook`NSLog:
-> 0x10fd12000 <+0>: jmpq *0x50ea(%rip) ; (void *)0x00007fff207ee762: NSLog

这条指令的意思获取 rip + 0x50ea 地址(A),然后跳转到该地址存储的值(B)(类比二级指针)。

那我们先找出 rip 的地址

1
2
3
4
5
6
7
8
9
10
11
12
13
14
15
16
17
18
19
20
21
22
23
(lldb) register read
General Purpose Registers:
rax = 0x0000600002f3e400
rbx = 0x000000010fda3060
rcx = 0x0000000114fbf600 dyld`_main_thread
rdx = 0x000000000000002c
rdi = 0x000000010fd179a0 @"%@"
rsi = 0x000000010fd179c0 @"hello world"
rbp = 0x00007ff7b0212ca0
rsp = 0x00007ff7b0212c78
r8 = 0x00007fff862a40c0 libsystem_pthread.dylib`_pthread_keys
r9 = 0x0000000000000000
r10 = 0x00007fff862da642 (void *)0xe6b800007fff862d
r11 = 0x00007fff2019c15c libobjc.A.dylib`-[NSObject autorelease]
r12 = 0x0000000114fbf3a0 dyld`_NSConcreteStackBlock
r13 = 0x00007ff7b0212d68
r14 = 0x000000010ff98e14 dyld_sim`start_sim
r15 = 0x0000000114fb3010 dyld`dyld4::sConfigBuffer
rip = 0x000000010fd12000 Demo_fishhook`symbol stub for: NSLog
rflags = 0x0000000000000246
cs = 0x000000000000002b
fs = 0x0000000000000000
gs = 0x0000000000000000

当前指令还卡在 0x000000010fd12000 处,所以 rip 还是它。那怎么知道 0x000000010fd12000 下一条指令的地址呢?也就是 0x000000010fd12000 这条指令的长度(PS: 按道理应该有文档能找到 AT&T X86-64 汇编 jmpq 指令的长度,但没搜到)。
后面用 lldb dis 乱猜一通,于是就有了下面的结果。

0x10fd12000 下一条指令是 0x10fd12006,所以地址(A)就是 0x000000010fd170f0,而 0x000000010fd170f0 里面存储的值(B)就是 0x00007fff207ee762,在系统库 Foundation 里面,也就是找到 NSLog 的实现了。这跟 fishhook 源码解析 里面提到的第一次会通过 __stub_helper 去查找不符合,这里 __DATA,__la_symbol_ptr 直接存储的就是实际地址值了。(PS: 我 Xcode 版本是 Version 13.1 (13A1030d),通过下断点得知是 dyld4, 我以为是 dyld4 做了什么优化,把电脑重启后再次运行还是一样的结果。)

Note:

  1. 大小端,内存地址存储的值是小端模式,即 0x10fd170f0: 62 e7 7e 20 ff 7f 00 00
  2. lldb image 指令的其他玩法,可以在 help 调试下输入 image help 查看

MachOView

既然 lldb 调试推理不出 __stub_helper,那就看下是否能通过 macho 可执行文件里面存储的原始值能推理出来不?

还是前面的断点

1
2
3
(lldb) image lookup -a 0x10fd12000
Address: Demo_fishhook[0x0000000100027000] (Demo_fishhook.__TEXT.__stubs + 18)
Summary: Demo_fishhook`symbol stub for: NSLog

__TEXT.__stubs section, 用 MachOView 来查看该 Demo 的可执行文件。

Note:

  1. 0x10fd12000 是虚拟内存地址
  2. 0x0000000100027000 是加上虚拟基地址的文件偏移(offset), 而虚拟基地址一般都是 0x0000000100000000, 即 2^32.
1
2
3
4
5
6
7
8
9
10
11
12
13
14
15
(lldb) image list // 得出该可执行文件 image 在虚拟内存中的起始地址:`0x000000010fceb000`
[ 0] 0D70A5F7-C54D-312D-B242-ADE1AB9BEF9D 0x000000010fceb000 /Users/joakim/Library/Developer/Xcode/DerivedData/Demo_fishhook-ebwkhxbcogafxbclcdeifrppsgdu/Build/Products/Debug-iphonesimulator/Demo_fishhook.app/Demo_fishhook
/Users/joakim/Library/Developer/Xcode/DerivedData/Demo_fishhook-ebwkhxbcogafxbclcdeifrppsgdu/Build/Products/Debug-iphonesimulator/Demo_fishhook.app.dSYM/Contents/Resources/DWARF/Demo_fishhook

(lldb) image list -o -f // 得到可执行文件的 ASLR 值
[ 0] 0x000000000fceb000 /Users/joakim/Library/Developer/Xcode/DerivedData/Demo_fishhook-ebwkhxbcogafxbclcdeifrppsgdu/Build/Products/Debug-iphonesimulator/Demo_fishhook.app/Demo_fishhook

(lldb) p/x 0x000000010fceb000 - 0x000000000fceb000
(long) $0 = 0x0000000100000000 // 上面两个地址相减,就得到了虚拟基址

(lldb) p/x 0x0000000100027000 - 0x0000000100000000 // 得到 `Demo_fishhook.__TEXT.__stubs` 在 macho 文件中的 offset
(long) $1 = 0x0000000000027000

(lldb) p/x 0x10fd12006 + 0x50ea - 0x000000000fceb000 // 得到前面提到的地址 A, 还是通过前面 lldb 计算得来,发现跟下面 MachOView 所查看到的是一样的
(int) $2 = 0x000000010002c0f0

RVA tab 找到 0x000000010002c0f0 地址

注意 Data 那一栏的值 00000001000273D8, 继续查找。

  • RVA: Relative Virtual Address, 相对虚拟地址(没添加 ASLR 的值)
  • RAW: offset, 在 macho 文件中的偏移


push 0x59
push 0x59: 表示将 0x59 立即数入栈,而我们知道栈一般用做函数调用时的传参。
那 0x59 立即数又是什么意思呢?
根据 AntiHook 的内容可知

其实在dyld源码里,dyld_ stub_bind最后会调用fastBindLazySymbol函数,这个函数的第二个参数是lazyBindingInfoOffset, 即0x0120是Binding Info或者Lazy Binding Info区起始开始到符号信息的偏移,而符号信息如下图

因为 NSLog 符号在 __DATA,__la_symbol_ptr(la: lazy), 所以就是相对于 Lazy Binding Info 偏移 0x59 。

1
2
(lldb) p/x 0x1000370F8 + 0x59
(long) $17 = 0x0000000100037151


嗯,有趣的事情来了,这里竟然有符号名 name(_NSLog)
dylib(3) 呢?表示该符号在所加载的第3个 dylib 里面(如下图)。

Note: 从这里可以看出,进行链接的时候会把动态库里符号的相关信息存储起来(即:该符号属于哪个动态库)。

jmp 0x10002733c

  • lea r11, qword ptr [rip + 0x4cbd]
    • rip + 0x4cbd = 0x100027343 + 0x4cbd = 0x000000010002c000 地址的值存入 r11 寄存器
  • push r11
    • 所以此时栈中有两个参数:前面的 0x59; 这里的 0x000000010002c000
  • jmp qword ptr [rip + 0x4d85]
    • 跳转到 rip + 0x4cbd = 0x10002734B + 0x4d85 = 0x000000010002c0d0 执行函数

注意:这里分为两块

  1. 前面这一块的就是 __stub_helper 的具体执行逻辑
  2. 后面这一块就是传参、然后调用 __stub_helper // 而这里的参数具体在前面讲解 0x59 的时候有提到

1
2
3
4
5
(lldb) p/x 0x000000000fceb000 + 0x10002C000
(long) $24 = 0x000000010fd17000
(lldb) x 0x000000010fd17000
0x10fd17000: 00 00 00 00 00 00 00 00 00 94 4d 8a ff 7f 00 00 ..........M.....
0x10fd17010: 08 28 2a 86 ff 7f 00 00 1a 33 25 20 ff 7f 00 00 .(*......3% ....

诶,在程序启动后,它的值还是为 0, 这是为什么呢?


奈斯,终于看到 dyld_stub_binder 了,并且它已经有值了。

1
2
3
4
5
(lldb) p/x 0x000000000fceb000 + 0x10002C0D0
(long) $25 = 0x000000010fd170d0
(lldb) x 0x000000010fd170d0
0x10fd170d0: 80 a6 2c 86 ff 7f 00 00 b9 85 36 20 ff 7f 00 00 ..,.......6 ....
0x10fd170e0: 10 ad 7d 20 ff 7f 00 00 84 c0 3f 20 ff 7f 00 00 ..} ......? ....

Note:这里的 __DATA,__nl_symbol_ptr__DATA,__got Section 都是属于非懒加载的,在程序启动时 dyld 就会修正这些符号值。

__DATA,__nl_symbol_ptr Section

__DATA,__got Section

__DATA,__la_symbol_ptr Section
Note: 注意这里的 Indirect Sym Index(Reserved1): 168, 后面讲解 fishhook 的时候会提到。

因为它们存在于有可读可写权限的 DATA Segment
TEXT Segment
可读可执行。

DATA Segment
可读可写。

总结

NSLog 这块的逻辑大致分为

  1. lazy binding 的符号地址最开始指向 __TEXT,__stubs 里所指向的方法,调用该方法的时候,它会调用 __DATA,__la_symbol_ptr 所指向地址里面的方法
  2. 未绑定的时候,__DATA,__la_symbol_ptr 指向 ___TEXT,__stub_helper ,而后者会执行系统函数(dyld_stub_binder)找到方法实现后,会修改 __DATA,__la_symbol_ptr 的值,从而指向实际的函数地址
  3. 已绑定的时候,__DATA,__la_symbol_ptr 则指向实际的函数地址。// 而 fishhook 就是这么干的,修改 __DATA,__la_symbol_ptr 里面相关符号的值

fishhook

有了前面 NSLog lazy binding 的调试经验,现在调试 fishhook 就会轻松很多。这里的 Demo 参考自 fishhook 源码解析

rebind_symbols

1
2
3
4
5
6
7
8
9
10
11
12
13
14
15
16
17
18
19
20
21
22
23
24
25
26
27
28
29
30
31
32
struct rebindings_entry {
struct rebinding *rebindings; // rebinding 类型的数组
size_t rebindings_nel; // 该数组的长度
struct rebindings_entry *next; // 链表的下一个 entry
};

// 链表头
static struct rebindings_entry *_rebindings_head;

int rebind_symbols(struct rebinding rebindings[], size_t rebindings_nel) {
// 维护一个 rebindings_entry 的结构
// 将 rebinding 的多个实例组织成一个链表
int retval = prepend_rebindings(&_rebindings_head, rebindings, rebindings_nel);
// 判断是否 malloc 失败,失败会返回 -1
if (retval < 0) {
return retval;
}
// _rebindings_head -> next 是第一次调用的标志符,NULL 则代表第一次调用
if (!_rebindings_head->next) {
// 第一次调用,将 _rebind_symbols_for_image 注册为回调
_dyld_register_func_for_add_image(_rebind_symbols_for_image);
} else {
// 先获取 dyld 镜像数量
uint32_t c = _dyld_image_count();
for (uint32_t i = 0; i < c; i++) {
// 根据下标依次进行重绑定过程
_rebind_symbols_for_image(_dyld_get_image_header(i), _dyld_get_image_vmaddr_slide(i));
}
}
// 返回状态值
return retval;
}

prepend_rebindings

该方法使用链表存储 rebindings_entry 结构,使用头插法将一个链表串起来,链表头用 _rebindings_head 保存。

1
2
3
4
5
6
7
8
9
10
11
12
13
14
15
16
17
18
19
20
21
22
23
24
25
26
27
28
29
static struct rebindings_entry *_rebindings_head;

/*
rebindings_head: 静态的链表头
rebindings: 方法符号数组
nel: 数组长度
*/
static int prepend_rebindings(struct rebindings_entry **rebindings_head,
struct rebinding rebindings[],
size_t nel) {
// 声明 rebindings_entry 一个指针,并为其分配空间
struct rebindings_entry *new_entry = (struct rebindings_entry *) malloc(sizeof(struct rebindings_entry));
if (!new_entry) {
return -1;
}
// 为数组 rebindings 分配内存
new_entry->rebindings = (struct rebinding *) malloc(sizeof(struct rebinding) * nel);
if (!new_entry->rebindings) {
free(new_entry);
return -1;
}
// 内存拷贝,将 rebindings 数组中 copy 到 new_entry -> rebingdings 成员中
memcpy(new_entry->rebindings, rebindings, sizeof(struct rebinding) * nel);
new_entry->rebindings_nel = nel;
// 头插法
new_entry->next = *rebindings_head;
*rebindings_head = new_entry;
return 0;
}

经过多次操作后,结果如下图所示
rebindings_entry

Note: 这里 *rebindings 是一个数组。

_rebind_symbols_for_image

_dyld_register_func_for_add_image 方法是 dyld 注册回调函数的方法,当镜像被加载的时候,就会主动触发注册的回调方法。

一个可执行文件会加载非常多的动态库,每个动态库的成功加载都会触发注册的回调方法。每个动态库镜像都会根据设置重绑定符号

这里多个 image 可以在程序运行的时候通过 image list 获取。

而这里,就注册了 _rebind_symbols_for_image 方法,但里面没做任何事情,直接调用另外一个方法。

  • header: 当前可执行文件的虚拟内存地址;也就是 image 的 header 头信息,结构体如下图所示
    Mach Header
    1
    2
    3
    (lldb) image list
    [ 0] 0D70A5F7-C54D-312D-B242-ADE1AB9BEF9D 0x000000010d574000 /Users/joakim/Library/Developer/Xcode/DerivedData/Demo_fishhook-ebwkhxbcogafxbclcdeifrppsgdu/Build/Products/Debug-iphonesimulator/Demo_fishhook.app/Demo_fishhook
    /Users/joakim/Library/Developer/Xcode/DerivedData/Demo_fishhook-ebwkhxbcogafxbclcdeifrppsgdu/Build/Products/Debug-iphonesimulator/Demo_fishhook.app.dSYM/Contents/Resources/DWARF/Demo_fishhook
  • slide: ASLR 偏移值
    1
    2
    (lldb) image list -o -f
    [ 0] 0x000000000d574000 /Users/joakim/Library/Developer/Xcode/DerivedData/Demo_fishhook-ebwkhxbcogafxbclcdeifrppsgdu/Build/Products/Debug-iphonesimulator/Demo_fishhook.app/Demo_fishhook
  • magic: 0x00000000feedfacf, 同 MachOView 那一栏的值,这里是大端模式
    1
    2
    (lldb) p/x 4277009103
    (long) $2 = 0x00000000feedfacf

Note: 该进程有多少个 image, 该方法就会回调多少次。

rebind_symbols_for_image

核心方法。

1
2
3
4
5
6
7
8
9
10
11
12
13
14
15
16
17
18
19
20
21
22
23
24
25
26
27
28
29
30
31
32
33
34
35
36
37
38
39
40
41
42
43
44
45
46
47
48
49
50
51
52
53
54
55
56
57
58
59
60
61
62
63
64
65
66
67
68
69
70
71
72
73
74
75
76
77
78
79
static void rebind_symbols_for_image(struct rebindings_entry *rebindings,
const struct mach_header *header,
intptr_t slide) {
Dl_info info;
// header 无效
if (dladdr(header, &info) == 0) {
return;
}

// 1. 查找 linkedit_segment symtab_cmd dysymtab_cmd
segment_command_t *cur_seg_cmd;
segment_command_t *linkedit_segment = NULL;
struct symtab_command* symtab_cmd = NULL;
struct dysymtab_command* dysymtab_cmd = NULL;

// 过掉 Mach-O Header, 到 Load Commands
uintptr_t cur = (uintptr_t)header + sizeof(mach_header_t);
/*
遍历每个 Load Command
header->ncmds: Load Commands 的数量
cur_seg_cmd->cmdsize: 当前 load command 的大小
*/
for (uint i = 0; i < header->ncmds; i++, cur += cur_seg_cmd->cmdsize) {
cur_seg_cmd = (segment_command_t *)cur;
// 判断类型是否是 SEG_LINKEDIT LC_SYMTAB LC_DYSYMTAB
if (cur_seg_cmd->cmd == LC_SEGMENT_ARCH_DEPENDENT) {
if (strcmp(cur_seg_cmd->segname, SEG_LINKEDIT) == 0) {
linkedit_segment = cur_seg_cmd;
}
} else if (cur_seg_cmd->cmd == LC_SYMTAB) {
symtab_cmd = (struct symtab_command*)cur_seg_cmd;
} else if (cur_seg_cmd->cmd == LC_DYSYMTAB) {
dysymtab_cmd = (struct dysymtab_command*)cur_seg_cmd;
}
}
// 没找到,则 return
if (!symtab_cmd || !dysymtab_cmd || !linkedit_segment ||
!dysymtab_cmd->nindirectsyms) {
return;
}

// Find base symbol/string table addresses
/*
2. 获取相关地址值
slide: ASLR 值
vmaddr: 虚拟地址值,fileoff: 文件偏移量,两者相减即可得 VM Size.
linkedit_base 就是在虚拟内存加载的基地址(image list 下 image 的值/header)
*/
uintptr_t linkedit_base = (uintptr_t)slide + linkedit_segment->vmaddr - linkedit_segment->fileoff;
nlist_t *symtab = (nlist_t *)(linkedit_base + symtab_cmd->symoff);
char *strtab = (char *)(linkedit_base + symtab_cmd->stroff);

// Get indirect symbol table (array of uint32_t indices into symbol table)
uint32_t *indirect_symtab = (uint32_t *)(linkedit_base + dysymtab_cmd->indirectsymoff);

// 3. 查找 section
// 游标重置
cur = (uintptr_t)header + sizeof(mach_header_t);
for (uint i = 0; i < header->ncmds; i++, cur += cur_seg_cmd->cmdsize) {
cur_seg_cmd = (segment_command_t *)cur;
if (cur_seg_cmd->cmd == LC_SEGMENT_ARCH_DEPENDENT) {
if (strcmp(cur_seg_cmd->segname, SEG_DATA) != 0 &&
strcmp(cur_seg_cmd->segname, SEG_DATA_CONST) != 0) {
continue;
}
// __DATA segment load command 后面跟 n 个 sections
for (uint j = 0; j < cur_seg_cmd->nsects; j++) {
section_t *sect =
(section_t *)(cur + sizeof(segment_command_t)) + j;
if ((sect->flags & SECTION_TYPE) == S_LAZY_SYMBOL_POINTERS) {
perform_rebinding_with_section(rebindings, sect, slide, symtab, strtab, indirect_symtab);
}
if ((sect->flags & SECTION_TYPE) == S_NON_LAZY_SYMBOL_POINTERS) {
perform_rebinding_with_section(rebindings, sect, slide, symtab, strtab, indirect_symtab);
}
}
}
}
}

查找 linkedit_segment symtab_cmd dysymtab_cmd

这没什么说的,就是常规的查找操作。

Load Commands

见下面 __LINKEDIT 截图左侧的三个箭头。

__LINKEDIT

__LINKEDIT
这是一个有意思的地方,__DATA Section 后面的都是 __LINKEDIT Segment,如下图。
__LINKEDIT Segment Start
Note: 这里切换成 RAW 了。

__LINKEDIT Segment End

1
2
3
4
(lldb) p/x 0x34000 + 0x836B0 // 
(int) $5 = 0x000b76b0
(lldb) p/x 0xB76A0 + 0x10 // 16: 0x10
(int) $6 = 0x000b76b0

最后一个 Section 的 index 是 0xB76A0, 占 16Bytes, 也就是 0x000b76b0,没毛病。

LC_SYSTAB

LC_SYSTAB
注意两个 Table Offset, 分别对应 Symbol Table 和 String Table 的 file offset.

LC_DYSYSTAB

LC_DYSYSTAB
动态符号表。

获取相关地址值

从上可知

  1. linkedit_base = header, 就是虚拟内存中加载的基地址
  2. symtab, 看上面的 LC_SYSTAB 截图,Symbol Table Offset(symtab_cmd->symoff): 00039f28
    Symbol Table
  3. strtab, 看上面的 LC_SYSTAB 截图,String Table Offset(symtab_cmd->stroff): 0005C8B0
    String Table
  4. indirect_symtab, 看上面的 LC_DYSYSTAB 截图,IndSym Table Offset: 0005C3D8
    Dynamic Symbol Table

查找 section

__DATA Segment, 下找到 type 为 S_LAZY_SYMBOL_POINTERS/S_NON_LAZY_SYMBOL_POINTER 的 section。
详见前面的相关截图
__DATA,__nl_symbol_ptr Section

perform_rebinding_with_section

重新绑定的逻辑,这里以 __la_symbol_ptr Section 为例。

1
2
3
4
5
6
7
8
9
10
11
12
13
14
15
16
17
18
19
20
21
22
23
24
25
26
27
28
29
30
31
32
33
34
35
36
37
38
39
40
41
42
43
44
45
46
47
48
49
50
51
52
53
54
55
56
57
58
59
60
61
62
63
64
65
static void perform_rebinding_with_section(struct rebindings_entry *rebindings,
section_t *section,
intptr_t slide,
nlist_t *symtab,
char *strtab,
uint32_t *indirect_symtab) {
// 该 section(__la_symbol_ptr) 在 indirect_symtab 的起始下标, 指向 indirect_symtab
uint32_t *indirect_symbol_indices = indirect_symtab + section->reserved1;
// 指向具体地址,Section64(__DATA, __la_symbol_ptr)
void **indirect_symbol_bindings = (void **)((uintptr_t)slide + section->addr);

/*
指针格式 sizeof(void *) = 8,
section->size = 1128, 在 MachOView Section64 Header(__la_symbol_ptr), size 也是 1128
所以共 1128/8 = 141 个符号,具体值在 Section64(__DATA, __la_symbol_ptr)
*/
for (uint i = 0; i < section->size / sizeof(void *); i++) {
uint32_t symtab_index = indirect_symbol_indices[i];
// 无效的符号
if (symtab_index == INDIRECT_SYMBOL_ABS || symtab_index == INDIRECT_SYMBOL_LOCAL ||
symtab_index == (INDIRECT_SYMBOL_LOCAL | INDIRECT_SYMBOL_ABS)) {
continue;
}
// 在字符串表的下标
uint32_t strtab_offset = symtab[symtab_index].n_un.n_strx;
// 获取字符串名
char *symbol_name = strtab + strtab_offset;
bool symbol_name_longer_than_1 = symbol_name[0] && symbol_name[1];
struct rebindings_entry *cur = rebindings;
while (cur) {
for (uint j = 0; j < cur->rebindings_nel; j++) {
// &symbol_name[1] 去掉函数修饰时前面的 `_`, eg: _NSLog
if (symbol_name_longer_than_1 && strcmp(&symbol_name[1], cur->rebindings[j].name) == 0) {
kern_return_t err;

if (cur->rebindings[j].replaced != NULL && indirect_symbol_bindings[i] != cur->rebindings[j].replacement)
// 替换前的原函数地址
*(cur->rebindings[j].replaced) = indirect_symbol_bindings[i];

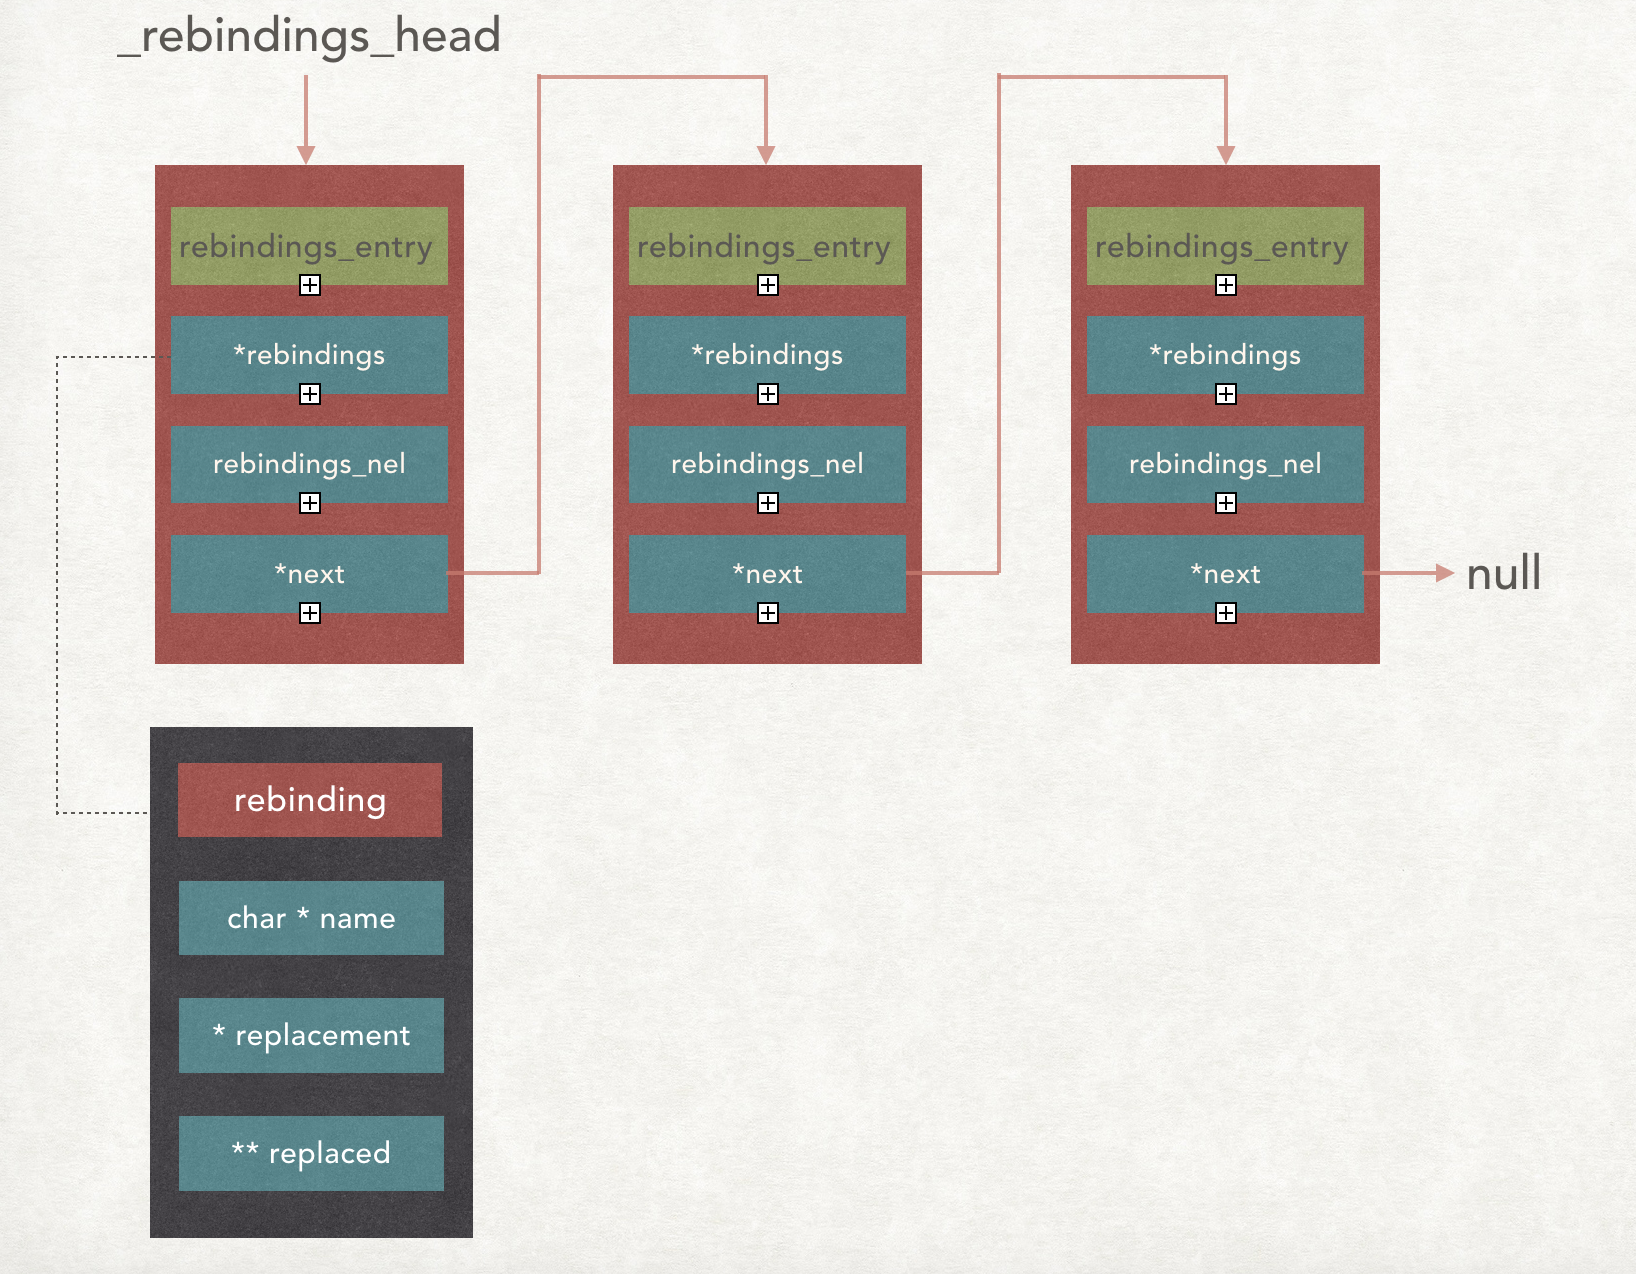
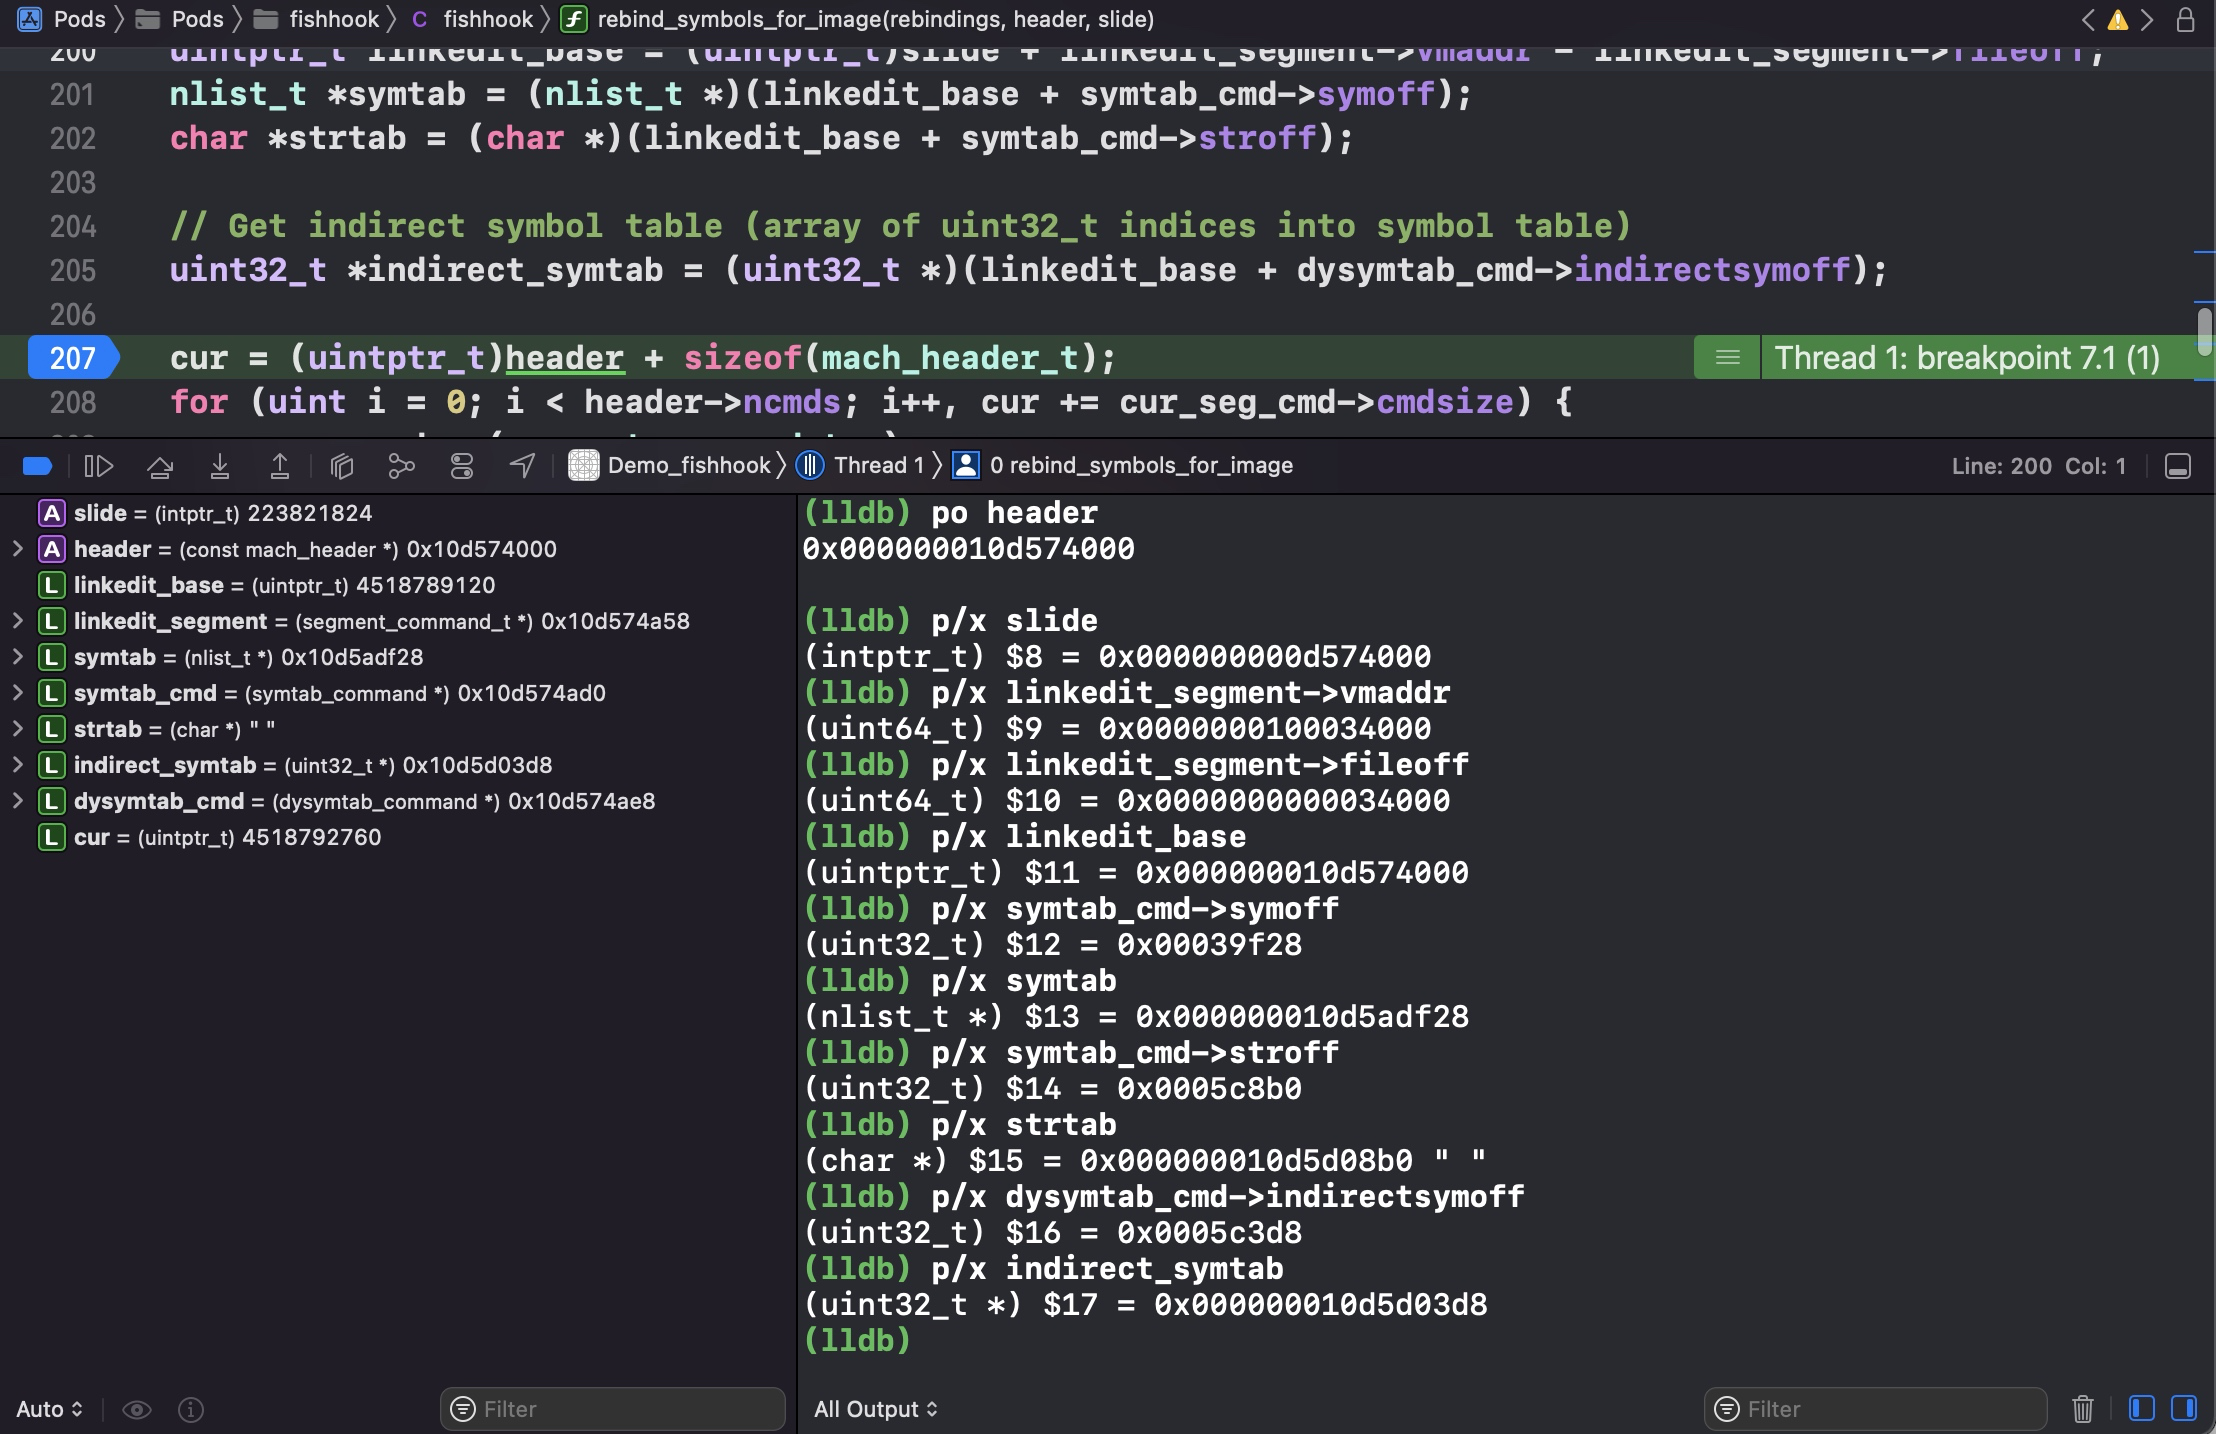
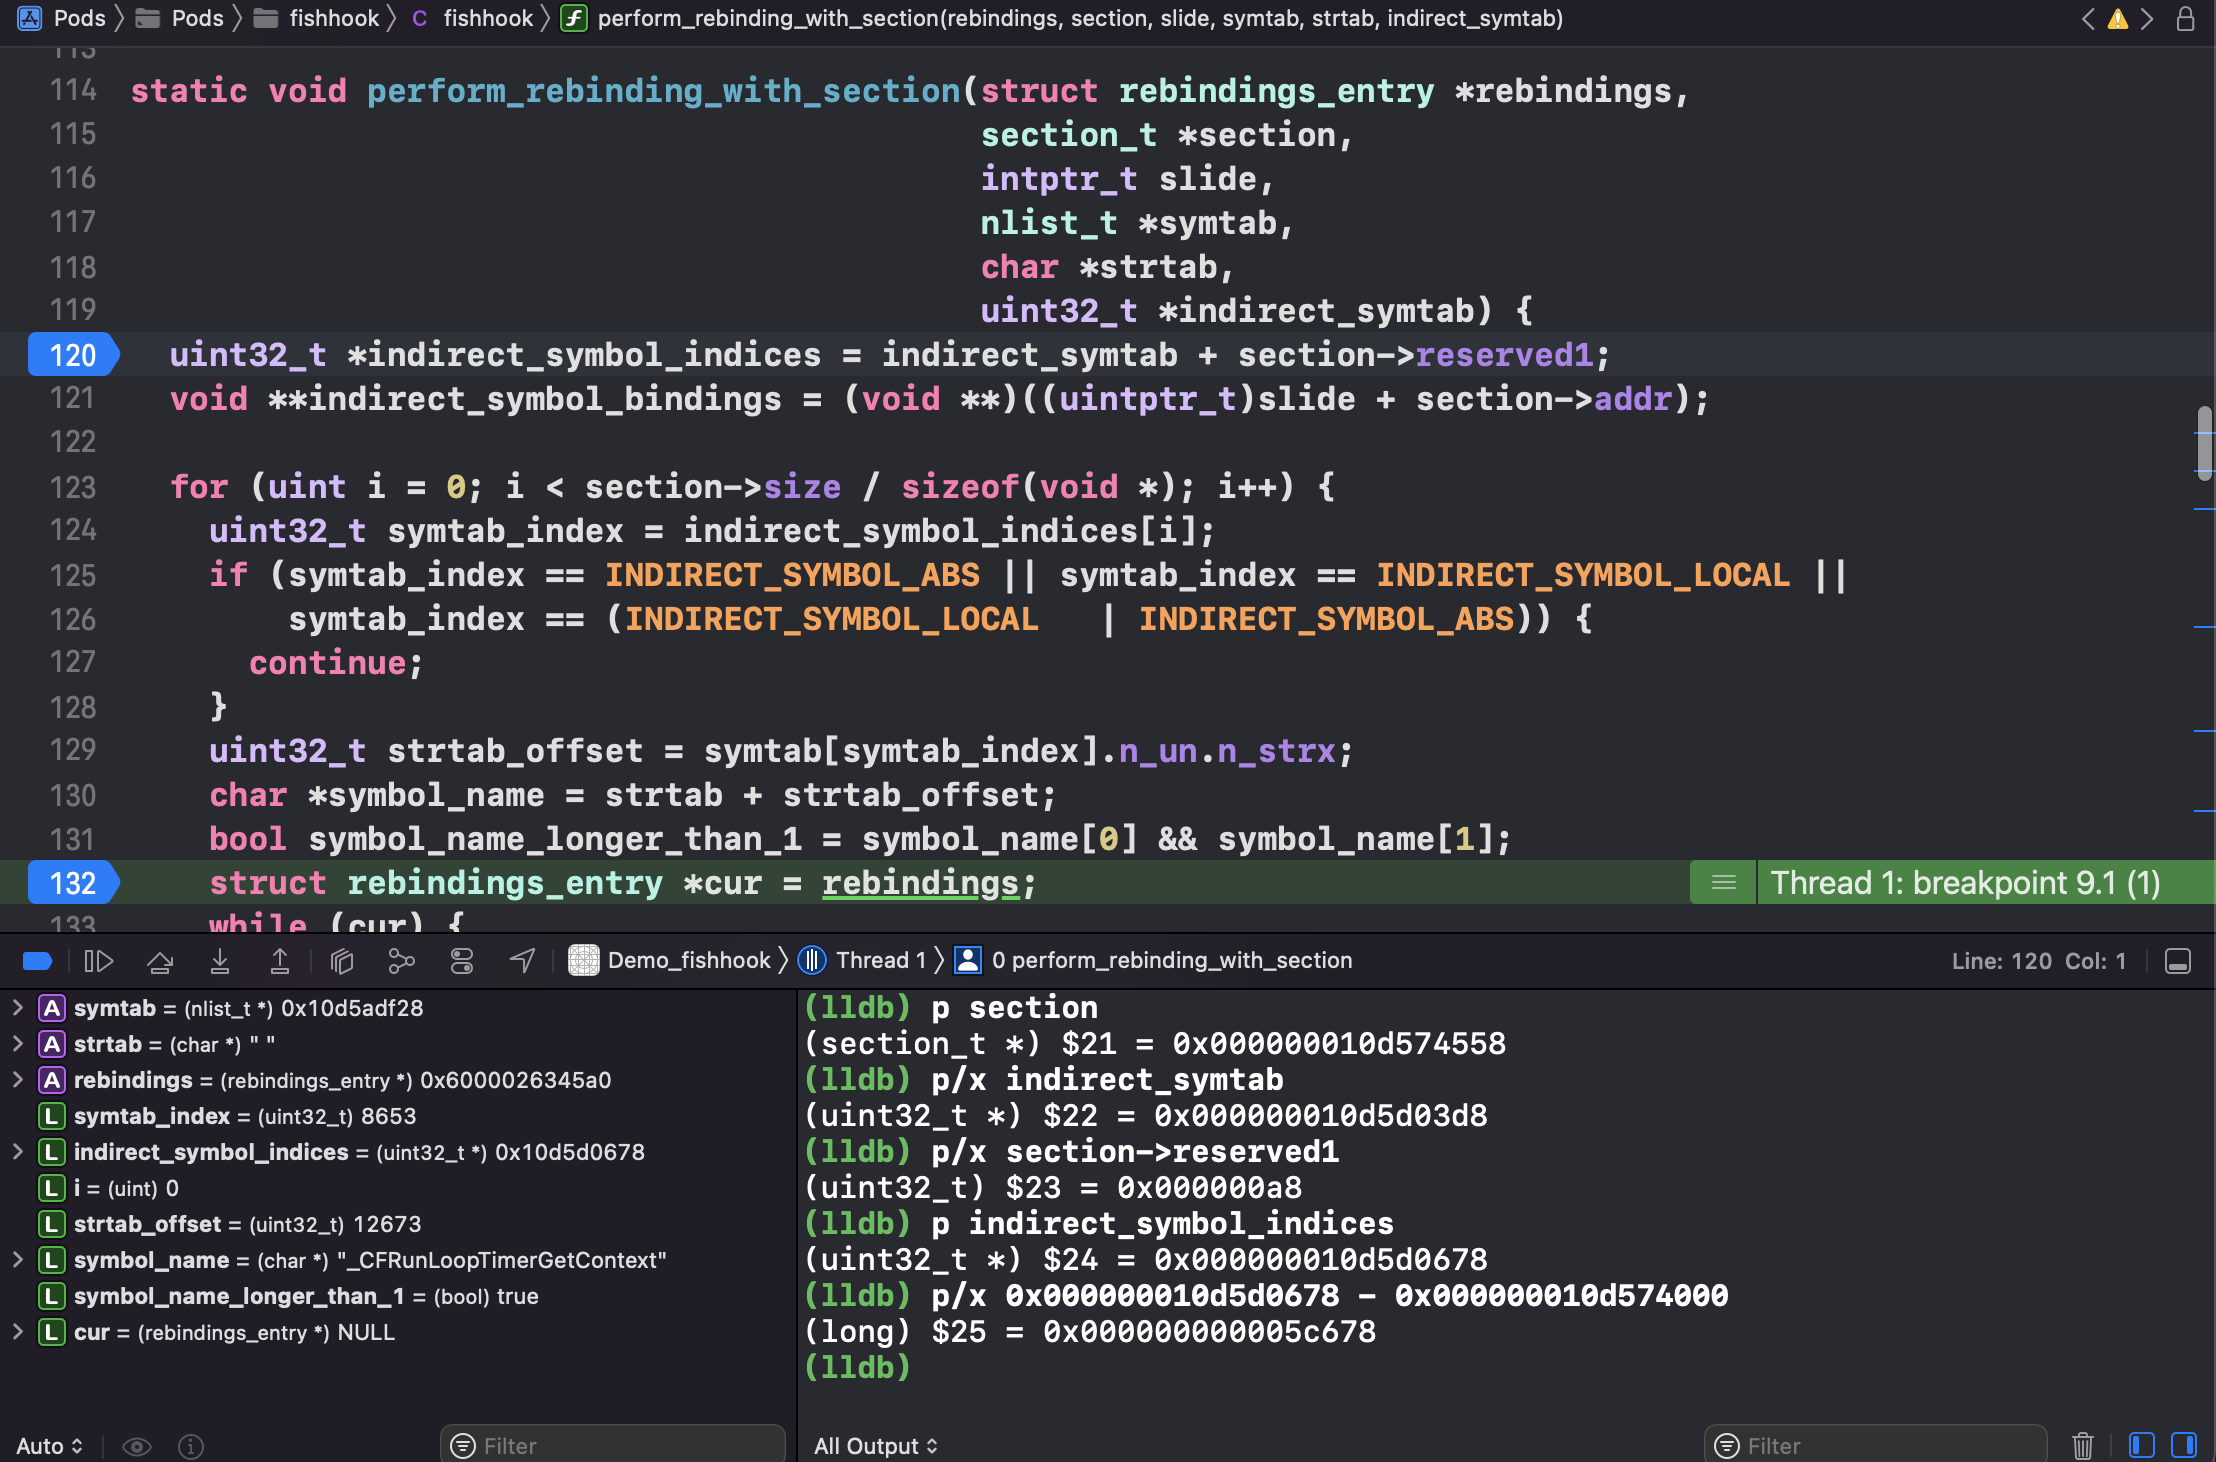
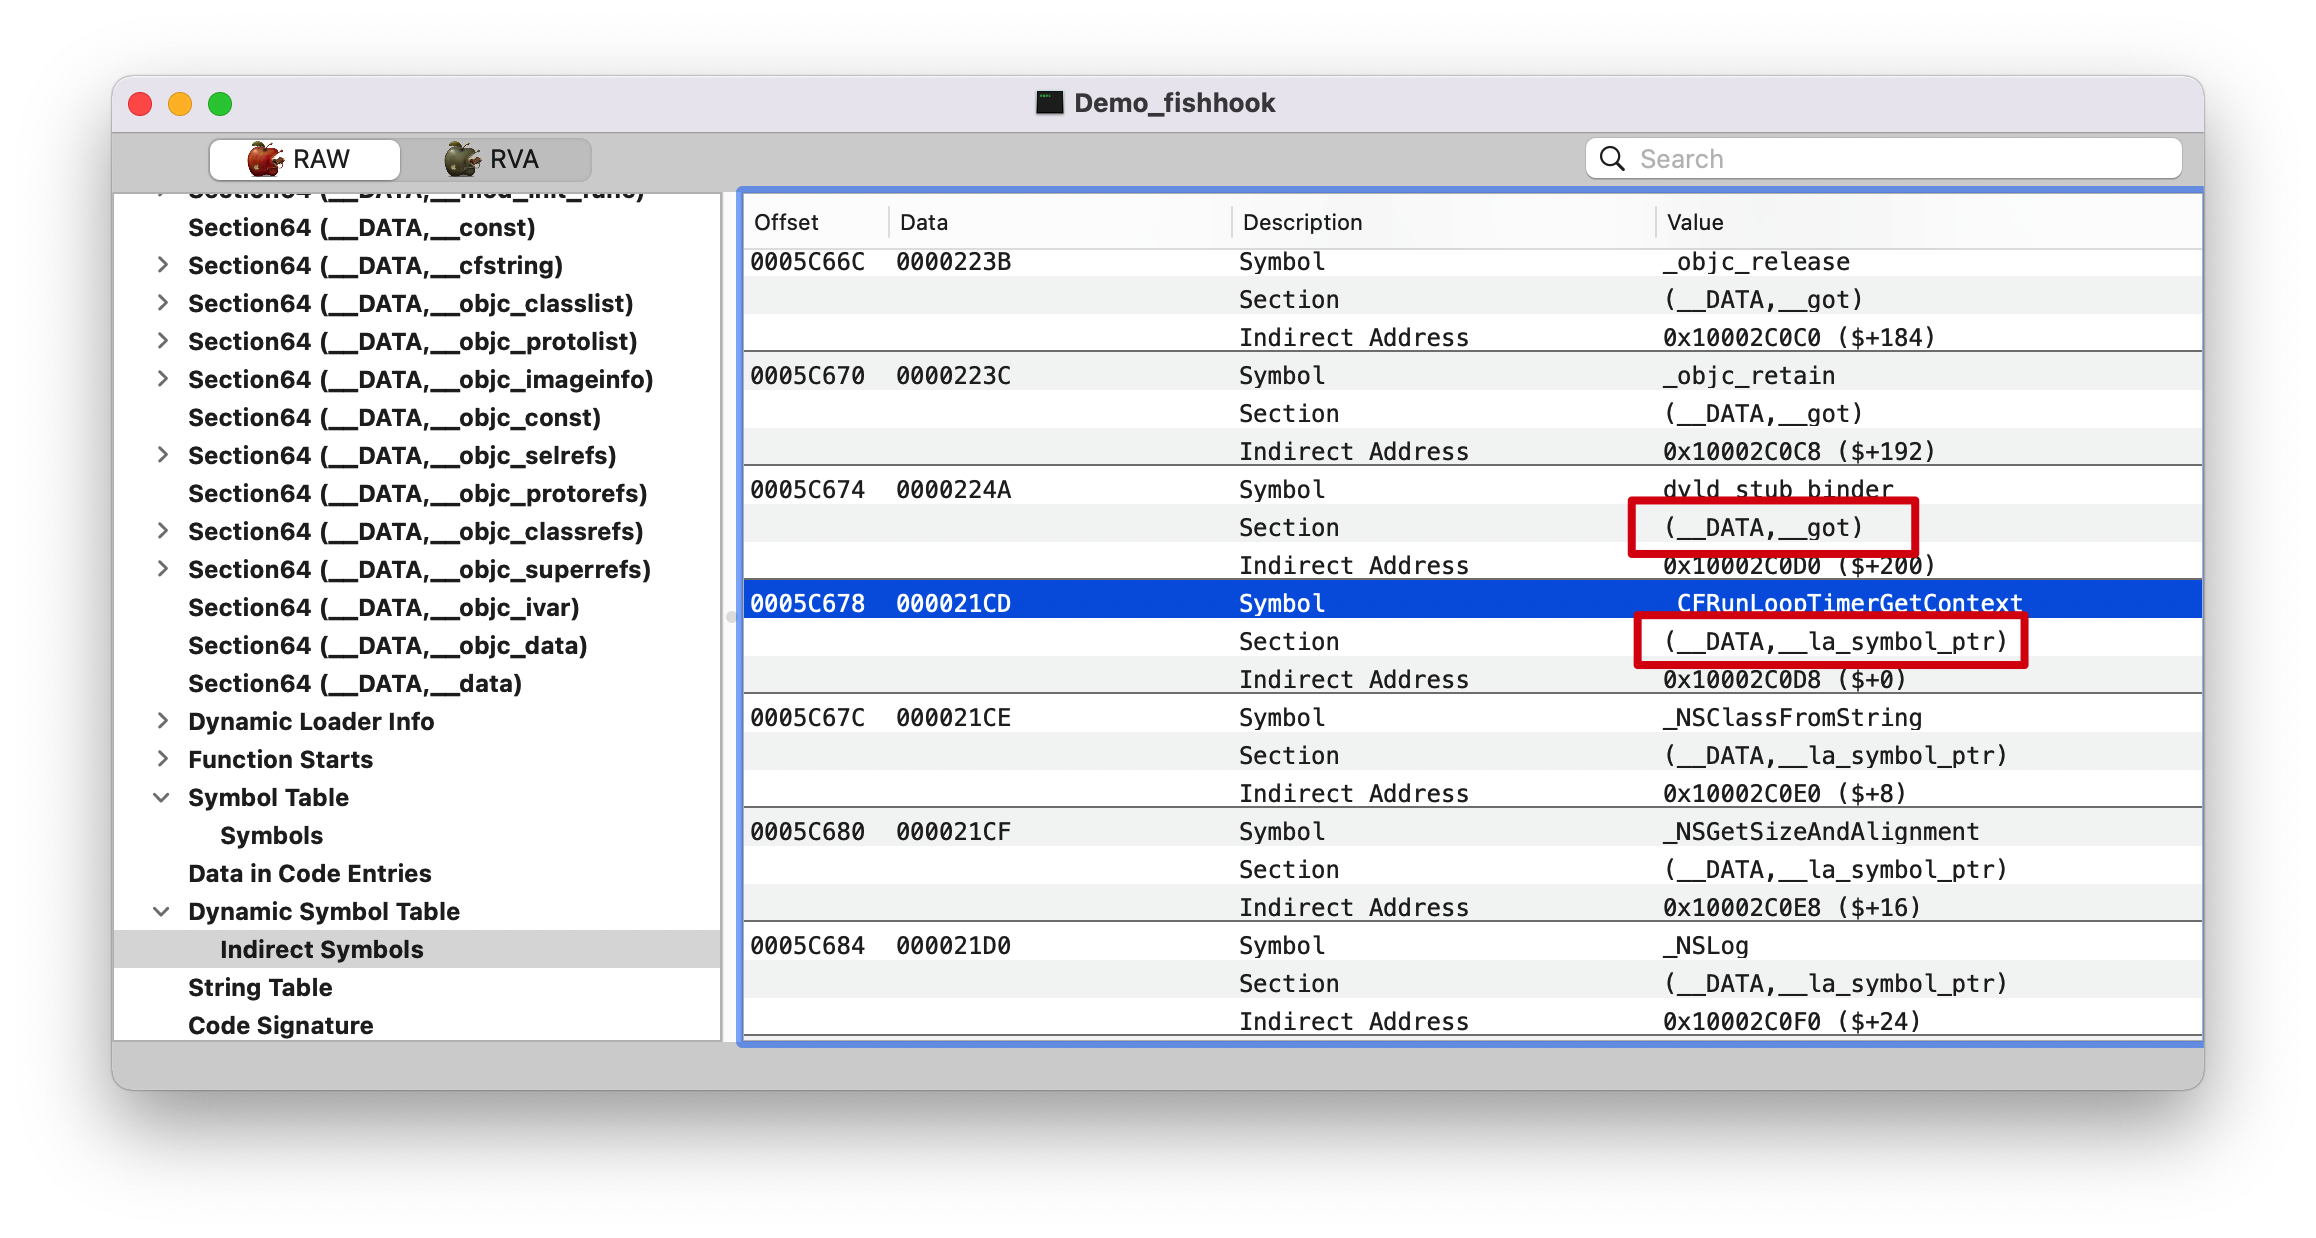
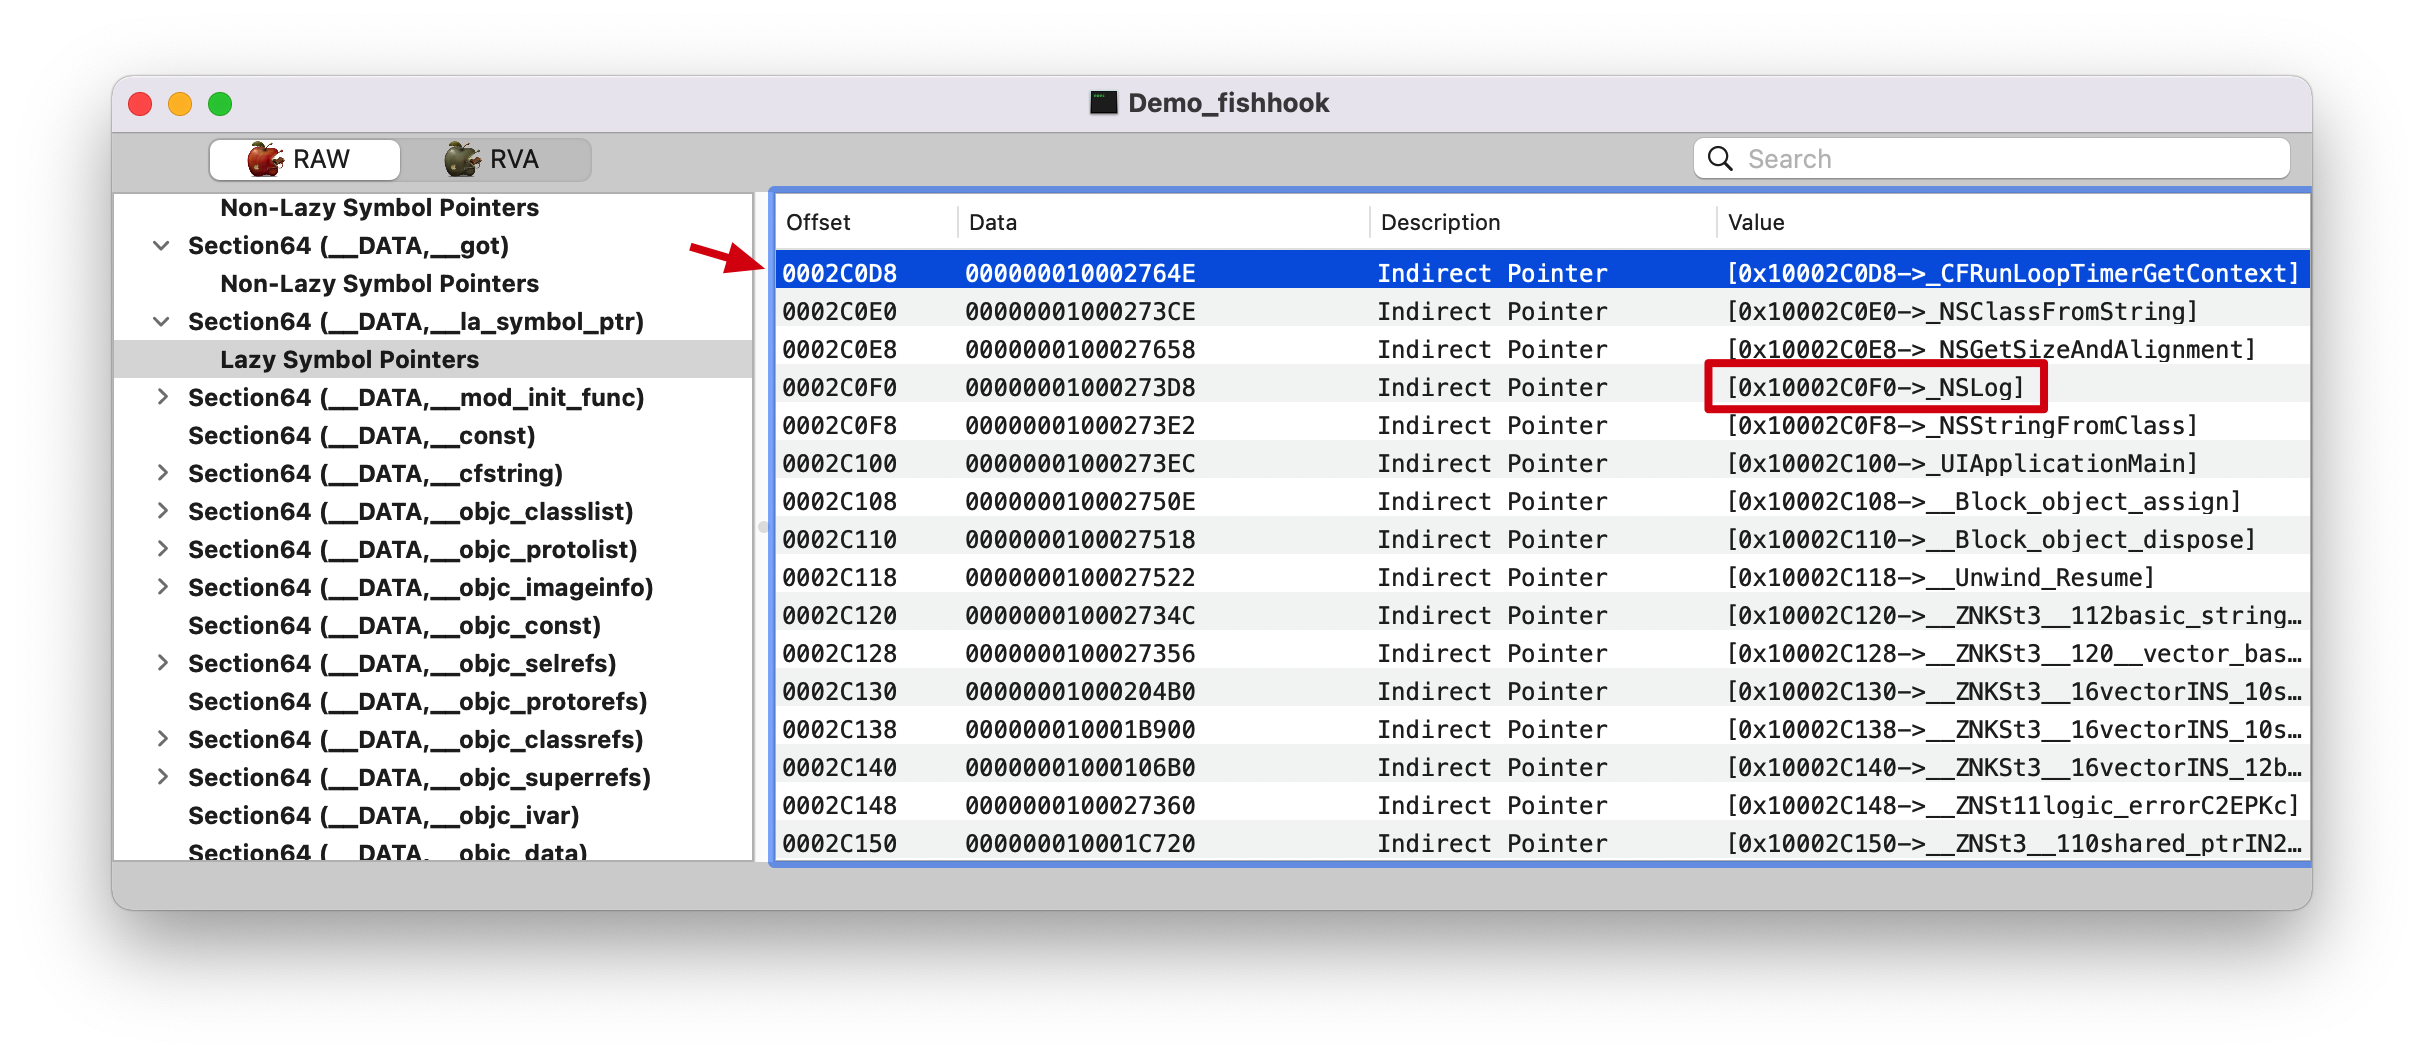
/**
* 1. Moved the vm protection modifying codes to here to reduce the
* changing scope.
* 2. Adding VM_PROT_WRITE mode unconditionally because vm_region
* API on some iOS/Mac reports mismatch vm protection attributes.
* -- Lianfu Hao Jun 16th, 2021
**/
err = vm_protect (mach_task_self (), (uintptr_t)indirect_symbol_bindings, section->size, 0, VM_PROT_READ | VM_PROT_WRITE | VM_PROT_COPY);
if (err == KERN_SUCCESS) {
/**
* Once we failed to change the vm protection, we
* MUST NOT continue the following write actions!
* iOS 15 has corrected the const segments prot.
* -- Lionfore Hao Jun 11th, 2021
**/
// 修改函数指向的地方
indirect_symbol_bindings[i] = cur->rebindings[j].replacement;
}
goto symbol_loop;
}
}
cur = cur->next;
}
symbol_loop:;
}
}

SECTION_TYPE

该 header(0x000000010d574000) 会过掉三个 section

  • 0x000000010d5744b8: __nl_symbol_ptr
  • 0x000000010d574508: __got
  • 0x000000010d574558: __la_symbol_ptr

Note: 这里纠正了我之前的一个问题,以为只会处理 __nl_symbol_ptr__la_symbol_ptr 这两个 section 的值,其实不是的,代码里面是判断的类型,而不是根据 Section 名字来的。

1
if ((sect->flags & SECTION_TYPE) == S_NON_LAZY_SYMBOL_POINTERS)

indirect_symtab

只处理 __la_symbol_ptr section.


0xa8=168, 还记得前面的截图
__DATA,__la_symbol_ptr Section
Dynamic Symbol Table
Dynamic Symbol Table 开始,第 168 个符号的 Offset 为 0x000000000005c678

从这里开始遍历,共遍历 141 个符号。
PS: 这里 MachOView 的 Dynamic Symbol Table 已经把符号都显示出来了(见 Symbol 那一行)。

symtab

1
2
(lldb) po symtab_index
8656

在符号表里面找第 8656 个符号。
PS: 这里是以 NSLog 来跟踪的。

strtab

1
2
(lldb) p/x 0x0005C8B0 + 0x000031C5
0x5FA75

0005C8B0 是前面 strtab 的起始地址。


如上图,即 0x5FA70: m, 开始数到 0x5FA75: _, 遇到 .(0x5FA7B) 就结束。这里的 Data 都是 ASCII 码来着,查看 asciitable

  • 6D: m
  • 0(00): .
  • 5F: _
  • 4E: N

代码具体地址

1
2
// 指向具体地址,Section64(__DATA, __la_symbol_ptr)
void **indirect_symbol_bindings = (void **)((uintptr_t)slide + section->addr);
1
2
3
4
5
6
7
8
(lldb) p/x slide
(intptr_t) $52 = 0x000000000d574000
(lldb) p/x section->addr
(uint64_t) $53 = 0x000000010002c0d8
(lldb) p indirect_symbol_bindings
(void **) $54 = 0x000000010d5a00d8
(lldb) p/x 0x000000010d5a00d8 - 0x000000010d574000
(long) $55 = 0x000000000002c0d8

1
2
3
4
(lldb) p 0x2c540 - 0x2c0d8
(int) $60 = 1128
(lldb) p 1128/8
(int) $61 = 141

0x2c540__DATA,__mod_init_func 的地址。
这里共 141 个数据,所以通过 Load Command 下面每个 Section Header 的描述信息可知该 Section 下面的符号大小和个数。

替换函数地址

1
2
3
4
(lldb) p &indirect_symbol_bindings[i]
(void **) $62 = 0x000000010d5a00f0
(lldb) p/x 0x000000010d5a00f0 - 0x000000010d574000
(long) $63 = 0x000000000002c0f0

就是上面截图 NSLog 符号在 Section64(__DATA, __la_symbol_ptr) 的值,因为 indirect_symbol_bindings 是二维指针数组,所以,这里需要进行取地址操作(&),所以这里替换 Section64(__DATA, __la_symbol_ptr)里面的具体地址值。

总结

  1. 通过注册系统回调 _dyld_register_func_for_add_image 获取每个 image 的虚拟内存起始地址和 ASLR 偏移
  2. 根据 image 的起始地址,加上 Header 的大小(Header 固定大小为 0x20),得出 SEG_LINKEDIT/LC_SYMTAB/LC_DYSYMTAB 这3个 Load Commands 的起始地址
  3. 遍历 Load Commands,拿到 __DATA segment 里面类型为 S_LAZY_SYMBOL_POINTERS/S_NON_LAZY_SYMBOL_POINTERS 的 section (包括 __DATA,__nl_symbol_ptr/__got/__la_symbol_ptr 三个) 的各项信息,包括段的位置,段的大小,段在 Dynamic Symbol Table 的起始索引 reserved1(也就是 MachOView 中的 Indirect Sym Index)
  4. Dynamic Symbol Table 遍历相关 Section(eg: Section64(__DATA, __la_symbol_ptr)) 的每个符号,然后找到符号在 LC_SYMTAB 的地址,从而得知该符号的名字
  5. 拿到该名字跟需要替换的符号做对比,如果对得上的话,进行替换,修改该 Section 下对应符号的指针指向

扩展

lldb - image

1
2
3
4
5
6
7
8
9
10
11
12
13
14
15
16
17
18
19
20
21
22
23
24
25
26
27
28
29
30
31
32
33
34
35
36
37
38
39
40
41
42
43
44
45
46
47
48
49
50
51
52
53
54
55
56
57
58
59
60
61
62
63
64
65
66
67
68
69
70
71
72
73
74
75
76
77
78
79
80
81
82
(lldb) image help
Commands for accessing information for one or more target modules.

Syntax: target modules <sub-command> ...

The following subcommands are supported:

add -- Add a new module to the current target's modules.
dump -- Commands for dumping information about one or more target
modules.
list -- List current executable and dependent shared library
images.
load -- Set the load addresses for one or more sections in a
target module.
lookup -- Look up information within executable and dependent
shared library images.
search-paths -- Commands for managing module search paths for a target.
show-unwind -- Show synthesized unwind instructions for a function.

(lldb) help image lookup
Look up information within executable and dependent shared library images.

Syntax: target modules lookup <cmd-options> [<filename> [<filename> [...]]]

Command Options Usage:
target modules lookup [-Av] -a <address-expression> [-o <offset>] [<filename> [<filename> [...]]]
target modules lookup [-Arv] -s <symbol> [<filename> [<filename> [...]]]
target modules lookup [-Aiv] -f <filename> [-l <linenum>] [<filename> [<filename> [...]]]
target modules lookup [-Airv] -F <function-name> [<filename> [<filename> [...]]]
target modules lookup [-Airv] -n <function-or-symbol> [<filename> [<filename> [...]]]
target modules lookup [-Av] -t <name> [<filename> [<filename> [...]]]

-A ( --all )
Print all matches, not just the best match, if a best match is
available.

-F <function-name> ( --function <function-name> )
Lookup a function by name in the debug symbols in one or more
target modules.

-a <address-expression> ( --address <address-expression> )
Lookup an address in one or more target modules.

-f <filename> ( --file <filename> )
Lookup a file by fullpath or basename in one or more target
modules.

-i ( --no-inlines )
Ignore inline entries (must be used in conjunction with --file or
--function).

-l <linenum> ( --line <linenum> )
Lookup a line number in a file (must be used in conjunction with
--file).

-n <function-or-symbol> ( --name <function-or-symbol> )
Lookup a function or symbol by name in one or more target modules.

-o <offset> ( --offset <offset> )
When looking up an address subtract <offset> from any addresses
before doing the lookup.

-r ( --regex )
The <name> argument for name lookups are regular expressions.

-s <symbol> ( --symbol <symbol> )
Lookup a symbol by name in the symbol tables in one or more target
modules.

-t <name> ( --type <name> )
Lookup a type by name in the debug symbols in one or more target
modules.

-v ( --verbose )
Enable verbose lookup information.

This command takes options and free-form arguments. If your arguments
resemble option specifiers (i.e., they start with a - or --), you must use
' -- ' between the end of the command options and the beginning of the
arguments.

'image' is an abbreviation for 'target modules'
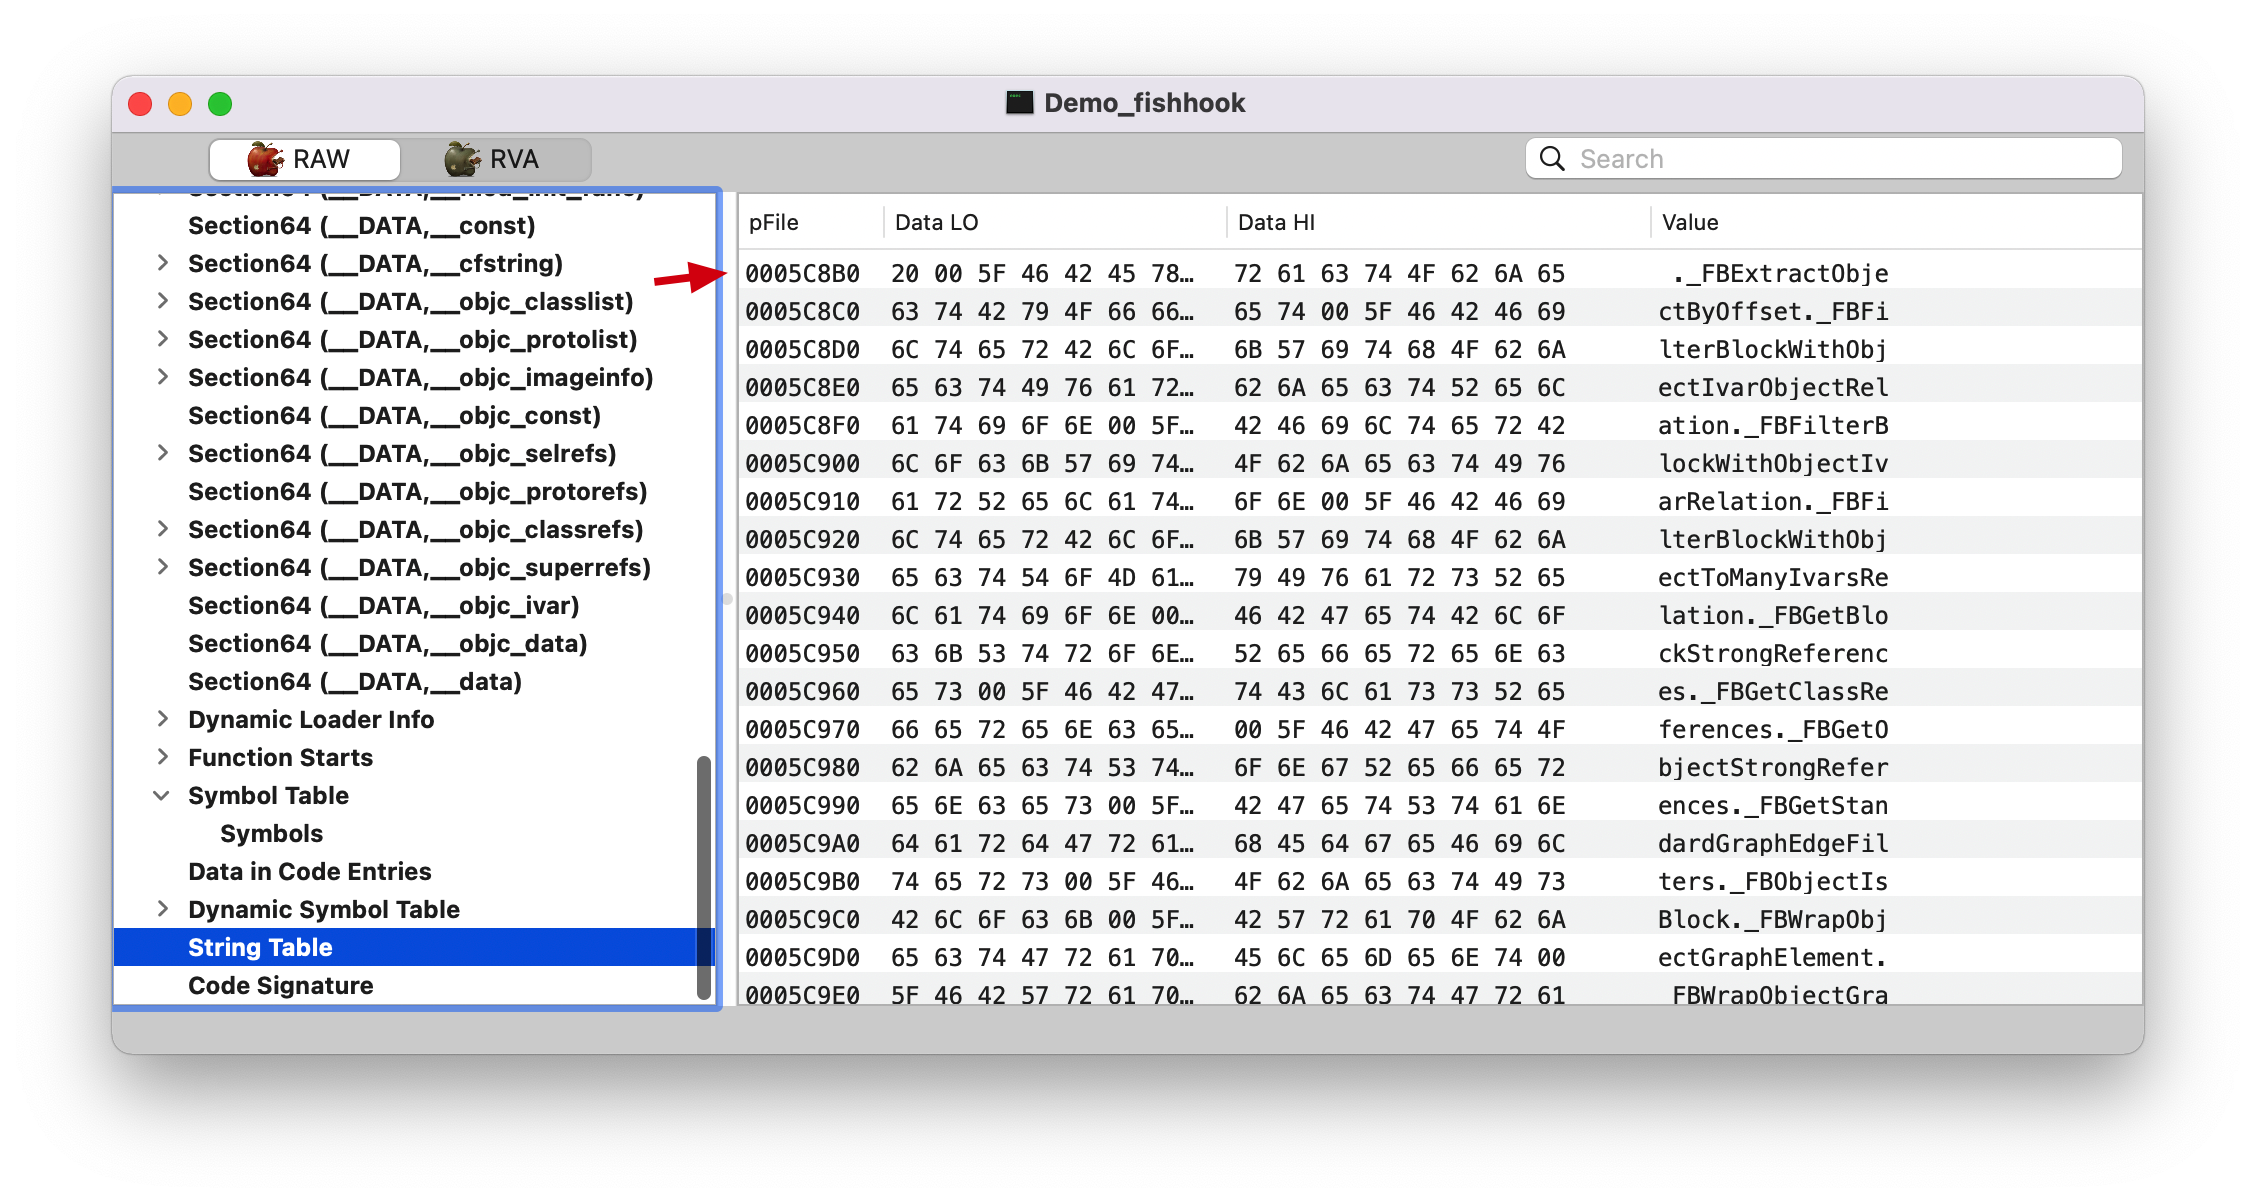
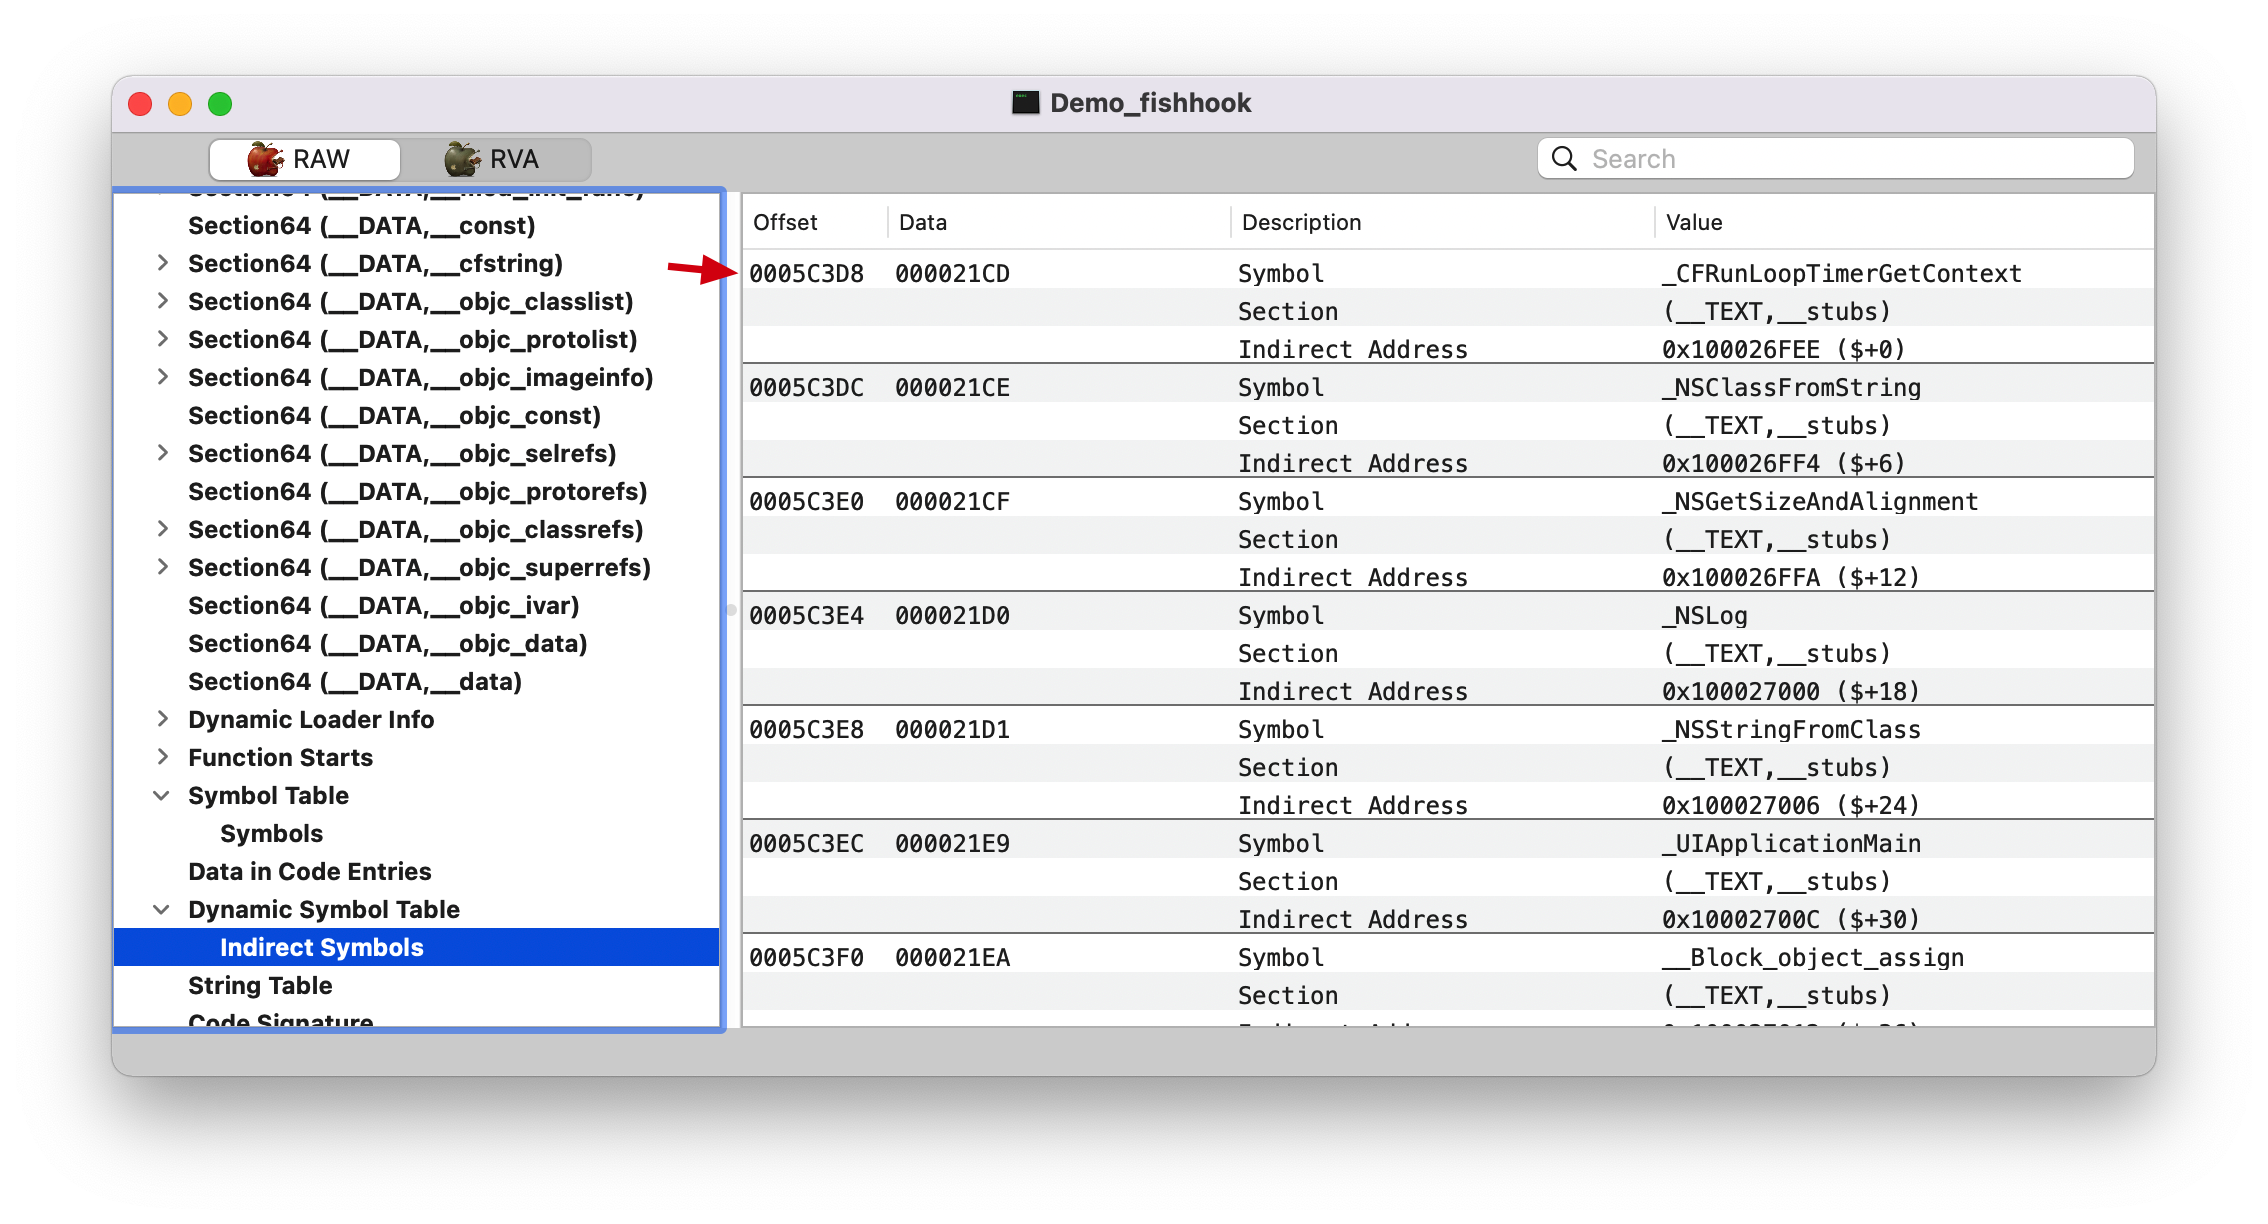
比如

  1. image list: 输出当前进程所依赖的共享库
  2. image list -o -f: 上个命令简洁版,输出相关库的 ASLR 地址(o: offset)
  3. image lookup -n xxx: 输出 xxx 符号的相关信息
  4. image lookup -t xxx: 输出 xxx 符号的类型
1
2
3
4
5
6
7
8
9
10
11
12
13
14
15
16
17
18
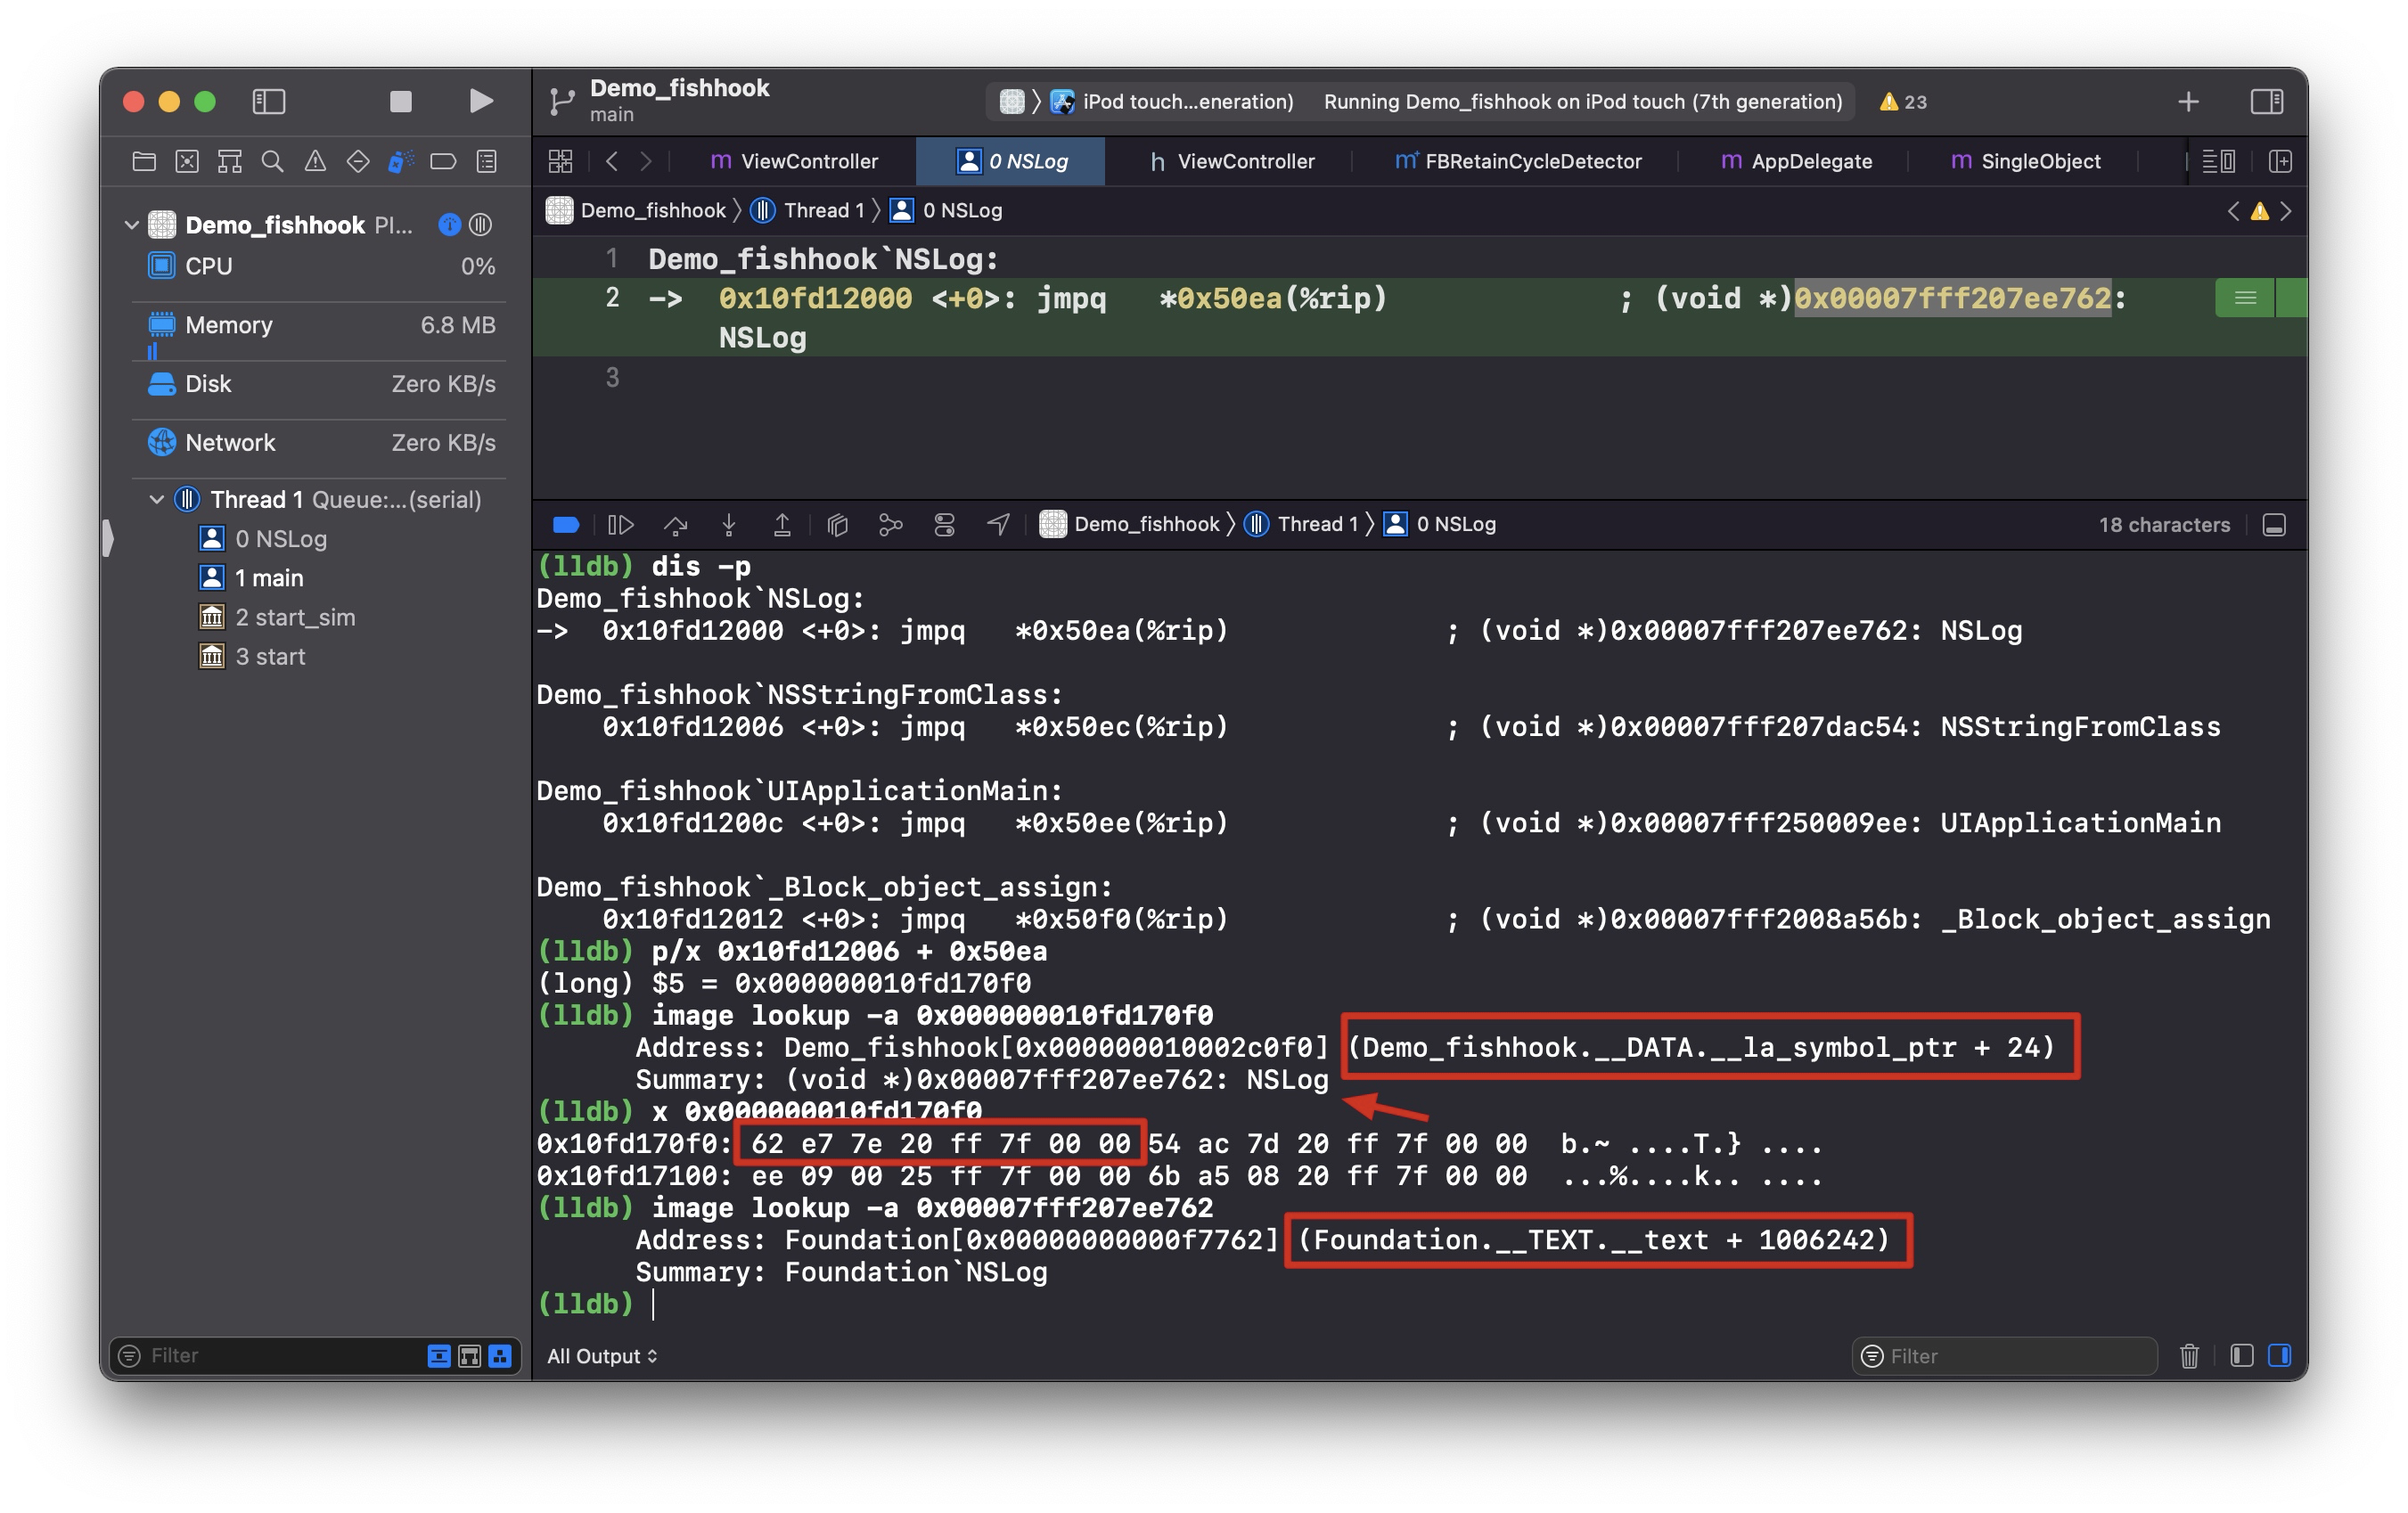
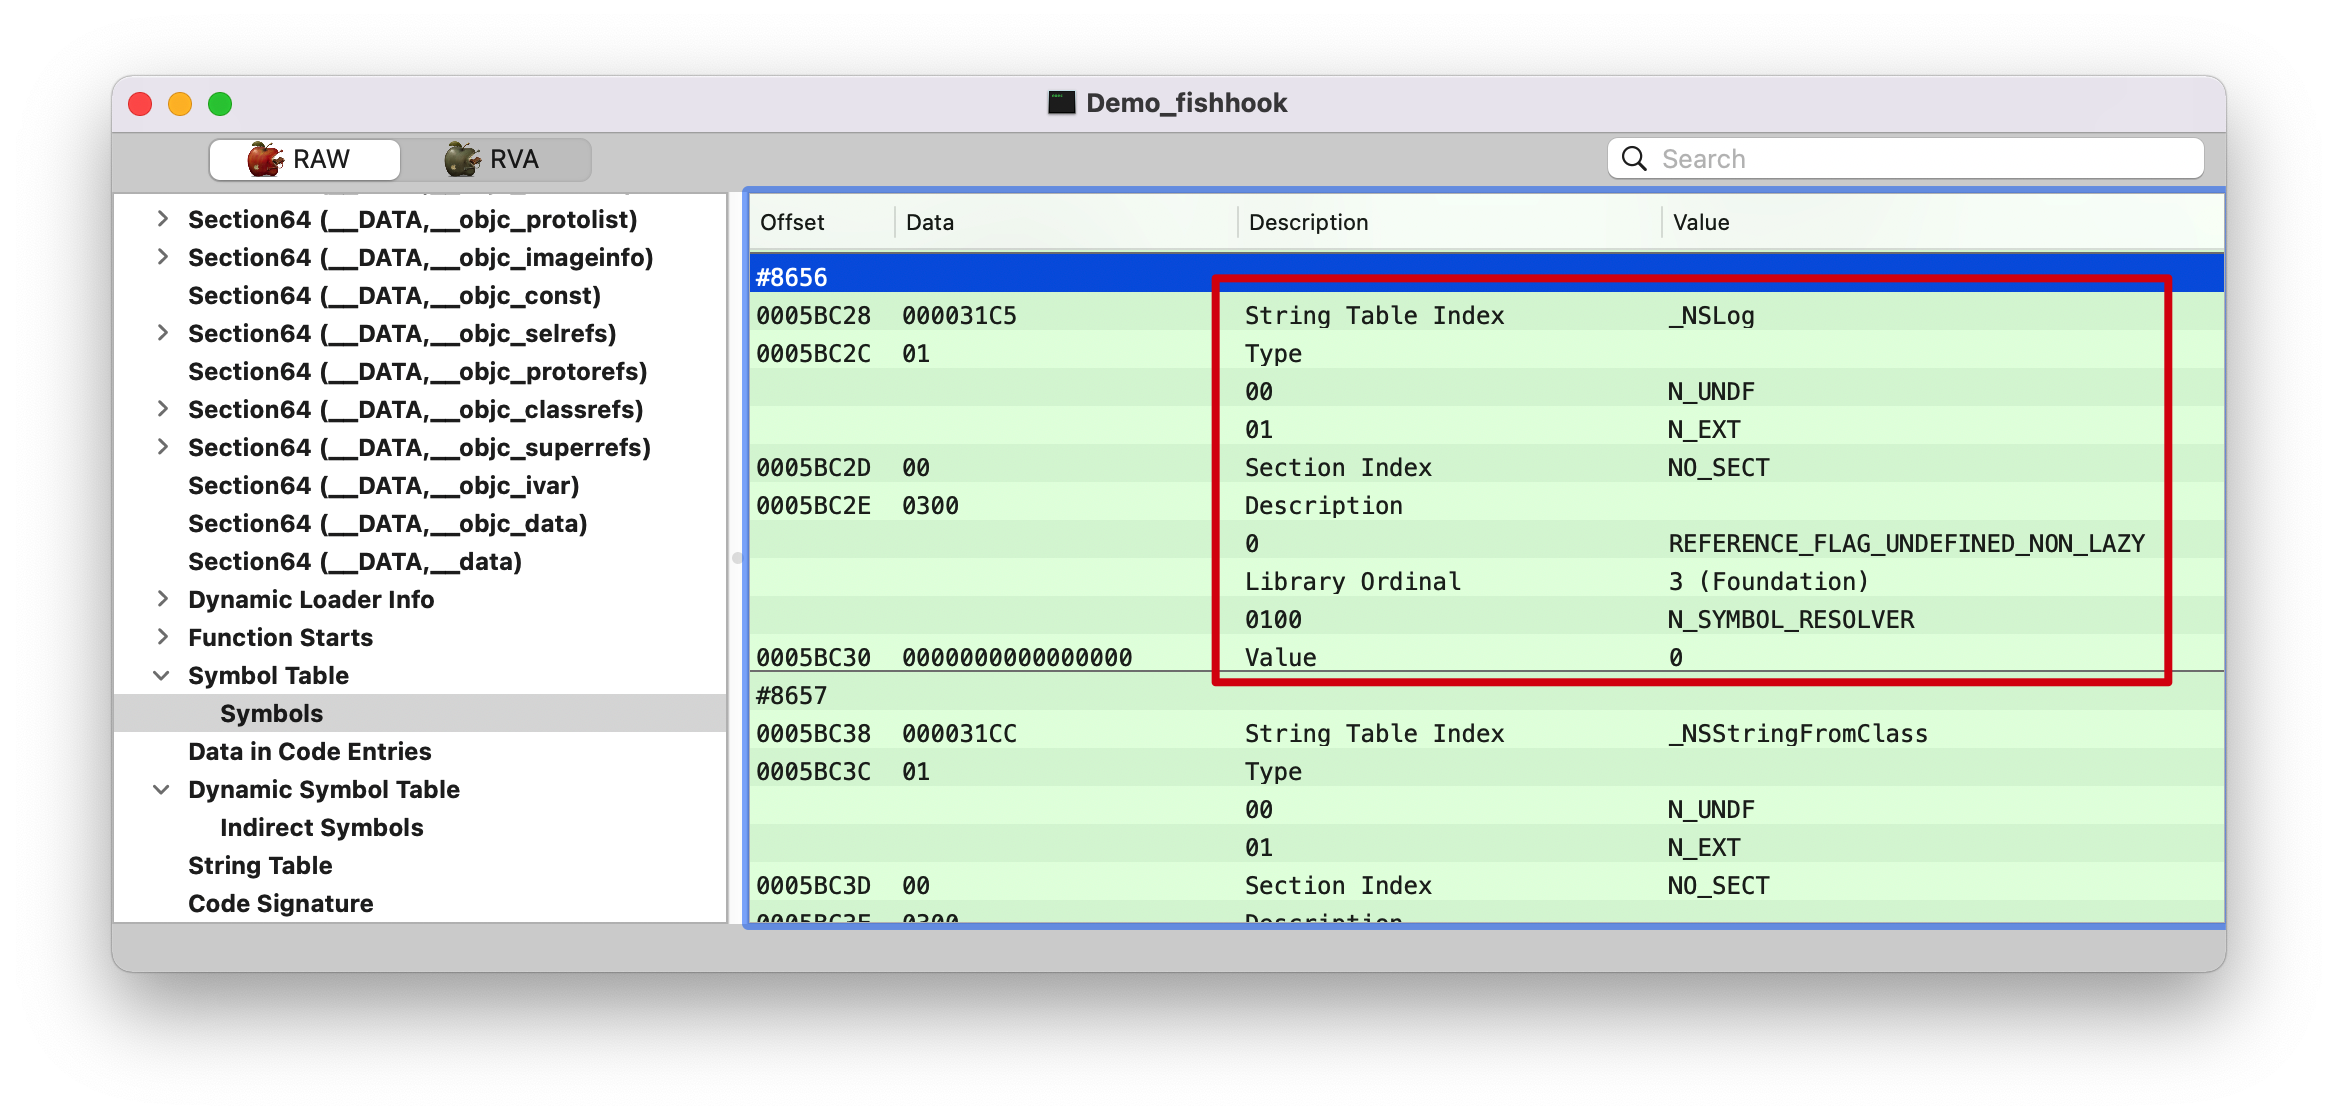
(lldb) image lookup -n NSLog
1 match found in /Applications/Xcode.app/Contents/Developer/Platforms/iPhoneOS.platform/Library/Developer/CoreSimulator/Profiles/Runtimes/iOS.simruntime/Contents/Resources/RuntimeRoot/System/Library/Frameworks/Foundation.framework/Foundation:
Address: Foundation[0x00000000000f7762] (Foundation.__TEXT.__text + 1006242)
Summary: Foundation`NSLog

(lldb) image lookup -t FBBlockStrongRelationDetector
0 match found in /Users/joakim/Library/Developer/Xcode/DerivedData/Demo_fishhook-ebwkhxbcogafxbclcdeifrppsgdu/Build/Products/Debug-iphonesimulator/Demo_fishhook.app/Demo_fishhook:
id = {0x00071c41}, name = "FBBlockStrongRelationDetector", byte-size = 176, decl = FBBlockStrongRelationDetector.h:23, compiler_type = "@interface FBBlockStrongRelationDetector : NSObject{
void * forwarding;
int flags;
int size;
void (*)(_block_byref_block *, _block_byref_block *) byref_keep;
void (*)(_block_byref_block *) byref_dispose;
void *[16] captured;
BOOL _strong;
}
@property(nonatomic, assign, readwrite, getter = isStrong, setter = setStrong:) BOOL strong;
@end"

antifishhook

从前面可知 fishhook 的原理就是修改相关 Section __DATA,__nl_symbol_ptr/__got/__la_symbol_ptr 下对应符号的指向。
Q: 那怎么防止 fishhook 呢?
A: 那在改回去呗,找到最初始的符号指向,即

然后通过 fishhook 再替换一波,使得调用 NSLog 的时候走 __stub_helper 的逻辑。
具体实现可参考 AntiHook,代码是用 Swift 实现的,值得一看。

参考链接

1. 概述

使用下面 demo 来探究 main 函数干了啥。

1
2
3
4
5
6
7
8
9
10
11
12
13
14
15
16
17
18
19
20
21
void main() {
// 见 [2.1]
runApp(
materialApp(),
);
}

class MyApp extends StatefulWidget {
@override
_MyAppState createState() => _MyAppState();
}

class _MyAppState extends State<MyApp> {
Widget build(BuildContext context) {
return Container();
/*
// 因为 MaterialApp 里面的逻辑比较多,所以直接上 Container.
return MaterialApp(home: Container(),);
*/
}
}

2. 启动流程

调试堆栈如下

-w1247

2.1 runApp

1
2
3
4
5
6
// scr/widgets/binding.dart
void runApp(Widget app) {
WidgetsFlutterBinding.ensureInitialized() // 见 [2.2]
..scheduleAttachRootWidget(app) // 见 [2.4]
..scheduleWarmUpFrame(); // 见 [2.10]
}

2.2 ensureInitialized

1
2
3
4
5
6
7
8
9
10
11
// scr/widgets/binding.dart
/// A concrete binding for applications based on the Widgets framework.
///
/// This is the glue that binds the framework to the Flutter engine.
class WidgetsFlutterBinding extends BindingBase with GestureBinding, SchedulerBinding, ServicesBinding, PaintingBinding, SemanticsBinding, RendererBinding, WidgetsBinding {
static WidgetsBinding ensureInitialized() {
if (WidgetsBinding.instance == null)
WidgetsFlutterBinding(); // 见 [2.2.1]
return WidgetsBinding.instance;
}
}

2.2.1 BindingBase 初始化

1
2
3
4
5
6
7
8
BindingBase() {
// 见 [2.3]
initInstances();
// ...

initServiceExtensions();
// ...
}

2.3 initInstances

initInstances 方法的调用顺序是从右到左的,即

  1. WidgetsBinding: The glue between the widgets layer and the Flutter engine.
  2. RendererBinding: The glue between the render tree and the Flutter engine.
  3. SemanticsBinding: The glue between the semantics layer and the Flutter engine.
  4. PaintingBinding: Binding for the painting library.
  5. ServicesBinding: Listens for platform messages and directs them to the [defaultBinaryMessenger].
  6. SchedulerBinding: Scheduler for running the following: xxx.
  7. GestureBinding: A binding for the gesture subsystem.

按照上面的顺序执行完 initInstances 中的 super.initInstances(), 再按照上面的逆序执行各个 BindinginitInstances 中剩余逻辑,然后执行 initServiceExtensions

2.3.1 GestureBinding

1
2
3
4
5
6
7
// scr/gestures/binding.dart
void initInstances() {
super.initInstances();
_instance = this;
// 设置 window 的 `onPointerDataPacket` 回调方法,在该回调方法中处理手势等交互逻辑。
window.onPointerDataPacket = _handlePointerDataPacket;
}

2.3.2 SchedulerBinding

1
2
3
4
5
6
7
8
9
10
11
12
13
14
15
16
// scr/scheduler/binding.dart
void initInstances() {
super.initInstances();
_instance = this;

// 非 `kReleaseMode` 模式下,添加 `addTimingsCallback` 回调,用来记录 frame 等相关信息。
if (!kReleaseMode) {
int frameNumber = 0;
addTimingsCallback((List<FrameTiming> timings) {
for (final FrameTiming frameTiming in timings) {
frameNumber += 1;
_profileFramePostEvent(frameNumber, frameTiming);
}
});
}
}

2.3.3 ServicesBinding

1
2
3
4
5
6
7
8
9
10
11
12
// scr/services/binding.dart
void initInstances() {
super.initInstances();
_instance = this;
_defaultBinaryMessenger = createBinaryMessenger();
_restorationManager = createRestorationManager();
window.onPlatformMessage = defaultBinaryMessenger.handlePlatformMessage;
initLicenses();
SystemChannels.system.setMessageHandler((dynamic message) => handleSystemMessage(message as Object));
SystemChannels.lifecycle.setMessageHandler(_handleLifecycleMessage);
readInitialLifecycleStateFromNativeWindow();
}

创建 _defaultBinaryMessenger,用来处理 platform channel 消息,iOS Flutter Platform Channel 有讲到。

2.3.4 PaintingBinding

1
2
3
4
5
6
7
8
// scr/painting/binding.dart
void initInstances() {
super.initInstances();
_instance = this;
// 创建 image chache.
_imageCache = createImageCache();
shaderWarmUp?.execute();
}

2.3.5 SemanticsBinding

1
2
3
4
5
6
7
// scr/semantics/binding.dart
void initInstances() {
super.initInstances();
_instance = this;
// 给 _accessibilityFeatures 赋值
_accessibilityFeatures = window.accessibilityFeatures;
}

2.3.6 RendererBinding

1
2
3
4
5
6
7
8
9
10
11
12
13
14
15
16
17
18
19
20
21
22
23
24
25
// scr/rendering/binding.dart
void initInstances() {
super.initInstances();
_instance = this;
// 见 [2.3.6.1]
_pipelineOwner = PipelineOwner(
onNeedVisualUpdate: ensureVisualUpdate,
onSemanticsOwnerCreated: _handleSemanticsOwnerCreated,
onSemanticsOwnerDisposed: _handleSemanticsOwnerDisposed,
);
// 设置 window 的相关回调
window
..onMetricsChanged = handleMetricsChanged
..onTextScaleFactorChanged = handleTextScaleFactorChanged
..onPlatformBrightnessChanged = handlePlatformBrightnessChanged
..onSemanticsEnabledChanged = _handleSemanticsEnabledChanged
..onSemanticsAction = _handleSemanticsAction;
// 见 [2.3.6.2]
initRenderView();
_handleSemanticsEnabledChanged();
assert(renderView != null);
// 添加 addPersistentFrameCallback 回调
addPersistentFrameCallback(_handlePersistentFrameCallback);
initMouseTracker();
}

2.3.6.1 PipelineOwner 初始化

1
2
3
4
5
6
7
8
// The pipeline owner manages the rendering pipeline.
class PipelineOwner {
PipelineOwner({
this.onNeedVisualUpdate,
this.onSemanticsOwnerCreated,
this.onSemanticsOwnerDisposed,
});
}

用来管理 rendering pipeline 的类,在 rendering pipeline 过程中,会按序执行以下方法(这几个阶段的操作对象都是 render objects)

  1. flushLayout
  2. flushCompositingBits
  3. flushPaint
  4. flushSemantics

2.3.6.2 initRenderView

1
2
3
4
5
6
7
8
9
10
11
void initRenderView() {
assert(!_debugIsRenderViewInitialized);
assert(() {
_debugIsRenderViewInitialized = true;
return true;
}());
// 创建 RenderView 对象,并赋值给 renderView, 见 [2.3.6.3]
renderView = RenderView(configuration: createViewConfiguration(), window: window);
// 准备首帧
renderView.prepareInitialFrame();
}

2.3.6.3 set renderView

1
2
3
4
5
6
7
8
// The root of the render tree.
class RenderView extends RenderObject with RenderObjectWithChildMixin<RenderBox> {
set renderView(RenderView value) {
assert(value != null);
// 见 [2.3.6.4]
_pipelineOwner.rootNode = value;
}
}

2.3.6.4 set rootNode

1
2
3
4
5
6
7
8
9
10
11
12
13
14
15
16
17
18
19
20
21
22
23
24
25
class PipelineOwner {
set rootNode(AbstractNode? value) {
if (_rootNode == value)
return;
_rootNode?.detach();
_rootNode = value;
_rootNode?.attach(this);
}
}

class AbstractNode {
@mustCallSuper
void detach() {
assert(_owner != null);
_owner = null;
assert(parent == null || attached == parent!.attached);
}

@mustCallSuper
void attach(covariant Object owner) {
assert(owner != null);
assert(_owner == null);
_owner = owner;
}
}

_owner 和 _rootNode 的赋值。

  • 将 RenderView 对象赋值给 _pipelineOwner 的 rootNode 成员变量
  • 将 _pipelineOwner 赋值给 RenderView 对象的 _owner 成员变量

2.3.7 WidgetsBinding

1
2
3
4
5
6
7
8
9
10
11
12
13
14
// scr/widgets/binding.dart
void initInstances() {
super.initInstances();
_instance = this;
// Initialization of [_buildOwner] has to be done after
// [super.initInstances] is called, as it requires [ServicesBinding] to
// properly setup the [defaultBinaryMessenger] instance.
_buildOwner = BuildOwner(); // 见 [2.3.7.1]
buildOwner.onBuildScheduled = _handleBuildScheduled;
window.onLocaleChanged = handleLocaleChanged;
window.onAccessibilityFeaturesChanged = handleAccessibilityFeaturesChanged;
SystemChannels.navigation.setMethodCallHandler(_handleNavigationInvocation);
FlutterErrorDetails.propertiesTransformers.add(transformDebugCreator);
}

2.3.7.1 BuildOwner 初始化

1
2
3
4
5
// scr/widgets/framework.dart
/// Manager class for the widgets framework.
class BuildOwner {
BuildOwner({ this.onBuildScheduled });
}

2.4 scheduleAttachRootWidget

1
2
3
4
5
6
7
void scheduleAttachRootWidget(Widget rootWidget) {
// 异步执行
Timer.run(() {
// 见 [2.4.1]
attachRootWidget(rootWidget);
});
}

2.4.1 attachRootWidget

1
2
3
4
5
6
7
8
9
void attachRootWidget(Widget rootWidget) {
_readyToProduceFrames = true;
// 见 [2.4.2]
_renderViewElement = RenderObjectToWidgetAdapter<RenderBox>(
container: renderView,
debugShortDescription: '[root]', // debug 描述信息
child: rootWidget,
).attachToRenderTree(buildOwner, renderViewElement as RenderObjectToWidgetElement<RenderBox>); // 见 [2.5]
}

该方法的主要参数

  • renderView: 见 [2.3.6.2]
  • rootWidget: 见 [1] 中的 demo, materialApp widget, 就是我们的 root widget
  • buildOwner: 见 [2.3.7.1]
  • _renderViewElement: 执行 attachToRenderTree 方法后,返回的 Element 类型的对象,可通过 WidgetsBinding.renderViewElement 获取,是 Element tree 的根节点(通过注释 The [Element] that is at the root of the hierarchy (and which wraps the [RenderView] object at the root of the rendering hierarchy).)。

2.4.2 RenderObjectToWidgetAdapter 初始化

1
2
3
4
5
6
7
8
// A bridge from a [RenderObject] to an [Element] tree.
class RenderObjectToWidgetAdapter<T extends RenderObject> extends RenderObjectWidget {
RenderObjectToWidgetAdapter({
this.child, // widget tree 中的对象
this.container, // The [RenderObject] that is the parent of the [Element] created by this widget.
this.debugShortDescription,
}) : super(key: GlobalObjectKey(container));
}

RenderObjectToWidgetAdapter 是一个从 [RenderObject](root of render tree) 到 [Element](root of element tree) 的桥接类,该类的主要方法有

  • createElement: 返回 RenderObjectToWidgetElement 对象, 见 [2.5.1]
  • createRenderObject: 返回 [2.3.6.2] 的 renderView, 见 [2.7]
  • attachToRenderTree: 创建 element, 见 [2.5]

2.5 attachToRenderTree

1
2
3
4
5
6
7
8
9
10
11
12
13
14
15
16
17
18
19
20
21
RenderObjectToWidgetElement<T> attachToRenderTree(BuildOwner owner, [ RenderObjectToWidgetElement<T> element ]) {
if (element == null) {
owner.lockState(() {
// 见 [2.5.1]
element = createElement();
assert(element != null);
// 见 [2.5.2]
element.assignOwner(owner);
});
// 见 [2.5.3]
owner.buildScope(element, () {
// 见 [2.5.4]
element.mount(null, null);
});
SchedulerBinding.instance.ensureVisualUpdate();
} else {
element._newWidget = this;
element.markNeedsBuild();
}
return element;
}

首次调用 attachToRenderTree 方法时,入参 element 为空,会创建 element 对象(RenderObjectToWidgetElement 类型),然后赋值给 [2.4.1] 的 _renderViewElement 成员变量。

2.5.1 createElement

1
2
3
4
5
6
7
RenderObjectToWidgetAdapter({
this.child,
this.container,
this.debugShortDescription,
}) : super(key: GlobalObjectKey(container));

RenderObjectToWidgetElement<T> createElement() => RenderObjectToWidgetElement<T>(this);

返回 RenderObjectToWidgetElement 类型的对象。

2.5.2 assignOwner

1
2
3
4
5
6
// The element at the root of the tree.
abstract class RootRenderObjectElement extends RenderObjectElement {
void assignOwner(BuildOwner owner) {
_owner = owner;
}
}

跟 [2.3.6.4] 类似,都是将 _pipelineOwner 赋值给 _owner 成员变量,_pipelineOwner 不亏是一个管理类。

2.5.3 buildScope

1
2
3
4
5
6
7
8
9
10
11
12
13
14
15
16
17
18
19
20
21
22
23
24
25
26
27
28
29
30
31
32
33
34
35
36
37
38
39
40
41
42
43
void buildScope(Element context, [ VoidCallback callback ]) {
if (callback == null && _dirtyElements.isEmpty)
return;
// ...
Timeline.startSync('Build', arguments: timelineArgumentsIndicatingLandmarkEvent);
try {
_scheduledFlushDirtyElements = true;
if (callback != null) {
// ...
_dirtyElementsNeedsResorting = false;
try {
callback(); // 见 [2.5.4]
} finally {
// ...
}
}
// 对脏 elements 进行排序
_dirtyElements.sort(Element._sort);
_dirtyElementsNeedsResorting = false;
int dirtyCount = _dirtyElements.length;
int index = 0;
while (index < dirtyCount) {
// ...
try {
// 执行脏 element 的 rebuild 方法
_dirtyElements[index].rebuild();
} catch (e, stack) {
// ...
}
index += 1;
if (dirtyCount < _dirtyElements.length || _dirtyElementsNeedsResorting) {
_dirtyElements.sort(Element._sort);
_dirtyElementsNeedsResorting = false;
dirtyCount = _dirtyElements.length;
while (index > 0 && _dirtyElements[index - 1].dirty) {
index -= 1;
}
}
}
} finally {
// ...
}
}

2.5.4 RenderObjectToWidgetElement.mount

1
2
3
4
5
6
7
void mount(Element parent, dynamic newSlot) {
assert(parent == null);
// 见 [2.5.4.1]
super.mount(parent, newSlot);
// 见 [2.9]
_rebuild();
}

因为 RenderObjectToWidgetElement 对象是 element tree 的根节点,所以这里 parent 为 null.

2.5.4.1 RootRenderObjectElement.mount

1
2
3
4
5
6
7
void mount(Element parent, dynamic newSlot) {
// Root elements should never have parents.
assert(parent == null);
assert(newSlot == null);
// 见 [2.5.4.2]
super.mount(parent, newSlot);
}

2.5.4.2 RenderObjectElement.mount

1
2
3
4
5
6
7
8
9
10
11
void mount(Element parent, dynamic newSlot) {
// 见 [2.5.4.3]
super.mount(parent, newSlot);
// ...
// 见 [2.7]
_renderObject = widget.createRenderObject(this);
// ...
// 见 [2.8]
attachRenderObject(newSlot);
_dirty = false;
}

2.5.4.3 Element.mount

1
2
3
4
5
6
7
8
9
10
11
12
13
14
15
16
17
18
19
20
21
22
23
24
25
26
Element(Widget widget)
: assert(widget != null),
_widget = widget;

void mount(Element parent, dynamic newSlot) {
// ...
// 父 element
_parent = parent;
// 当前 element 的 slot
_slot = newSlot;
// root element 的 _depth 为 1,子 element 依次 +1
_depth = _parent != null ? _parent.depth + 1 : 1;
// 处于激活状态
_active = true;
// 只用 parent 的 _owner, 也就是说所有 element tree 的上节点公用一个 _owner
if (parent != null) // Only assign ownership if the parent is non-null
_owner = parent.owner;
// widget 是构造方法中赋值的,也就是 [2.5.1] 中的 RenderObjectToWidgetAdapter, 所以 key 就是 [2.5.1] 中的 GlobalObjectKey(container), 见 [2.6]
final Key key = widget.key;
if (key is GlobalKey) {
// 见 [2.6]
key._register(this);
}
_updateInheritance();
// ...
}

2.6 GlobalKey._register

1
2
3
4
5
6
7
8
9
10
11
12
13
14
15
16
// src/widgets/framework.dart
@optionalTypeArgs
abstract class GlobalKey<T extends State<StatefulWidget>> extends Key {
const GlobalKey.constructor() : super.empty();
static final Map<GlobalKey, Element> _registry = <GlobalKey, Element>{};

// 将当前 Key 对象和 Element 对象关联起来,this 就是当前 key 对象
void _register(Element element) {
_registry[this] = element;
}

void _unregister(Element element) {
if (_registry[this] == element)
_registry.remove(this);
}
}

由 [2.5.4.3] 可知,这里是 GlobalObjectKey 类型的对象。

1
2
3
4
5
6
7
8
9
10
11
12
13
14
15
16
17
18
19
20
// src/widgets/framework.dart
class GlobalObjectKey<T extends State<StatefulWidget>> extends GlobalKey<T> {
/// Creates a global key that uses [identical] on [value] for its [operator==].
const GlobalObjectKey(this.value) : super.constructor();

/// The object whose identity is used by this key's [operator==].
final Object value;

@override
bool operator ==(Object other) {
if (other.runtimeType != runtimeType)
return false;
return other is GlobalObjectKey<T>
&& identical(other.value, value);
}

@override
int get hashCode => identityHashCode(value);
// ...
}

由 [2.5.1] 可知,value 就是 [2.3.3.2] 的 renderView 对象,说明 GlobalObjectKey 是用来处理 render tree 和 element tree 之间的节点关系。

2.7 createRenderObject

1
RenderObjectWithChildMixin<T> createRenderObject(BuildContext context) => container;

将 [2.3.6.2] 的 renderView 对象赋值给 _renderObject

2.8 attachRenderObject

1
2
3
4
5
6
7
8
9
10
11
void attachRenderObject(dynamic newSlot) {
assert(_ancestorRenderObjectElement == null);
_slot = newSlot;
// 选择此 element tree 的祖先节点,此时为 null.
_ancestorRenderObjectElement = _findAncestorRenderObjectElement();
// 向 element 树中插入刚刚创建的 renderObject
_ancestorRenderObjectElement?.insertRenderObjectChild(renderObject, newSlot);
final ParentDataElement<ParentData> parentDataElement = _findAncestorParentDataElement();
if (parentDataElement != null)
_updateParentData(parentDataElement.widget);
}

此时 newSlot _ancestorRenderObjectElement _slot 均为 null, 同上,后面的 _ancestorRenderObjectElement parentDataElement 也为 null.

2.9 _rebuild

1
2
3
4
5
6
7
8
void _rebuild() {
try {
// 见 [2.9.1]
_child = updateChild(_child, widget.child, _rootChildSlot);
} catch (exception, stack) {
// ...
}
}

该方法的相关入参

  • _child: 第一次执行,_child 为 null
  • widget.child: widget: RenderObjectToWidgetAdapter 对象,所以 widget.child 就是 [2.4.1] 中我们在 main.dart 中自定义的 root widget
  • _rootChildSlot: static const Object _rootChildSlot = Object(); 是一个常量,表示一个 element 只有一个 child

2.9.1 Element.updateChild

1
2
3
4
5
6
7
8
9
10
11
12
13
14
15
16
17
18
19
20
21
22
23
24
25
26
27
28
29
30
31
32
33
Element updateChild(Element child, Widget newWidget, dynamic newSlot) {
if (newWidget == null) {
if (child != null)
// 移除旧的 element
deactivateChild(child);
return null;
}
Element newChild;
if (child != null) {
bool hasSameSuperclass = true;
// ...
if (hasSameSuperclass && child.widget == newWidget) {
if (child.slot != newSlot)
// 更新 element
updateSlotForChild(child, newSlot);
newChild = child;
} else if (hasSameSuperclass && Widget.canUpdate(child.widget, newWidget)) {
if (child.slot != newSlot)
// 更新 element
updateSlotForChild(child, newSlot);
// 更新 widget
child.update(newWidget);
newChild = child;
} else {
newChild = inflateWidget(newWidget, newSlot);
}
} else {
// 见 [2.9.2]
newChild = inflateWidget(newWidget, newSlot);
}

return newChild;
}

2.9.2 Element.inflateWidget

1
2
3
4
5
6
7
8
9
10
11
12
13
14
15
16
17
18
Element inflateWidget(Widget newWidget, dynamic newSlot) {
final Key key = newWidget.key;
if (key is GlobalKey) {
// 从 _inactiveElements 中找可复用的 element
final Element newChild = _retakeInactiveElement(key, newWidget);
if (newChild != null) {
// 激活
newChild._activateWithParent(this, newSlot);
final Element updatedChild = updateChild(newChild, newWidget, newSlot);
return updatedChild;
}
}
// 创建 element, 见 [2.9.3], 这里是 StatefulElement
final Element newChild = newWidget.createElement();
// 见 [2.9.4]
newChild.mount(this, newSlot);
return newChild;
}

这里 key 为 null.

2.9.3 createElement

这个的 root widget 是 StatefulWidget 类型,所以会走

1
2
3
4
5
6
class StatefulElement extends ComponentElement {
StatefulElement(StatefulWidget widget) : _state = widget.createState(), super(widget) {
_state._element = this;
_state._widget = widget;
}
}

上面的方法主要功能

  • 对 _state 赋值
  • 对 element 的 widget 赋值,见前面的 2.5.4.3 Element.mount
  • 对 _state._element 赋值
  • 对 _state._widget 赋值

由此看见, state 是一个桥接类,关联 element 和 widget.

2.9.4 ComponentElement.mount

1
2
3
4
5
6
7
8
9
10
@override
void mount(Element parent, dynamic newSlot) {
// 见 [2.5.4.3], 不过这里 parent 有值,是 [2.5.4] 新建的 RenderObjectToWidgetElement(root element)
super.mount(parent, newSlot);
assert(_child == null);
assert(_active);
// 见 [2.9.5]
_firstBuild();
assert(_child != null);
}

StatefulElement extends ComponentElement extends Element, ComponentElement 是跟 2.5.4.2 RenderObjectElement 是同级别的子类。

2.9.5 ComponentElement._firstBuild

1
2
3
4
void _firstBuild() {
// 见 [2.9.5.1]
rebuild();
}

2.9.5.1 Element.rebuild

1
2
3
4
5
6
7
void rebuild() {
// 未被激活(没调用 mount 方法) 或者 没被标脏(没调用相关 update 方法或者 markNeedsBuild 方法),则不会走下面的逻辑
if (!_active || !_dirty)
return;
// 见 [2.9.5.2]
performRebuild();
}

2.9.5.2 StatefulElement.performRebuild

1
2
3
4
5
6
7
8
9
10
void performRebuild() {
// 只有调用当前类的 didChangeDependencies 方法,才会将 _didChangeDependencies 置为 true
if (_didChangeDependencies) {
// 调用 state didChangeDependencies 方法
_state.didChangeDependencies();
_didChangeDependencies = false;
}
// 见 [2.9.5.3]
super.performRebuild();
}

2.9.5.3 ComponentElement.performRebuild

1
2
3
4
5
6
7
8
9
10
11
12
13
14
15
void performRebuild() {
Widget built;
try {
// 见 [2.9.5.4]
built = build();
} finally {
// 已 build, 后续不要再构建
_dirty = false;
}

try {
// 同 [2.9.1], 第一次 _child 为 null
_child = updateChild(_child, built, slot);
}
}

2.9.5.4 build

1
Widget build() => _state.build(this);

自此,最终会调用 rootwidget, 即 _MyAppState 的 build 方法。

2.10 scheduleWarmUpFrame

1
2
3
4
5
6
7
8
9
10
11
12
13
14
15
16
17
18
19
20
21
22
23
24
25
26
27
28
29
30
31
32
33
34
35
36
37
void scheduleWarmUpFrame() {
if (_warmUpFrame || schedulerPhase != SchedulerPhase.idle)
return;

_warmUpFrame = true;
Timeline.startSync('Warm-up frame');
final bool hadScheduledFrame = _hasScheduledFrame;
// 异步执行, 执行完上面的代码才会执行 `2.4.1 attachRootWidget`
// We use timers here to ensure that microtasks flush in between.
Timer.run(() {
assert(_warmUpFrame);
handleBeginFrame(null);
});
Timer.run(() {
assert(_warmUpFrame);
handleDrawFrame();
// We call resetEpoch after this frame so that, in the hot reload case,
// the very next frame pretends to have occurred immediately after this
// warm-up frame. The warm-up frame's timestamp will typically be far in
// the past (the time of the last real frame), so if we didn't reset the
// epoch we would see a sudden jump from the old time in the warm-up frame
// to the new time in the "real" frame. The biggest problem with this is
// that implicit animations end up being triggered at the old time and
// then skipping every frame and finishing in the new time.
resetEpoch();
_warmUpFrame = false;
if (hadScheduledFrame)
scheduleFrame();
});

// Lock events so touch events etc don't insert themselves until the
// scheduled frame has finished.
lockEvents(() async {
await endOfFrame;
Timeline.finishSync();
});
}

进行绘制操作。

3. 总结

从 2.1 的 runApp 入口可知,

  1. WidgetsFlutterBinding 初始化,这是一个单例,负责创建各种绑定对象,有的时候我们需要将这段代码前置,使得各种绑定操作在 runApp 之前完成;
  2. attachRootWidget, 自底向上遍历整个视图树,创建 element、renderObject 对象,建立 widget、element、renderObject 三者之间的关系;
  3. scheduleWarmUpFrame, 执行绘制操作

Q: 自底向上遍历整个视图树的时候,感觉 mount 无线递归执行,什么时候完成呢?
A: 当遍历到最顶层的 widget 时,在调用 updateChild 的时候回返回 null, 也就是的结束,从而回来,然后回到 2.5 attachToRenderTree,返回 RenderObjectToWidgetElement 类型的 root element. 我把前面 demo 的 debug 流程贴出来,如下:

1
2
3
4
5
6
7
8
9
10
11
12
13
14
15
16
17
18
19
20
21
22
23
24
25
26
27
28
29
30
31
32
33
34
35
36
37
38
RenderObjectToWidgetElement 
- mount // parent: null, newSlot: null
- _rebuild
- updateChild // child: null, newWidget: MyApp
- inflateWidget // newWidget: MyApp
- createElement // StatefulElement: ComponentElement
- mount

StatefulElement: ComponentElement
- mount // parent: [root](renderObject: RenderView#5a380 NEEDS-LAYOUT NEEDS-PAINT)
- _firstBuild
- rebuild
- performRebuild
- updateChild // child: null, newWidget: Container
- inflateWidget // newWidget: Container
- createElement // StatelessElement: ComponentElement
- mount //

StatelessElement: ComponentElement
- mount // parent: MyApp(state: _MyAppState#9e4bc)
- _firstBuild
- rebuild
- performRebuild // StatelessElement.build
- updateChild // child: null, newWidget: LimitedBox
- inflateWidget // newWidget: LimitedBox(maxWidth: 0.0, maxHeight: 0.0)
- createElement // SingleChildRenderObjectElement: RenderObjectElement
- mount

SingleChildRenderObjectElement
- mount // parent: Container
- updateChild // child: null, newWidget: ConstrainedBox(BoxConstraints(biggest))
- inflateWidget // newWidget: ConstrainedBox(BoxConstraints(biggest))
- createElement // SingleChildRenderObjectElement: RenderObjectElement
- mount

SingleChildRenderObjectElement
- mount // parent: LimitedBox(maxWidth: 0.0, maxHeight: 0.0, renderObject: RenderLimitedBox#3d07c NEEDS-LAYOUT NEEDS-PAINT NEEDS-COMPOSITING-BITS-U
- updateChild // child: null, newWidget: null

3.1 问题

  1. 三棵树的关系,element 的具体功能
  2. 不同 element 执行 build 方法的时机
  3. key slot 等联系
  4. 整个执行一帧的流程
  5. 页面刷新的具体流程,setState vs provider 局部刷新

本文基于 flutter 1.22.2 源码,在 ios_debug_unopt 产物下调试。

1. 概述

本文下面的 demo(来自 Writing custom platform-specific code) 和 flutter 源码来分析 ios platform channels 的实现。

1.1 demo

1
2
3
4
5
6
7
8
9
10
11
12
13
14
15
16
17
18
19
20
21
22
23
24
25
import 'dart:async';

import 'package:flutter/material.dart';
import 'package:flutter/services.dart';
...
class _MyHomePageState extends State<MyHomePage> {
static const platform = const MethodChannel('samples.flutter.dev/battery');

// Get battery level.
String _batteryLevel = 'Unknown battery level.';

Future<void> _getBatteryLevel() async {
String batteryLevel;
try {
final int result = await platform.invokeMethod('getBatteryLevel');
batteryLevel = 'Battery level at $result % .';
} on PlatformException catch (e) {
batteryLevel = "Failed to get battery level: '${e.message}'.";
}

setState(() {
_batteryLevel = batteryLevel;
});
}
}
1
2
3
4
5
6
7
8
9
10
11
12
13
14
15
16
17
18
19
20
21
22
23
24
25
26
27
28
29
30
31
32
33
34
35
36
37
38
39
40
41
42
#import <Flutter/Flutter.h>
#import "GeneratedPluginRegistrant.h"

@implementation AppDelegate
- (BOOL)application:(UIApplication*)application didFinishLaunchingWithOptions:(NSDictionary*)launchOptions {
FlutterViewController* controller = (FlutterViewController*)self.window.rootViewController;

FlutterMethodChannel* batteryChannel = [FlutterMethodChannel
methodChannelWithName:@"samples.flutter.dev/battery"
binaryMessenger:controller.binaryMessenger];

__weak typeof(self) weakSelf = self;
[batteryChannel setMethodCallHandler:^(FlutterMethodCall* call, FlutterResult result) {
// Note: this method is invoked on the UI thread.
if ([@"getBatteryLevel" isEqualToString:call.method]) {
int batteryLevel = [weakSelf getBatteryLevel];

if (batteryLevel == -1) {
result([FlutterError errorWithCode:@"UNAVAILABLE"
message:@"Battery info unavailable"
details:nil]);
} else {
result(@(batteryLevel));
}
} else {
result(FlutterMethodNotImplemented);
}
}];

[GeneratedPluginRegistrant registerWithRegistry:self];
return [super application:application didFinishLaunchingWithOptions:launchOptions];
}

- (int)getBatteryLevel {
UIDevice* device = UIDevice.currentDevice;
device.batteryMonitoringEnabled = YES;
if (device.batteryState == UIDeviceBatteryStateUnknown) {
return -1;
} else {
return (int)(device.batteryLevel * 100);
}
}

2. Dart 层

2.1 MethodChannel 初始化

flutter/packages/flutter/lib/src/services/platform_channel.dart

1
2
3
4
5
/// A named channel for communicating with platform plugins using asynchronous method calls.
const MethodChannel(this.name, [this.codec = const StandardMethodCodec(), BinaryMessenger? binaryMessenger ])
: assert(name != null),
assert(codec != null),
_binaryMessenger = binaryMessenger;

初始化,默认是使用标准编解码器 StandardMethodCodec,在发送到 platform plugin 要使用 codec 进行编码,同样 platform plugin 发送过来的消息要解码成 Dart 层的数据。所以,platform plugin 那边需要兼容 Dart 层的 codec

2.2 MessageCodec 抽象类

flutter/packages/flutter/lib/src/services/message_codec.dart

1
2
3
4
5
/// A message encoding/decoding mechanism.
abstract class MessageCodec<T> {
ByteData? encodeMessage(T message);
T decodeMessage(ByteData? message);
}

StandardMethodCodec 实现了抽象类 MessageCodec 的编解码方法。

-w755

从上图可知,目标有四个类实现了 MessageCodec

  • BinaryCodec: [MessageCodec] with unencoded binary messages represented using [ByteData]. // 没编码的原始二进制数据类型
  • JSONMessageCodec: [MessageCodec] with UTF-8 encoded JSON messages. // utf-8 编码的 json 消息
  • StandardMessageCodec: [MessageCodec] using the Flutter standard binary encoding. // flutter 标准的二进制编码,可以参考 Writing custom platform-specific codePlatform channel data types support and codecs 小节,当然 class StandardMessageCodec implements MessageCodec<dynamic> { 定义上面的注释也有解释。
  • StringCodec: [MessageCodec] with UTF-8 encoded String messages. // utf-8 编码的字符串消息

2.3 invokeMethod

flutter/packages/flutter/lib/src/services/platform_channel.dart

1
2
3
4
5
6
7
8
9
10
11
12
13
14
15
16
17
18
19
20
21
Future<T?> invokeMethod<T>(String method, [ dynamic arguments ]) {
return _invokeMethod<T>(method, missingOk: false, arguments: arguments);
}

@optionalTypeArgs
Future<T?> _invokeMethod<T>(String method, { required bool missingOk, dynamic arguments }) async {
assert(method != null);
// 见 2.6
final ByteData? result = await binaryMessenger.send(
name,
codec.encodeMethodCall(MethodCall(method, arguments)),
);
if (result == null) {
if (missingOk) {
return null;
}
throw MissingPluginException('No implementation found for method $method on channel $name');
}
// 见 [6.6]
return codec.decodeEnvelope(result) as T;
}

该方法主要功能:

  1. 创建 MethodCall 对象[见 2.3.1]
  2. 调用 StandardMessageCodec 的 encodeMethodCall, 将 MethodCall 对象编码成 ByteData 数据[见 2.3.2]
  3. 调用 BinaryMessenger 来发送 ByteData 数据 [见 2.4]
  4. 调用 StandardMessageCodec 的 decodeEnvelope, 将发送返回后的结果进行解码

2.3.1 MethodCall初始化

flutter/packages/flutter/lib/src/services/message_codec.dart

1
2
const MethodCall(this.method, [this.arguments])
: assert(method != null); // 方法名,非空

这里的参数就是 invokeMethod 方法的入参 methodarguments

2.3.2 encodeMethodCall

flutter/packages/flutter/lib/src/services/message_codec.dart

来自抽象类 MethodCodec, 对方法调用和结果进行编解码。

1
2
3
4
5
6
7
8
9
10
11
12
13
14
15
16
17
/// A codec for method calls and enveloped results.
abstract class MethodCodec {
/// Encodes the specified [methodCall] into binary.
ByteData encodeMethodCall(MethodCall methodCall);

/// Decodes the specified [methodCall] from binary.
MethodCall decodeMethodCall(ByteData? methodCall);

/// Decodes the specified result [envelope] from binary.
dynamic decodeEnvelope(ByteData envelope);

/// Encodes a successful [result] into a binary envelope.
ByteData encodeSuccessEnvelope(dynamic result);

/// Encodes an error result into a binary envelope.
ByteData encodeErrorEnvelope({ required String code, String? message, dynamic details});
}

flutter/packages/flutter/lib/src/services/message_codecs.dart

1
2
3
4
5
6
7
8
9
@override
ByteData encodeMethodCall(MethodCall call) {
// 创建一个写buffer, 见 [2.3.3]
final WriteBuffer buffer = WriteBuffer();
// 调用 StandardMessageCodec 的 writeValue 方法,将数据写入 buffer
messageCodec.writeValue(buffer, call.method);
messageCodec.writeValue(buffer, call.arguments);
return buffer.done();
}

2.3.3 WriteBuffer

flutter/packages/flutter/lib/src/foundation/serialization.dart

1
2
3
4
5
6
7
8
9
10
11
12
WriteBuffer()
: _buffer = Uint8Buffer(),
_eightBytes = ByteData(8) {
_eightBytesAsList = _eightBytes.buffer.asUint8List();
}

ByteData done() {
final ByteData result = _buffer!.buffer.asByteData(0, _buffer!.lengthInBytes);
_buffer = null;
// 返回最后的写入结果
return result;
}

2.4 binaryMessenger.send

flutter/packages/flutter/lib/src/services/platform_channel.dart

1
2
3
4
5
6
7
8
9
10
11
12
13
14
15
16
17
18
19
20
21
22
BinaryMessenger get binaryMessenger => _binaryMessenger ?? defaultBinaryMessenger;

BinaryMessenger get defaultBinaryMessenger {
assert(() {
if (ServicesBinding.instance == null) {
throw FlutterError(
'ServicesBinding.defaultBinaryMessenger was accessed before the '
'binding was initialized.\n'
"If you're running an application and need to access the binary "
'messenger before `runApp()` has been called (for example, during '
'plugin initialization), then you need to explicitly call the '
'`WidgetsFlutterBinding.ensureInitialized()` first.\n'
"If you're running a test, you can call the "
'`TestWidgetsFlutterBinding.ensureInitialized()` as the first line in '
"your test's `main()` method to initialize the binding."
);
}
return true;
}());
// 见 [2.4.1]
return ServicesBinding.instance!.defaultBinaryMessenger;
}

由于 MethodChannel 初始化的时候没有传 BinaryMessenger 对象,所以这里是用的默认值:ServicesBinding.instance!.defaultBinaryMessenger.

2.4.1 _sendPlatformMessage

flutter/packages/flutter/lib/src/services/binding.dart

1
2
3
4
5
6
7
8
9
10
11
12
13
14
15
16
17
18
19
20
21
22
class _DefaultBinaryMessenger extends BinaryMessenger {
const _DefaultBinaryMessenger._();
Future<ByteData?> _sendPlatformMessage(String channel, ByteData? message) {
// 见 [2.4.2]
final Completer<ByteData?> completer = Completer<ByteData?>();
// ui.window is accessed directly instead of using ServicesBinding.instance.window
// because this method might be invoked before any binding is initialized.
// This issue was reported in #27541. It is not ideal to statically access
// ui.window because the Window may be dependency injected elsewhere with
// a different instance. However, static access at this location seems to be
// the least bad option.
// 见 [2.5]
ui.window.sendPlatformMessage(channel, message, (ByteData? reply) {
try {
// 见 [3.1.1], 会在 engine 层保存起来
completer.complete(reply);
} catch (exception, stack) {
// ...
});
return completer.future;
}
}

2.4.2 Completer 初始化

flutter/bin/cache/pkg/sky_engine/lib/async/future.dart

1
2
// 见 [2.4.3]
factory Completer() => new _AsyncCompleter<T>();

2.4.3 _AsyncCompleter 初始化

flutter/bin/cache/pkg/sky_engine/lib/async/future_impl.dart

1
2
3
4
5
6
7
8
9
10
11
12
13
14
15
16
17
18
19
abstract class _Completer<T> implements Completer<T> {
final _Future<T> future = new _Future<T>();

void complete([FutureOr<T>? value]);

void _completeError(Object error, StackTrace stackTrace);

// The future's _isComplete doesn't take into account pending completions.
// We therefore use _mayComplete.
bool get isCompleted => !future._mayComplete;
}

class _AsyncCompleter<T> extends _Completer<T> {
void complete([FutureOr<T>? value]) {
if (!future._mayComplete) throw new StateError("Future already completed");
// 见 [6.5]
future._asyncComplete(value == null ? value as dynamic : value);
}
}

2.5 window.sendPlatformMessage

flutter/bin/cache/pkg/sky_engine/lib/ui/window.dart

1
2
3
4
5
6
7
8
9
10
11
12
13
void sendPlatformMessage(String name,
ByteData? data,
PlatformMessageResponseCallback? callback) {
// 见[2.5.1]
final String? error =
_sendPlatformMessage(name, _zonedPlatformMessageResponseCallback(callback), data);
if (error != null)
throw Exception(error);
}
// 见 [3.1]
String? _sendPlatformMessage(String name,
PlatformMessageResponseCallback? callback,
ByteData? data) native 'PlatformConfiguration_sendPlatformMessage';

_sendPlatformMessage 是一个 Native 代码,会调用到引擎层。

2.5.1 _zonedPlatformMessageResponseCallback

flutter/bin/cache/pkg/sky_engine/lib/ui/window.dart

1
2
3
4
5
6
7
8
9
10
11
12
13
/// Wraps the given [callback] in another callback that ensures that the
/// original callback is called in the zone it was registered in.
static PlatformMessageResponseCallback? _zonedPlatformMessageResponseCallback(PlatformMessageResponseCallback? callback) {
if (callback == null)
return null;

// Store the zone in which the callback is being registered.
final Zone registrationZone = Zone.current;

return (ByteData? data) {
registrationZone.runUnaryGuarded(callback, data);
};
}

将当前注册回调的 Zone.current 存起来。

3. engine 层

3.1 _SendPlatformMessage

engine/src/flutter/lib/ui/window/platform_configuration.cc

在 flutter 源码中搜索 _sendPlatformMessage

1
2
3
4
5
6
7
8
9
10
11
12
13
14
15
16
17
18
19
20
21
22
23
24
25
26
27
28
29
30
31
32
33
34
35
36
37
38
39
40
// platform_configuration.cc -L137
void _SendPlatformMessage(Dart_NativeArguments args) {
tonic::DartCallStatic(&SendPlatformMessage, args);
}

// platform_configuration.cc -L105
Dart_Handle SendPlatformMessage(Dart_Handle window,
const std::string& name,
Dart_Handle callback,
Dart_Handle data_handle) {
// 获取当前 dart_state
UIDartState* dart_state = UIDartState::Current();
// 没有 platform_configuration, 抛出异常
if (!dart_state->platform_configuration()) {
return tonic::ToDart(
"Platform messages can only be sent from the main isolate");
}

fml::RefPtr<PlatformMessageResponse> response;
if (!Dart_IsNull(callback)) {
// 见 [3.1.1] 和 [3.1.2]
response = fml::MakeRefCounted<PlatformMessageResponseDart>(
tonic::DartPersistentValue(dart_state, callback),
dart_state->GetTaskRunners().GetUITaskRunner());
}
if (Dart_IsNull(data_handle)) {
dart_state->platform_configuration()->client()->HandlePlatformMessage(
fml::MakeRefCounted<PlatformMessage>(name, response));
} else {
tonic::DartByteData data(data_handle);
const uint8_t* buffer = static_cast<const uint8_t*>(data.data());
// 见 [3.2]
dart_state->platform_configuration()->client()->HandlePlatformMessage(
fml::MakeRefCounted<PlatformMessage>(
name, std::vector<uint8_t>(buffer, buffer + data.length_in_bytes()),
response));
}

return Dart_Null();
}

该方法主要功能:

  1. 发送平台消息,只允许在主 isolate 中发出,否则会抛出异常
  2. 相关参数
    1. window: Dart 层的 window
    2. name: channel 名
    3. callback: 见 [3.1.1] 的描述
    4. data_handle: 编码后的 MethodCall 对象,也就是待执行的方法和参数,后续赋值给 PlatformMessage 对象的 data 成员变量
  3. 创建 PlatformMessageResponseDart 对象,保存 callback 和 GetUITaskRunner
  4. 调用 RuntimeController 的 HandlePlatformMessage 方法,入参为 PlatformMessage, 见 [3.1.3]

3.1.1 DartPersistentValue

1
2
3
4
5
6
7
8
9
10
11
12
13
// dart_persistent_value.cc -L20
DartPersistentValue::DartPersistentValue(DartState* dart_state,
Dart_Handle value)
: value_(nullptr) {
Set(dart_state, value);
}

// dart_persistent_value.cc -L30
void DartPersistentValue::Set(DartState* dart_state, Dart_Handle value) {
TONIC_DCHECK(is_empty());
dart_state_ = dart_state->GetWeakPtr();
value_ = Dart_NewPersistentHandle(value);
}

dart_statecallback 封装成 DartPersistentValue 对象,这里的 callback 就是 [2.4] 中的 completer.complete(reply);,处理发送返回的数据。

3.1.2 PlatformMessageResponseDart 初始化

engine/src/flutter/lib/ui/window/platform_message_response_dart.cc

1
2
3
4
5
PlatformMessageResponseDart::PlatformMessageResponseDart(
tonic::DartPersistentValue callback,
fml::RefPtr<fml::TaskRunner> ui_task_runner)
: callback_(std::move(callback)),
ui_task_runner_(std::move(ui_task_runner)) {}

简单的赋初始值。

3.1.3 PlatformMessage 初始化

1
2
3
4
5
6
7
8
// platform_message.cc -L11
PlatformMessage::PlatformMessage(std::string channel,
std::vector<uint8_t> data,
fml::RefPtr<PlatformMessageResponse> response)
: channel_(std::move(channel)),
data_(std::move(data)),
hasData_(true),
response_(std::move(response)) {}

该方法相关入参

  • channel: channel 名
  • data: data_handle(见 [3.1] 的描述) 转换后的值
  • response: 见 [3.1.1], 对 3.1.1callback 的封装

至此, Dart 层传过来的数据以及在 engine 层转换后的数据,都封装在了 PlatformMessage 对象中,后续在 engine 层都是操作该 PlatformMessage 对象。

3.2 RuntimeController::HandlePlatformMessage

engine/src/flutter/runtime/runtime_controller.cc

1
2
3
4
5
6
7
// |PlatformConfigurationClient|
// runtime_controller.cc -L328
void RuntimeController::HandlePlatformMessage(
fml::RefPtr<PlatformMessage> message) {
// 见 3.3
client_.HandlePlatformMessage(std::move(message));
}

note: 这块的逻辑代码需要了解 flutter 的引擎启动。

相关调用链在

1
2
3
4
5
6
7
8
9
10
11
12
13
14
15
16
17
18
19
20
21
22
23
24
25
26
27
28
29
30
31
32
33
34
35
36
37
38
39
40
41
42
43
44
45
46
47
48
49
50
51
52
53
54
55
56
57
// runtime_controller.cc -L64
RuntimeController::RuntimeController(
RuntimeDelegate& p_client,
DartVM* p_vm,
fml::RefPtr<const DartSnapshot> p_isolate_snapshot,
TaskRunners p_task_runners,
fml::WeakPtr<SnapshotDelegate> p_snapshot_delegate,
fml::WeakPtr<HintFreedDelegate> p_hint_freed_delegate,
fml::WeakPtr<IOManager> p_io_manager,
fml::RefPtr<SkiaUnrefQueue> p_unref_queue,
fml::WeakPtr<ImageDecoder> p_image_decoder,
std::string p_advisory_script_uri,
std::string p_advisory_script_entrypoint,
const std::function<void(int64_t)>& idle_notification_callback,
const PlatformData& p_platform_data,
const fml::closure& p_isolate_create_callback,
const fml::closure& p_isolate_shutdown_callback,
std::shared_ptr<const fml::Mapping> p_persistent_isolate_data)
: client_(p_client),
vm_(p_vm),
isolate_snapshot_(std::move(p_isolate_snapshot)),
task_runners_(p_task_runners),
snapshot_delegate_(p_snapshot_delegate),
hint_freed_delegate_(p_hint_freed_delegate),
io_manager_(p_io_manager),
unref_queue_(p_unref_queue),
image_decoder_(p_image_decoder),
advisory_script_uri_(p_advisory_script_uri),
advisory_script_entrypoint_(p_advisory_script_entrypoint),
idle_notification_callback_(idle_notification_callback),
platform_data_(std::move(p_platform_data)),
isolate_create_callback_(p_isolate_create_callback),
isolate_shutdown_callback_(p_isolate_shutdown_callback),
persistent_isolate_data_(std::move(p_persistent_isolate_data)) {
// Create the root isolate as soon as the runtime controller is initialized.
// It will be run at a later point when the engine provides a run
// configuration and then runs the isolate.
auto strong_root_isolate =
DartIsolate::CreateRootIsolate(
vm_->GetVMData()->GetSettings(), //
isolate_snapshot_, //
task_runners_, //
std::make_unique<PlatformConfiguration>(this), //
snapshot_delegate_, //
hint_freed_delegate_, //
io_manager_, //
unref_queue_, //
image_decoder_, //
p_advisory_script_uri, //
p_advisory_script_entrypoint, //
nullptr, //
isolate_create_callback_, //
isolate_shutdown_callback_ //
)
.lock();
// ...
}

std::make_unique<PlatformConfiguration>(this): 将当前 RuntimeController 对象作为入参初始化 PlatformConfiguration 对象(赋值给 client_ 成员变量)。

3.3 Engine::HandlePlatformMessage

1
2
3
4
5
6
7
8
9
// engine.cc -L496
void Engine::HandlePlatformMessage(fml::RefPtr<PlatformMessage> message) {
if (message->channel() == kAssetChannel) {
HandleAssetPlatformMessage(std::move(message));
} else {
// 见 [3.4]
delegate_.OnEngineHandlePlatformMessage(std::move(message));
}
}

相关调用链在

1
2
3
4
5
6
7
8
9
10
11
12
13
14
15
16
17
18
19
20
21
22
23
24
25
26
27
28
29
30
31
32
33
34
35
36
37
38
39
// engine.cc -L59
Engine::Engine(Delegate& delegate,
const PointerDataDispatcherMaker& dispatcher_maker,
DartVM& vm,
fml::RefPtr<const DartSnapshot> isolate_snapshot,
TaskRunners task_runners,
const PlatformData platform_data,
Settings settings,
std::unique_ptr<Animator> animator,
fml::WeakPtr<IOManager> io_manager,
fml::RefPtr<SkiaUnrefQueue> unref_queue,
fml::WeakPtr<SnapshotDelegate> snapshot_delegate)
: Engine(delegate,
dispatcher_maker,
vm.GetConcurrentWorkerTaskRunner(),
task_runners,
settings,
std::move(animator),
io_manager,
nullptr) {
runtime_controller_ = std::make_unique<RuntimeController>(
*this, // runtime delegate
&vm, // VM
std::move(isolate_snapshot), // isolate snapshot
task_runners_, // task runners
std::move(snapshot_delegate), // snapshot delegate
GetWeakPtr(), // hint freed delegate
std::move(io_manager), // io manager
std::move(unref_queue), // Skia unref queue
image_decoder_.GetWeakPtr(), // image decoder
settings_.advisory_script_uri, // advisory script uri
settings_.advisory_script_entrypoint, // advisory script entrypoint
settings_.idle_notification_callback, // idle notification callback
platform_data, // platform data
settings_.isolate_create_callback, // isolate create callback
settings_.isolate_shutdown_callback, // isolate shutdown callback
settings_.persistent_isolate_data // persistent isolate data
);
}

std::make_unique<RuntimeController>(: 将当前 engine 对象作为入参初始化 RuntimeController 对象(赋值给 client_ 成员变量)。

3.4 Shell::OnEngineHandlePlatformMessage

1
2
3
4
5
6
7
8
9
10
11
12
13
14
15
16
17
18
19
20
// |Engine::Delegate|
void Shell::OnEngineHandlePlatformMessage(
fml::RefPtr<PlatformMessage> message) {
FML_DCHECK(is_setup_);
FML_DCHECK(task_runners_.GetUITaskRunner()->RunsTasksOnCurrentThread());

if (message->channel() == kSkiaChannel) {
HandleEngineSkiaMessage(std::move(message));
return;
}

// 在 Platform 线程中执行任务
task_runners_.GetPlatformTaskRunner()->PostTask(
[view = platform_view_->GetWeakPtr(), message = std::move(message)]() {
if (view) {
// 见 [3.5]
view->HandlePlatformMessage(std::move(message));
}
});
}

相关调用链在

1
2
3
4
5
6
7
8
9
10
11
12
13
14
15
16
17
18
19
20
21
22
23
24
25
26
27
28
29
30
31
32
33
34
35
// shell.cc -L152
fml::TaskRunner::RunNowOrPostTask(
shell->GetTaskRunners().GetUITaskRunner(),
fml::MakeCopyable([&engine_promise, //
shell = shell.get(), //
&dispatcher_maker, //
&platform_data, //
isolate_snapshot = std::move(isolate_snapshot), //
vsync_waiter = std::move(vsync_waiter), //
&weak_io_manager_future, //
&snapshot_delegate_future, //
&unref_queue_future //
]() mutable {
TRACE_EVENT0("flutter", "ShellSetupUISubsystem");
const auto& task_runners = shell->GetTaskRunners();

// The animator is owned by the UI thread but it gets its vsync pulses
// from the platform.
auto animator = std::make_unique<Animator>(*shell, task_runners,
std::move(vsync_waiter));

engine_promise.set_value(std::make_unique<Engine>(
*shell, //
dispatcher_maker, //
*shell->GetDartVM(), //
std::move(isolate_snapshot), //
task_runners, //
platform_data, //
shell->GetSettings(), //
std::move(animator), //
weak_io_manager_future.get(), //
unref_queue_future.get(), //
snapshot_delegate_future.get() //
));
}));

std::make_unique<Engine>(: 将 *shell 指针作为入参初始化 Engine 对象(赋值给 delegate_ 成员变量)。

3.5 PlatformViewIOS::HandlePlatformMessage

1
2
3
4
5
6
// |PlatformView|
// platform_view_ios.mm -L61
void PlatformViewIOS::HandlePlatformMessage(fml::RefPtr<flutter::PlatformMessage> message) {
// 见 [3.6]
platform_message_router_.HandlePlatformMessage(std::move(message));
}

platform_view_

相关调用链如下

1
2
3
4
5
6
7
8
9
10
11
12
13
14
15
16
17
18
19
20
21
22
23
24
25
26
27
28
29
30
31
32
33
34
35
36
37
38
39
40
41
42
43
44
45
46
47
// shell.cc -L544, 给 platform_view_ 赋值
bool Shell::Setup(std::unique_ptr<PlatformView> platform_view,
std::unique_ptr<Engine> engine,
std::unique_ptr<Rasterizer> rasterizer,
std::unique_ptr<ShellIOManager> io_manager) {
// ...
platform_view_ = std::move(platform_view);
// ...
}

// shell.cc -L167
std::unique_ptr<Shell> Shell::CreateShellOnPlatformThread(
DartVMRef vm,
TaskRunners task_runners,
const PlatformData platform_data,
Settings settings,
fml::RefPtr<const DartSnapshot> isolate_snapshot,
const Shell::CreateCallback<PlatformView>& on_create_platform_view,
const Shell::CreateCallback<Rasterizer>& on_create_rasterizer) {
// ...
// 获取 platform_view
auto platform_view = on_create_platform_view(*shell.get());

// ...
if (!shell->Setup(std::move(platform_view), //
engine_future.get(), //
rasterizer_future.get(), //
io_manager_future.get()) //
) {
return nullptr;
}
// ...
}

// FlutterEngine.mm -L513
- (BOOL)createShell:(NSString*)entrypoint
libraryURI:(NSString*)libraryURI
initialRoute:(NSString*)initialRoute {
// ...
// on_create_platform_view 回调
flutter::Shell::CreateCallback<flutter::PlatformView> on_create_platform_view =
[](flutter::Shell& shell) {
return std::make_unique<flutter::PlatformViewIOS>(
shell, flutter::GetRenderingAPIForProcess(), shell.GetTaskRunners());
};
// ...
}

3.6 PlatformMessageRouter::HandlePlatformMessage

1
2
3
4
5
6
7
8
9
10
11
12
13
14
15
16
17
18
19
20
21
22
23
24
25
26
27
28
29
30
31
// platform_message_router.mm -L17
void PlatformMessageRouter::HandlePlatformMessage(
fml::RefPtr<flutter::PlatformMessage> message) const {
// [3.1.2] 中的 PlatformMessageResponseDart 对象
fml::RefPtr<flutter::PlatformMessageResponse> completer = message->response();
// message->channel(): [3.1] 中的 channel 名
auto it = message_handlers_.find(message->channel());
if (it != message_handlers_.end()) {
FlutterBinaryMessageHandler handler = it->second;
NSData* data = nil;
if (message->hasData()) {
// 由 [3.1.3] 可知, message->data() 就是编码后的 `MethodCall` 对象
data = GetNSDataFromVector(message->data());
}
// 见 [5.4]
handler(data, ^(NSData* reply) {
if (completer) {
if (reply) {
// 见 [6.1]
completer->Complete(GetMappingFromNSData(reply));
} else {
completer->CompleteEmpty();
}
}
});
} else {
if (completer) {
completer->CompleteEmpty();
}
}
}

该方法注意功能:

  1. 根据 channel 名在 message_handlers_ unordered_map 中找到对应的 FlutterBinaryMessageHandler 类型的 handler
  2. 调用 handler 回调方法获取 reply 数据
  3. 将 reply 数据作为入参,调用 PlatformMessageResponseDart 对象的 Complete 方法

现在的问题是, FlutterBinaryMessageHandler 类型的 handler 是在哪里赋值的,也就是什么时候调用 [4.4] 的方法,详见下一小节:[4]。

4. shell 层

note: 这块的逻辑代码需要了解 flutter 的引擎启动。
在创建 engine 的时候,会设置 engine 层相关的 channel.

engine/src/flutter/shell/platform/darwin/ios/framework/Source/FlutterEngine.mm

1
2
3
4
5
6
7
8
9
10
11
// FlutterEngine.mm  -L541
- (BOOL)createShell:(NSString*)entrypoint
libraryURI:(NSString*)libraryURI
initialRoute:(NSString*)initialRoute {
// ...
// 见 [4.1]
[self setupChannels];
// ...
[self maybeSetupPlatformViewChannels];
// ...
}

4.1 setupChannels

engine/src/flutter/shell/platform/darwin/ios/framework/Source/FlutterEngine.mm

1
2
3
4
5
6
7
8
9
10
11
12
13
14
15
// FlutterEngine.mm -L367
- (void)setupChannels {
// This will be invoked once the shell is done setting up and the isolate ID
// for the UI isolate is available.
fml::WeakPtr<FlutterEngine> weakSelf = [self getWeakPtr];
// 见 [4.2]
[_binaryMessenger setMessageHandlerOnChannel:@"flutter/isolate"
binaryMessageHandler:^(NSData* message, FlutterBinaryReply reply) {
if (weakSelf) {
weakSelf.get().isolateId =
[[FlutterStringCodec sharedInstance] decode:message];
}
}];
// ...
}

设置 flutter/isolate channel。

4.1.1 FlutterBinaryMessengerRelay 初始化

1
2
3
4
5
6
7
8
9
// FlutterEngine.mm -L132
- (instancetype)initWithName:(NSString*)labelPrefix
project:(FlutterDartProject*)project
allowHeadlessExecution:(BOOL)allowHeadlessExecution {
// ...
// 将当前 FlutterEngine 对象赋值给 FlutterBinaryMessengerRelay 对象 _binaryMessenger 的 parent 成员变量。
_binaryMessenger = [[FlutterBinaryMessengerRelay alloc] initWithParent:self];
// ...
}

4.2 setMessageHandlerOnChannel

engine/src/flutter/shell/platform/darwin/ios/framework/Source/FlutterBinaryMessengerRelay.mm

1
2
3
4
5
6
7
8
9
10
11
12
// FlutterBinaryMessengerRelay.mm -L42
- (FlutterBinaryMessengerConnection)setMessageHandlerOnChannel:(NSString*)channel
binaryMessageHandler:
(FlutterBinaryMessageHandler)handler {
if (self.parent) {
// 见 [4.3]
return [self.parent setMessageHandlerOnChannel:channel binaryMessageHandler:handler];
} else {
FML_LOG(WARNING) << "Communicating on a dead channel.";
return -1;
}
}

4.3 setMessageHandlerOnChannel

1
2
3
4
5
6
7
8
9
10
11
12
13
14
15
// FlutterEngine.mm -L730
- (FlutterBinaryMessengerConnection)setMessageHandlerOnChannel:(NSString*)channel
binaryMessageHandler:
(FlutterBinaryMessageHandler)handler {
NSParameterAssert(channel);
if (_shell && _shell->IsSetup()) {
// 见 [4.4]
self.iosPlatformView->GetPlatformMessageRouter().SetMessageHandler(channel.UTF8String, handler);
return _connections->AquireConnection(channel.UTF8String);
} else {
NSAssert(!handler, @"Setting a message handler before the FlutterEngine has been run.");
// Setting a handler to nil for a not setup channel is a noop.
return flutter::ConnectionCollection::MakeErrorConnection(-1);
}
}

4.4 PlatformMessageRouter::SetMessageHandler

1
2
3
4
5
6
7
8
9
// platform_message_router.mm -L43
void PlatformMessageRouter::SetMessageHandler(const std::string& channel,
FlutterBinaryMessageHandler handler) {
message_handlers_.erase(channel);
if (handler) {
message_handlers_[channel] =
fml::ScopedBlock<FlutterBinaryMessageHandler>{handler, fml::OwnershipPolicy::Retain};
}
}

5. native 层

现在来看下 native 层的 Objective-C 的代码,来自 [1.1] 节。

5.1 FlutterMethodChannel 初始化

engine/src/flutter/shell/platform/darwin/common/framework/Source/FlutterChannels.mm

1
2
3
4
5
6
7
8
// FlutterChannels.mm -L181
+ (instancetype)methodChannelWithName:(NSString*)name
binaryMessenger:(NSObject<FlutterBinaryMessenger>*)messenger {
// 见 [5.1.1]
NSObject<FlutterMethodCodec>* codec = [FlutterStandardMethodCodec sharedInstance];
// 创建 FlutterMethodChannel 对象
return [FlutterMethodChannel methodChannelWithName:name binaryMessenger:messenger codec:codec];
}

该方法注意功能

  1. 入参
    1. name: channel 名
    2. messenger: (FlutterViewController *)controller.binaryMessenger // 也就是 [4.1.1] 里面的对象
  2. 创建 FlutterMethodChannel 对象,后面调用它的 setMethodCallHandler 来处理 Dart 层的调用方法 // 见 [5.2]

5.1.1 FlutterStandardMethodCodec

engine/src/flutter/shell/platform/darwin/common/framework/Source/FlutterStandardCodec.mm

1
2
3
4
5
6
7
8
9
10
11
12
13
14
// FlutterStandardCodec.mm -L60
@implementation FlutterStandardMethodCodec {
FlutterStandardReaderWriter* _readerWriter;
}
+ (instancetype)sharedInstance {
static id _sharedInstance = nil;
if (!_sharedInstance) {
// 见 [5.1.2]
FlutterStandardReaderWriter* readerWriter =
[[[FlutterStandardReaderWriter alloc] init] autorelease];
_sharedInstance = [[FlutterStandardMethodCodec alloc] initWithReaderWriter:readerWriter];
}
return _sharedInstance;
}

5.1.2 FlutterMessageCodec

engine/src/flutter/shell/platform/darwin/common/framework/Headers/FlutterCodecs.h

1
2
3
4
5
6
7
8
9
10
11
12
/**
* A factory of compatible reader/writer instances using the Flutter standard
* binary encoding or extensions thereof.
*/
FLUTTER_EXPORT
@interface FlutterStandardReaderWriter : NSObject

/**
* A message encoding/decoding mechanism.
*/
FLUTTER_EXPORT
@protocol FlutterMessageCodec

上面的注释 A message encoding/decoding mechanism. 跟 [2.2] 是一样的,所以 FlutterCodecs 文件中的相关编解码类是跟 Dart 层是相对应的(Dart 层中 ByteData8 对应 iOS 中的 NSData)。

5.2 setMethodCallHandler 方法

1
2
3
4
5
6
7
8
9
10
11
12
13
14
15
16
17
18
19
20
21
22
23
24
25
26
27
28
29
30
31
32
// FlutterChannels.mm -L231
- (void)setMethodCallHandler:(FlutterMethodCallHandler)handler {
if (!handler) {
if (_connection > 0) {
[_messenger cleanupConnection:_connection];
_connection = 0;
} else {
[_messenger setMessageHandlerOnChannel:_name binaryMessageHandler:nil];
}
return;
}
// Make sure the block captures the codec, not self.
NSObject<FlutterMethodCodec>* codec = _codec;
// 见 [5.3], 这里 messageHandler 就是 [3.6] 中的 handler 。
FlutterBinaryMessageHandler messageHandler = ^(NSData* message, FlutterBinaryReply callback) {
// 见 [5.3.1]
FlutterMethodCall* call = [codec decodeMethodCall:message];
// 见 [5.4]
handler(call, ^(id result) {
if (result == FlutterMethodNotImplemented)
callback(nil);
else if ([result isKindOfClass:[FlutterError class]])
// 见 [5.3.2]
callback([codec encodeErrorEnvelope:(FlutterError*)result]);
else
// 见 [5.3.3]
callback([codec encodeSuccessEnvelope:result]);
});
};
// 见 [4.2]
_connection = [_messenger setMessageHandlerOnChannel:_name binaryMessageHandler:messageHandler];
}

5.3 messageHandler

由前面 [3.6] 可知,根据 channel 名(samples.flutter.dev/battery) 找到 FlutterBinaryMessageHandler 回调后,就会调用它,里面就是 NSData 和 FlutterMethodCall 的相互转换,见 [5.3.1 ~ 5.3.3] 小节。

5.3.1 decodeMethodCall

由 [5.1.1] 可知,在 FlutterStandardMethodCodec 中。

1
2
3
4
5
6
7
8
9
// FlutterStandardCodec.mm -L115
- (FlutterMethodCall*)decodeMethodCall:(NSData*)message {
FlutterStandardReader* reader = [_readerWriter readerWithData:message];
id value1 = [reader readValue];
id value2 = [reader readValue];
NSAssert(![reader hasMore], @"Corrupted standard method call");
NSAssert([value1 isKindOfClass:[NSString class]], @"Corrupted standard method call");
return [FlutterMethodCall methodCallWithMethodName:value1 arguments:value2];
}

将消息读出来,然后封装成 FlutterMethodCall 对象。

5.3.2 encodeErrorEnvelope

1
2
3
4
5
6
7
8
9
10
// FlutterStandardCodec.mm -L105
- (NSData*)encodeErrorEnvelope:(FlutterError*)error {
NSMutableData* data = [NSMutableData dataWithCapacity:32];
FlutterStandardWriter* writer = [_readerWriter writerWithData:data];
[writer writeByte:1];
[writer writeValue:error.code];
[writer writeValue:error.message];
[writer writeValue:error.details];
return data;
}

将 Error 组装成二进制数据。

5.3.3 encodeSuccessEnvelope

1
2
3
4
5
6
7
8
// FlutterStandardCodec.mm -L97
- (NSData*)encodeSuccessEnvelope:(id)result {
NSMutableData* data = [NSMutableData dataWithCapacity:32];
FlutterStandardWriter* writer = [_readerWriter writerWithData:data];
[writer writeByte:0];
[writer writeValue:result];
return data;
}

将成功数据组装成二进制数据。

5.4 setMethodCallHandler 回调

这里以 [1.1] 为例,就是获取当前电量值,然后回调 result,在通过 [5.3.3] 或 [5.3.4] 转成 NSData 后,作为入参给 Complete 调用(见[6.1])。

6. 回传结果

6.1 PlatformMessageResponseDart::Complete

1
2
3
4
5
6
7
8
9
10
11
12
13
14
15
16
17
18
19
20
21
22
23
24
// platform_message_response_dart.cc -L30
void PlatformMessageResponseDart::Complete(std::unique_ptr<fml::Mapping> data) {
if (callback_.is_empty()) {
return;
}
FML_DCHECK(!is_complete_);
is_complete_ = true;
// 在 UI 线程中执行任务
ui_task_runner_->PostTask(fml::MakeCopyable(
[callback = std::move(callback_), data = std::move(data)]() mutable {
// callback_ 见 [3.1.1] 的赋初始值
std::shared_ptr<tonic::DartState> dart_state =
callback.dart_state().lock();
if (!dart_state) {
return;
}
tonic::DartState::Scope scope(dart_state);
// 见 [6.2]
Dart_Handle byte_buffer =
tonic::DartByteData::Create(data->GetMapping(), data->GetSize());
// 见 [6.3]
tonic::DartInvoke(callback.Release(), {byte_buffer});
}));
}

6.2 DartByteData::Create

engine/src/flutter/third_party/tonic/typed_data/dart_byte_data.cc

1
2
3
4
5
6
7
8
9
10
11
12
13
Dart_Handle DartByteData::Create(const void* data, size_t length) {
if (length < kExternalSizeThreshold) {
auto handle = DartByteData{data, length}.dart_handle();
// The destructor should release the typed data.
return handle;
} else {
void* buf = ::malloc(length);
TONIC_DCHECK(buf);
::memcpy(buf, data, length);
return Dart_NewExternalTypedDataWithFinalizer(
Dart_TypedData_kByteData, buf, length, buf, length, FreeFinalizer);
}
}

将 [5.4.3] 或 [5.4.4] 返回的 NSData 转成 Dart 层的 Data 类型。

6.3 DartInvoke

engine/src/flutter/third_party/tonic/logging/dart_invoke.cc

1
2
3
4
5
6
7
8
9
Dart_Handle DartInvoke(Dart_Handle closure,
std::initializer_list<Dart_Handle> args) {
int argc = args.size();
Dart_Handle* argv = const_cast<Dart_Handle*>(args.begin());
// 见 [6.4]
Dart_Handle handle = Dart_InvokeClosure(closure, argc, argv);
LogIfError(handle);
return handle;
}

6.4 Dart_InvokeClosure

1
2
3
4
5
6
7
8
9
10
11
12
13
14
15
16
17
18
19
20
21
22
23
24
25
26
27
28
29
30
DART_EXPORT Dart_Handle Dart_InvokeClosure(Dart_Handle closure,
int number_of_arguments,
Dart_Handle* arguments) {
DARTSCOPE(Thread::Current());
API_TIMELINE_DURATION(T);
CHECK_CALLBACK_STATE(T);
const Instance& closure_obj = Api::UnwrapInstanceHandle(Z, closure);
if (closure_obj.IsNull() || !closure_obj.IsCallable(NULL)) {
RETURN_TYPE_ERROR(Z, closure, Instance);
}
if (number_of_arguments < 0) {
return Api::NewError(
"%s expects argument 'number_of_arguments' to be non-negative.",
CURRENT_FUNC);
}

// Set up arguments to include the closure as the first argument.
const Array& args = Array::Handle(Z, Array::New(number_of_arguments + 1));
Object& obj = Object::Handle(Z);
args.SetAt(0, closure_obj);
for (int i = 0; i < number_of_arguments; i++) {
obj = Api::UnwrapHandle(arguments[i]);
if (!obj.IsNull() && !obj.IsInstance()) {
RETURN_TYPE_ERROR(Z, arguments[i], Instance);
}
args.SetAt(i + 1, obj);
}
// Now try to invoke the closure.
return Api::NewHandle(T, DartEntry::InvokeClosure(args));
}

执行 Closure 的回调,也就是前面 [3.1] 的 callback, 详见 [3.1.1] 的描述,最终会调用到 [2.4.1] 的回调,也就是 [2.4.3] 中的方法。

6.5 _asyncComplete

1
2
3
4
5
6
7
8
9
10
11
12
13
14
15
16
17
18
19
20
21
22
23
24
// future_impl.dart -L540
void _asyncComplete(FutureOr<T> value) {
assert(!_isComplete);
// Two corner cases if the value is a future:
// 1. the future is already completed and an error.
// 2. the future is not yet completed but might become an error.
// The first case means that we must not immediately complete the Future,
// as our code would immediately start propagating the error without
// giving the time to install error-handlers.
// However the second case requires us to deal with the value immediately.
// Otherwise the value could complete with an error and report an
// unhandled error, even though we know we are already going to listen to
// it.

if (value is Future<T>) {
_chainFuture(value);
return;
}
// TODO(40014): Remove cast when type promotion works.
// This would normally be `as T` but we use `as dynamic` to make the
// unneeded check be implict to match dart2js unsound optimizations in the
// user code.
_asyncCompleteWithValue(value as dynamic); // Value promoted to T.
}

这里的 value 就是 [6.1] 的入参 data, 就是 [1.1] setMethodCallHandler 后回调的值,通过 Complete 异步调用后,最终会调用到 [6.6].

6.6 decodeEnvelope

1
2
3
4
5
6
7
8
9
10
11
12
13
14
15
16
17
18
19
// message_codecs.dart -L570
dynamic decodeEnvelope(ByteData envelope) {
// First byte is zero in success case, and non-zero otherwise.
if (envelope.lengthInBytes == 0)
throw const FormatException('Expected envelope, got nothing');
// 创建 ReadBuffer 对象
final ReadBuffer buffer = ReadBuffer(envelope);
if (buffer.getUint8() == 0)
// 见 [6.6.1]
return messageCodec.readValue(buffer);
final dynamic errorCode = messageCodec.readValue(buffer);
final dynamic errorMessage = messageCodec.readValue(buffer);
final dynamic errorDetails = messageCodec.readValue(buffer);
final String? errorStacktrace = (buffer.hasRemaining) ? messageCodec.readValue(buffer) as String : null;
if (errorCode is String && (errorMessage == null || errorMessage is String) && !buffer.hasRemaining)
throw PlatformException(code: errorCode, message: errorMessage as String, details: errorDetails, stacktrace: errorStacktrace);
else
throw const FormatException('Invalid envelope');
}

6.6.1 readValue

1
2
3
4
5
6
7
dynamic readValue(ReadBuffer buffer) {
if (!buffer.hasRemaining)
throw const FormatException('Message corrupted');
final int type = buffer.getUint8();
// 转成 await 调用处需要的数据类型
return readValueOfType(type, buffer);
}

7. native -> dart

前面讲的是 dart 层异步调用 native 层,现在来讲下 native -> dart 的大致逻辑,代码来自我们项目中的

1
2
3
4
5
6
7
8
9
10
11
12
13
14
- (void)test {
// 见 [7.1]
[_channel invokeMethod:@"didBeforeLoadRequest" arguments:urlStr result:^(id _Nullable result) {
if ([result isKindOfClass:[NSNumber class]]) {
if ([result boolValue]) {
decisionHandler(WKNavigationActionPolicyAllow);
} else {
decisionHandler(WKNavigationActionPolicyCancel);
}
} else {
decisionHandler(WKNavigationActionPolicyAllow);
}
}];
}

7.1 invokeMethod:arguments:result:

1
2
3
4
5
6
7
8
9
10
11
12
13
14
15
16
// FlutterChannels.mm -L219
- (void)invokeMethod:(NSString*)method arguments:(id)arguments result:(FlutterResult)callback {
// 初始化 FlutterMethodCall
FlutterMethodCall* methodCall = [FlutterMethodCall methodCallWithMethodName:method
arguments:arguments];
// 将 FlutterMethodCall 编码成 NSData
NSData* message = [_codec encodeMethodCall:methodCall];
// 回调操作
FlutterBinaryReply reply = ^(NSData* data) {
if (callback) {
callback((data == nil) ? FlutterMethodNotImplemented : [_codec decodeEnvelope:data]);
}
};
// 见 [7.2.1]
[_messenger sendOnChannel:_name message:message binaryReply:reply];
}

该方法主要功能:

  1. 创建 FlutterMethodCall 对象,跟 [2.3] 是类似的
  2. FlutterMethodCall 对象进行编码操作
  3. reply: 对 dart 层返回的数据进行解码操作,并执行 callback 回调

7.2.1 sendOnChannel:message:

1
2
3
4
5
6
7
8
9
10
11
// FlutterBinaryMessengerRelay.mm -L28
- (void)sendOnChannel:(NSString*)channel
message:(NSData*)message
binaryReply:(FlutterBinaryReply)callback {
if (self.parent) {
// 见 [7.2.2]
[self.parent sendOnChannel:channel message:message binaryReply:callback];
} else {
FML_LOG(WARNING) << "Communicating on a dead channel.";
}
}

7.2.2 sendOnChannel:message:binaryReply:

1
2
3
4
5
6
7
8
9
10
11
12
13
14
15
16
17
18
19
20
21
22
23
// FlutterEngine.mm -L704
- (void)sendOnChannel:(NSString*)channel
message:(NSData*)message
binaryReply:(FlutterBinaryReply)callback {
NSParameterAssert(channel);
NSAssert(_shell && _shell->IsSetup(),
@"Sending a message before the FlutterEngine has been run.");
// 创建 PlatformMessageResponseDarwin 对象,后续在 Platform 线程中执行任务,见 [7.2.3]
fml::RefPtr<flutter::PlatformMessageResponseDarwin> response =
(callback == nil) ? nullptr
: fml::MakeRefCounted<flutter::PlatformMessageResponseDarwin>(
^(NSData* reply) {
callback(reply);
},
_shell->GetTaskRunners().GetPlatformTaskRunner());
// 创建 PlatformMessage 对象,跟 [3.1.3] 是类似的
fml::RefPtr<flutter::PlatformMessage> platformMessage =
(message == nil) ? fml::MakeRefCounted<flutter::PlatformMessage>(channel.UTF8String, response)
: fml::MakeRefCounted<flutter::PlatformMessage>(
channel.UTF8String, flutter::GetVectorFromNSData(message), response);
// 见 [7.3]
_shell->GetPlatformView()->DispatchPlatformMessage(platformMessage);
}

7.2.3 PlatformMessageResponseDarwin

1
2
3
4
5
6
// platform_message_response_darwin.mm -L9
PlatformMessageResponseDarwin::PlatformMessageResponseDarwin(
PlatformMessageResponseCallback callback,
fml::RefPtr<fml::TaskRunner> platform_task_runner)
: callback_(callback, fml::OwnershipPolicy::Retain),
platform_task_runner_(std::move(platform_task_runner)) {}

7.3.4 PlatformMessageResponseDarwin::Complete

1
2
3
4
5
6
7
8
// platform_message_response_darwin.mm -L17
void PlatformMessageResponseDarwin::Complete(std::unique_ptr<fml::Mapping> data) {
fml::RefPtr<PlatformMessageResponseDarwin> self(this);
// 在 platform 线程中执行任务
platform_task_runner_->PostTask(fml::MakeCopyable([self, data = std::move(data)]() mutable {
self->callback_.get()(GetNSDataFromMapping(std::move(data)));
}));
}

这里的 callback_ 就是 [7.2.2] 里面的

1
2
3
^(NSData* reply) {
callback(reply);
},

从而 callback 回调到 [7.1] 的 reply,最终会将调用到 [7] 的 result 回调,自此,整个链路就完成了。

7.3 PlatformView::DispatchPlatformMessage

1
2
3
4
5
6
// platform_view.cc -L35
void PlatformView::DispatchPlatformMessage(
fml::RefPtr<PlatformMessage> message) {
// 见 [7.4]
delegate_.OnPlatformViewDispatchPlatformMessage(std::move(message));
}

这里 PlatformView 是前面 PlatformViewIOS 的父类,所以看下 PlatformViewIOS 的初始化方法,看 delegate_.

7.3.1 PlatformViewIOS 初始化

1
2
3
4
5
6
7
// platform_view_ios.mm -47
PlatformViewIOS::PlatformViewIOS(PlatformView::Delegate& delegate,
IOSRenderingAPI rendering_api,
flutter::TaskRunners task_runners)
: PlatformView(delegate, std::move(task_runners)),
ios_context_(IOSContext::Create(rendering_api)),
accessibility_bridge_([this](bool enabled) { PlatformView::SetSemanticsEnabled(enabled); }) {}

由前面 [3.5] 可知,这里的 delegate_ 就是 Shell 对象。

7.4 Shell::OnPlatformViewDispatchPlatformMessage

1
2
3
4
5
6
7
8
9
10
11
12
13
14
15
16
// shell.cc -L838
// |PlatformView::Delegate|
void Shell::OnPlatformViewDispatchPlatformMessage(
fml::RefPtr<PlatformMessage> message) {
FML_DCHECK(is_setup_);
FML_DCHECK(task_runners_.GetPlatformTaskRunner()->RunsTasksOnCurrentThread());

// 在 UI 线程中执行任务
task_runners_.GetUITaskRunner()->PostTask(
[engine = engine_->GetWeakPtr(), message = std::move(message)] {
if (engine) {
// 见 [7.5]
engine->DispatchPlatformMessage(std::move(message));
}
});
}

7.5 Engine::DispatchPlatformMessage

1
2
3
4
5
6
7
8
9
10
11
12
13
14
15
16
17
18
19
20
21
22
23
24
25
26
27
28
29
30
// engine.cc -L333
void Engine::DispatchPlatformMessage(fml::RefPtr<PlatformMessage> message) {
// 判断相关 channel 名,在调用前面 [4.1] setupChannels 方法的时候,会设置这些 channel
std::string channel = message->channel();
if (channel == kLifecycleChannel) {
if (HandleLifecyclePlatformMessage(message.get())) {
return;
}
} else if (channel == kLocalizationChannel) {
if (HandleLocalizationPlatformMessage(message.get())) {
return;
}
} else if (channel == kSettingsChannel) {
HandleSettingsPlatformMessage(message.get());
return;
} else if (!runtime_controller_->IsRootIsolateRunning() &&
channel == kNavigationChannel) {
// If there's no runtime_, we may still need to set the initial route.
HandleNavigationPlatformMessage(std::move(message));
return;
}
// 在主 isolate 中执行任务
if (runtime_controller_->IsRootIsolateRunning() &&
// 见 [7.6]
runtime_controller_->DispatchPlatformMessage(std::move(message))) {
return;
}

FML_DLOG(WARNING) << "Dropping platform message on channel: " << channel;
}

7.6 RuntimeController::DispatchPlatformMessage

1
2
3
4
5
6
7
8
9
10
11
12
bool RuntimeController::DispatchPlatformMessage(
fml::RefPtr<PlatformMessage> message) {
if (auto* platform_configuration = GetPlatformConfigurationIfAvailable()) {
TRACE_EVENT1("flutter", "RuntimeController::DispatchPlatformMessage",
"mode", "basic");
// 见 [7.7]
platform_configuration->DispatchPlatformMessage(std::move(message));
return true;
}

return false;
}

7.7 PlatformConfiguration::DispatchPlatformMessage

1
2
3
4
5
6
7
8
9
10
11
12
13
14
15
16
17
18
19
20
21
22
23
24
25
26
27
28
29
30
31
32
void PlatformConfiguration::DispatchPlatformMessage(
fml::RefPtr<PlatformMessage> message) {
std::shared_ptr<tonic::DartState> dart_state = library_.dart_state().lock();
if (!dart_state) {
FML_DLOG(WARNING)
<< "Dropping platform message for lack of DartState on channel: "
<< message->channel();
return;
}
tonic::DartState::Scope scope(dart_state);
// message->hasData() 是前面 [7.1] 中的 FlutterMethodCall 对象
Dart_Handle data_handle =
(message->hasData()) ? ToByteData(message->data()) : Dart_Null();
if (Dart_IsError(data_handle)) {
FML_DLOG(WARNING)
<< "Dropping platform message because of a Dart error on channel: "
<< message->channel();
return;
}

int response_id = 0;
// 跟 response_id 和 response 关联起来,由前面 [7.2.2] 可知这里 message->response() 为空
if (auto response = message->response()) {
response_id = next_response_id_++;
pending_responses_[response_id] = response;
}
// native -> dart, 见 [7.8]
tonic::LogIfError(
tonic::DartInvokeField(library_.value(), "_dispatchPlatformMessage",
{tonic::ToDart(message->channel()), data_handle,
tonic::ToDart(response_id)}));
}

7.8 _dispatchPlatformMessage

1
2
3
4
5
6
7
8
9
10
11
12
13
14
15
16
17
18
19
20
21
22
23
24
25
26
27
28
29
// hooks.dart -L144
@pragma('vm:entry-point')
// ignore: unused_element
void _dispatchPlatformMessage(String name, ByteData? data, int responseId) {
if (name == ChannelBuffers.kControlChannelName) {
try {
channelBuffers.handleMessage(data!);
} catch (ex) {
_printDebug('Message to "$name" caused exception $ex');
} finally {
window._respondToPlatformMessage(responseId, null);
}
} else if (window.onPlatformMessage != null) {
// 见 [7.8.1]
_invoke3<String, ByteData?, PlatformMessageResponseCallback>(
window.onPlatformMessage,
window._onPlatformMessageZone,
name,
data,
(ByteData? responseData) {
window._respondToPlatformMessage(responseId, responseData);
},
);
} else {
channelBuffers.push(name, data, (ByteData? responseData) {
window._respondToPlatformMessage(responseId, responseData);
});
}
}

7.8.1

1
2
3
4
5
6
7
8
9
10
11
12
13
14
15
16
// hooks.dart -L270
/// Invokes [callback] inside the given [zone] passing it [arg1], [arg2], and [arg3].
void _invoke3<A1, A2, A3>(void callback(A1 a1, A2 a2, A3 a3)?, Zone zone, A1 arg1, A2 arg2, A3 arg3) {
if (callback == null)
return;

assert(zone != null); // ignore: unnecessary_null_comparison

if (identical(zone, Zone.current)) {
callback(arg1, arg2, arg3);
} else {
zone.runGuarded(() {
callback(arg1, arg2, arg3);
});
}
}

在给定的 Zone 里面,根据参数回调 callback.

  • callback: window.onPlatformMessage, 见 [7.9]
  • zone: window._onPlatformMessageZone
  • arg1: name // channel 名
  • arg2: data // FlutterMethodCall 对象,见 [7.7]
  • arg3: window._respondToPlatformMessage, 见 [7.10]

7.9 onPlatformMessage

1
2
3
4
5
6
7
8
9
10
11
12
13
14
15
// Listens for platform messages and directs them to the [defaultBinaryMessenger].
mixin ServicesBinding on BindingBase, SchedulerBinding {
@override
void initInstances() {
super.initInstances();
_instance = this;
_defaultBinaryMessenger = createBinaryMessenger();
_restorationManager = createRestorationManager();
// 见 [7.9.1]
window.onPlatformMessage = defaultBinaryMessenger.handlePlatformMessage;
initLicenses();
SystemChannels.system.setMessageHandler((dynamic message) => handleSystemMessage(message as Object));
SystemChannels.lifecycle.setMessageHandler(_handleLifecycleMessage);
readInitialLifecycleStateFromNativeWindow();
}

7.9.1 handlePlatformMessage

1
2
3
4
5
6
7
8
9
10
11
12
13
14
15
16
17
18
19
20
21
22
23
24
25
26
27
28
29
30
Future<void> handlePlatformMessage(
String channel,
ByteData? data,
ui.PlatformMessageResponseCallback? callback,
) async {
ByteData? response;
try {
// 获取 handler, 跟 [3.6] 类似,现在的问题是在哪里设置的 _handlers 呢?见 [7.13]
final MessageHandler? handler = _handlers[channel];
if (handler != null) {
// 执行 handler
response = await handler(data);
} else {
ui.channelBuffers.push(channel, data, callback!);
callback = null;
}
} catch (exception, stack) {
FlutterError.reportError(FlutterErrorDetails(
exception: exception,
stack: stack,
library: 'services library',
context: ErrorDescription('during a platform message callback'),
));
} finally {
if (callback != null) {
// 回调 response, 见 [7.10]
callback(response);
}
}
}

7.10 _respondToPlatformMessage

1
2
3
4
// window -L1216, 见 [7.11]
/// Called by [_dispatchPlatformMessage].
void _respondToPlatformMessage(int responseId, ByteData? data)
native 'PlatformConfiguration_respondToPlatformMessage';

_dispatchPlatformMessage 会调用 _respondToPlatformMessage 方法,而 _respondToPlatformMessage 又是一个 native 方法。

7.11 _RespondToPlatformMessage

1
2
3
4
5
6
7
8
9
10
11
12
13
14
15
16
17
18
19
20
21
22
23
24
// platform_configuration.cc -L159
void _RespondToPlatformMessage(Dart_NativeArguments args) {
tonic::DartCallStatic(&RespondToPlatformMessage, args);
}

// platform_configuration.cc -L141
void RespondToPlatformMessage(Dart_Handle window,
int response_id,
const tonic::DartByteData& data) {
if (Dart_IsNull(data.dart_handle())) {
UIDartState::Current()
->platform_configuration()
->CompletePlatformMessageEmptyResponse(response_id);
} else {
// TODO(engine): Avoid this copy.
const uint8_t* buffer = static_cast<const uint8_t*>(data.data());
// 见 [7.11.1]
UIDartState::Current()
->platform_configuration()
->CompletePlatformMessageResponse(
response_id,
std::vector<uint8_t>(buffer, buffer + data.length_in_bytes()));
}
}

7.11.1 PlatformConfiguration::CompletePlatformMessageResponse

1
2
3
4
5
6
7
8
9
10
11
12
13
14
15
16
17
18
19
void PlatformConfiguration::CompletePlatformMessageResponse(
int response_id,
std::vector<uint8_t> data) {
// 这 response_id 为 0, 对应着 [7.1] result 入参为 nil 的情况
if (!response_id) {
return;
}
auto it = pending_responses_.find(response_id);
// 根据 response_id 没找到内容
if (it == pending_responses_.end()) {
return;
}
// 获取 [7.7] 的 message->response(), 对应 [7.2.2] 的 response 对象
auto response = std::move(it->second);
// 移除该回调
pending_responses_.erase(it);
// 见 [7.3.4]
response->Complete(std::make_unique<fml::DataMapping>(std::move(data)));
}

7.12 setMethodCallHandler

1
2
3
4
5
6
7
8
9
10
11
12
// paltform_channel.dart -L377
void setMethodCallHandler(Future<dynamic> Function(MethodCall call)? handler) {
// 见 MethodChannel(this) 和 handler 关联起来
_methodChannelHandlers[this] = handler;
// 见 [7.13]
binaryMessenger.setMessageHandler(
name,
handler == null
? null
: (ByteData? message) => _handleAsMethodCall(message, handler),
);
}

7.13 setMessageHandler

1
2
3
4
5
6
7
8
9
10
// binding.dart -L311
void setMessageHandler(String channel, MessageHandler? handler) {
if (handler == null)
_handlers.remove(channel);
else
_handlers[channel] = handler;
ui.channelBuffers.drain(channel, (ByteData? data, ui.PlatformMessageResponseCallback callback) async {
await handlePlatformMessage(channel, data, callback);
});
}

这里跟前面 [7.9.1] 串联起来了,对 _handlers 进行赋值。

8. 总结

8.1 调用链路

8.1.1 dart -> native

调用流程如下:

赋值 handler 流程图如下:

method channel 的执行涉及到主线程和UI线程的交互,代码调用从 dart -> shell -> native(ios), 执行完成后再原路返回 native(ios) -> shell -> dart.

  • 3.4 Shell::OnEngineHandlePlatformMessage, 在 UI 线程(io.flutter.1.ui), 将任务派发给主线程
  • 6.1 PlatformMessageResponseDart::Complete, 在主线程(platform), 将任务派发给 UI 线程

8.1.2 native -> dart

调用流程如下:

同 [8.1.1], method channel 的执行涉及到主线程和UI线程的交互,代码调用从 native(ios) -> shell -> dart, 执行完成后再原路返回 dart -> shell -> native(ios).

  • 7.3.4 PlatformMessageResponseDarwin::Complete, 在 UI 线程(io.flutter.1.ui), 将任务派发给主线程
  • 7.4 Shell::OnPlatformViewDispatchPlatformMessage, 在主线程(platform), 将任务派发给 UI 线程

8.2 相关概念

  1. shell
  2. isolate(和线程的关系)
  3. ui platform 等线程,flutter 中有多少线程?
  4. future Complete 异步调用
  5. dart 和 native(ios) 中的相关编解码类

8.3 问题

  1. dart 层和 native 层数据通信的本质是什么?
  2. 怎么监控 platform channel 的执行过程,方便调试?

answer

  1. 看源码可知,双方交互都是传递二进制数据,然后通过双方的编解码类来转成当前层所需要的对象,所以是二进制数据流;
  2. 可以自定义一个 BinaryMessenger 类,然后替换系统的 ServicesBinding.defaultBinaryMessenger,从而达到监控的目的;

10. 参考链接

在做今天的每日一题:832. 翻转图像时,看到了之前的笔记,里面提到了一道类似的题目48. 旋转图像,如果没记错的话,它应该是去年的一道每日一题。当时还想着要把沿对角线翻转的代码给记住的,但是现在也不记得了,为了完成去年前的任务,晚上花了点时间把相关翻转代码记录一下。

经验

给定一个 n × n 的二维矩阵 matrix(eg: [[1,2,3],[4,5,6],[7,8,9]]),在遍历中分别输出行下标(i)和列表(j)的值。
以下的代码,记住画个图再来推理一篇,记忆效果会更好。

水平上下翻转

行和是 n-1, 遍历一半;列正常处理。

1
2
3
4
5
6
7
8
9
10
11
for (int i = 0; i < n/2; i++) {
for (int j = 0; j < n; j++) {
swap(matrix[i][j], matrix[n-i-1][j]);
cout << '[' << i << ',' << j << ']'<< endl;
}
}
/*
[0,0]
[0,1]
[0,2]
*/

垂直左右翻转

行正常处理;列和是 n-1, 遍历一半。

1
2
3
4
5
6
7
8
9
10
11
for (int i = 0; i < n; i++) {
for (int j = 0; j < n/2; j++) {
swap(matrix[i][j], matrix[i][n-j-1]);
cout << '[' << i << ',' << j << ']'<< endl;
}
}
/*
[0,0]
[1,0]
[2,0]
*/

主对角线(左上-右下)翻转

交换i, j.

1
2
3
4
5
6
7
8
9
10
11
for (int i = 0; i < n; i++) {
for (int j = 0; j < i; j++) {
swap(matrix[i][j], matrix[j][i]);
cout << '[' << i << ',' << j << ']'<< endl;
}
}
/*
[1,0]
[2,0]
[2,1]
*/

副对角线(右上-左下)翻转

交换i, j.

1
2
3
4
5
6
7
8
9
10
11
for (int i = 0; i < n-1; i++) {
for(int j = 0; j < n-i-1; j++) {
swap(matrix[i][j], matrix[n-j-1][n-i-1]);
cout << "[" << i << "," << j << "]" << endl;
}
}
/*
[0,0]
[0,1]
[1,0]
*/

套路

  1. 顺时针90度:主对角线(左上-右下)翻转,再垂直左右翻转
  2. 逆时针90度:主对角线(左上-右下)翻转,再水平上下翻转
  3. 顺时针180度:主对角线(左上-右下)翻转,再副对角线(右上-左下)翻转
  4. 逆时针180度:主对角线(左上-右下)翻转,再副对角线(右上-左下)翻转

48. 旋转图像

顺时针旋转 90 度。

用套路1.

1
2
3
4
5
6
7
8
9
10
11
12
13
14
15
16
17
18
19
20
21
22
23
24
25
26
class Solution {
public:
void rotate(vector<vector<int>>& matrix) {
int n = matrix.size();
if (!n) return;
// 主对角线翻转
for (int i = 0; i < n; i++) {
for (int j = 0; j < i; j++) {
myswap(matrix[i][j], matrix[j][i]);
}
}
// 垂直左右翻转
int mid = n >> 1;
for (int i = 0; i < n; i++) {
for (int j = 0; j < mid; j++) {
myswap(matrix[i][j], matrix[i][n-j-1]);
}
}
}

void myswap(int& a, int& b) {
a = a ^ b;
b = a ^ b;
a = a ^ b;
}
};

二分查找,就是在一个区间内查找某个值(eg: target)的时候,每次把区间一分为二,然后选择满足性质的区间(即包含 target)继续一分为二,直到区间长度为一。

阅读全文 »

本文是对 Advanced Graphics and Animations for iOS Apps 的一个学习记录文章,字幕在 transcripts ,当然也可以下载 WWDC 在桌面上看带有字幕的视频。这篇挺实用的,讲解了渲染的基本流程,以及怎么发现并解决渲染性能的问题。(ps: 20中旬发现这个视频下架了,可以在 419_hd_advanced_graphics_and_animation_performance.mov 下载)。

阅读全文 »